Stitch Along with the 12-Day Advent Embroidery Kit: Frost & Flora Bauble
Welcome to this year’s Advent Embroidery – The Frost & Flora Bauble! 🎄
I’m continuing the bauble theme for another year, and this design is a fun, festive way to count down to Christmas! It’s a 12-Day Advent embroidery kit, with each day adding a little more stitching until your bauble is beautifully finished.
If you joined in with last year’s free pattern, you’ll love this year’s new design too!
The kit comes with everything you need – pre-printed fabric, all the threads, needles, instructions, and here you’ll find the links to daily video tutorials – so you can simply pick it up and enjoy the stitching.

🪡 Start stitching on December 13th and enjoy 12 days of festive embroidery as you count down to Christmas 🎄
🪡 Or, if you’d like to pace yourself (and leave room for allll the other festive things going on), start on December 1st and stitch every other day.
🪡 And of course, you can always skip the Advent timing entirely and stitch at your own pace, whenever you like! 🎄🪡
What’s in the FULL Frost & Flora Bauble Kit?
Everything you need to stitch this festive 12-day Advent embroidery and have it looking lovely when it’s finished:
• A pre-printed fabric panel, ready to pop straight into your hoop
• A 5" stitching hoop
• A 4" display hoop
• 12 bobbins of Anchor threads
• 6 embroidery needles
• Red and white cotton cord to hang your finished bauble
• A full instruction booklet with step-by-step guides, stitch tips, embroidery guides, and a QR link to this blog for quick access to all the daily video tutorials – plus a cute little countdown tick sheet to keep track of your progress
Everything’s included, so you can just pick it up and enjoy the stitching! 🎄

🪡Just like last year, I'll be making a reel for each day’s stitching and posting them on my social media! I'll add links to each video here in the blog as they go live, so you can easily follow along.
NOTE: I’ll start posting video links from December 1st, adding a new one every other day as they’re shared on social media.
What Else You’ll Need
• A pair of sharp scissors
Any sharp scissors will do the trick, but embroidery scissors are ideal. Their small, pointed blades help you trim threads cleanly and get into tight spaces without fraying the ends. If you don’t have embroidery scissors, no stress – any small, sharp pair from your sewing kit will work just fine.
• And of course… a few nice hot cuppas ☕ and maybe even some mince pies! 🤭
Now that you’ve got everything you need, just follow the ‘Getting Started’ section in your instruction book to prepare your fabric in the hoop. You’ll also find helpful sections on preparing your threads, which needle to use where, and how to start, finish, and tie off your stitches. Once you’re all set, we can dive straight into Day 1 of stitching…

The Only Rule….
If you’re stitching along with the Advent timing, don’t worry about getting “behind.” We all stitch at our own pace! I’ve balanced the larger sections with quicker stitching days to allow time to catch up. But remember, the most important part is to enjoy the process, relax, and have fun. In the end, you’ll have a beautiful bauble to hang and cherish.
The 12 Days of Stitching
Eeeee! Lets get started with this fun countdown!
Day 1 – Band Padding
Follow along in the video below and don’t forget to follow your instruction booklet for the stitches, and thread colours and strand numbers.
Not a fan of this stitch? No worries - just pick a padding stitch that works for you!

Day 2 – The Band
Finish stitching the band by following the video below and check your instruction booklet for the stitch, thread colour, and strand number.
Don’t worry if they’re not perfect; small wobbles add character (and no one will notice once the bauble’s finished!).

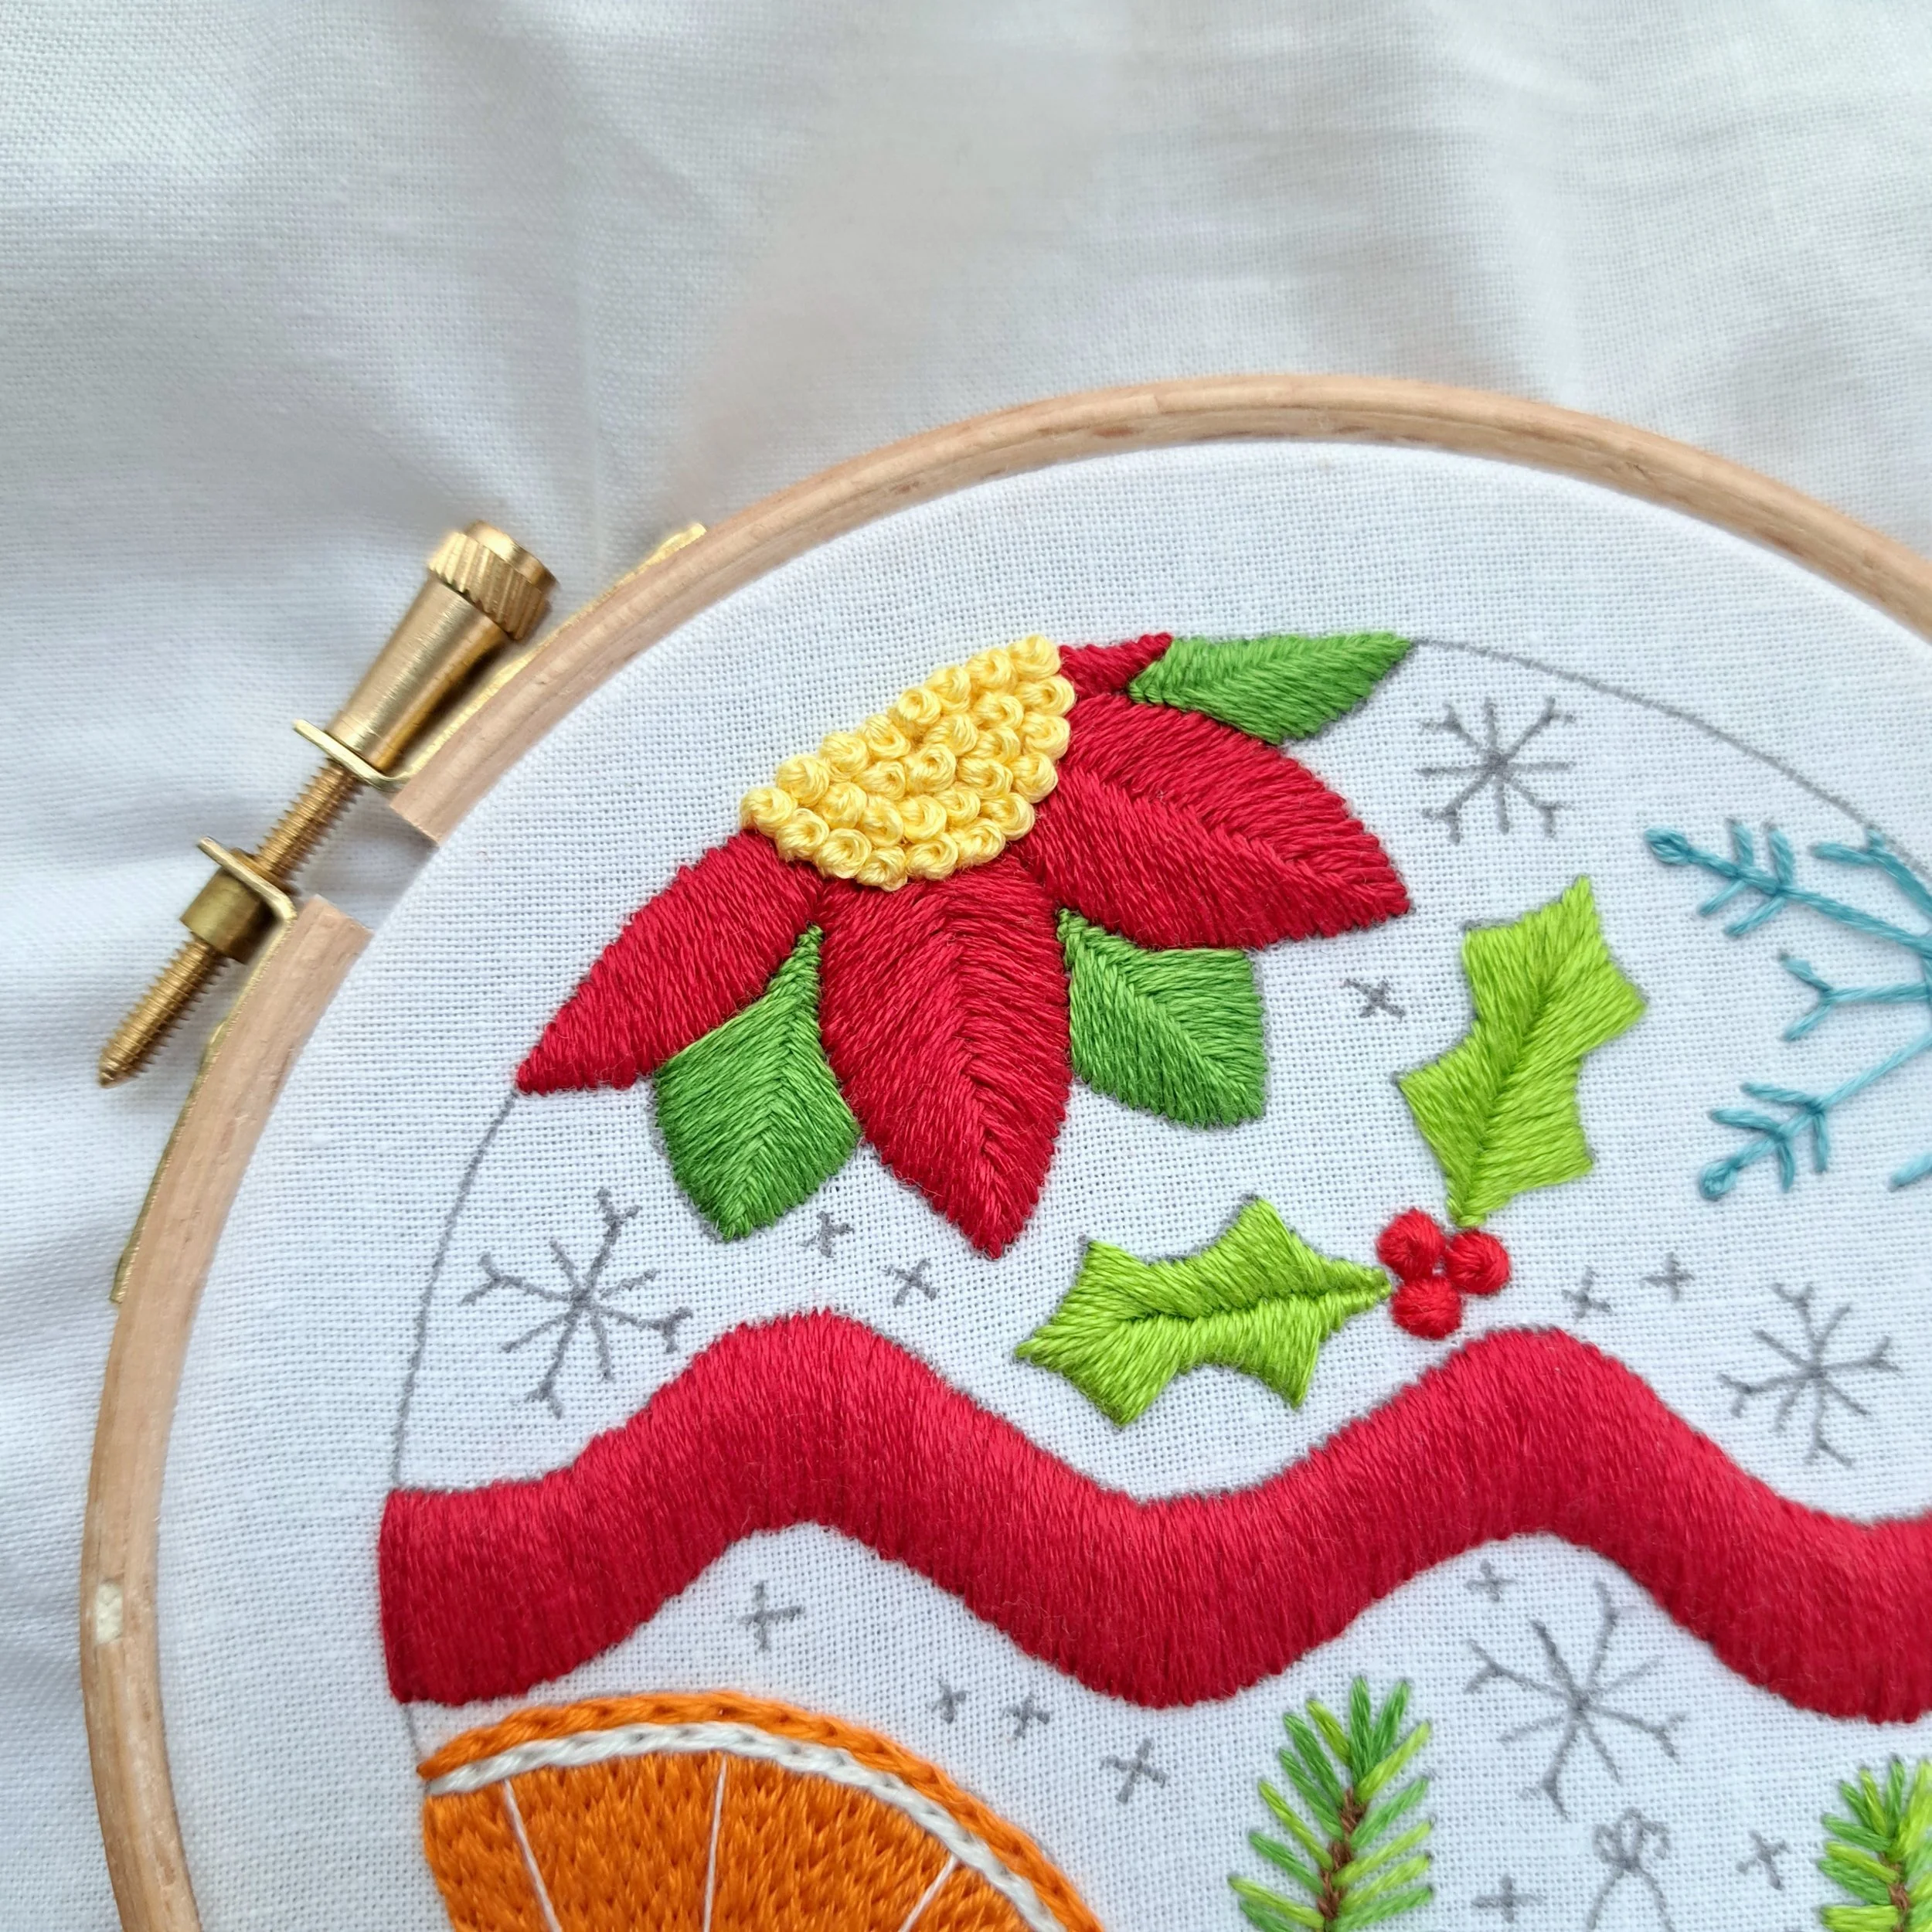
Day 3 – Holly Leaves and Berries
Stitch the holly leaves and berries using the instruction book and the video below.
These berries look so good stitched like this, don’t they? Perfectly raised - chefs kiss! And it makes such a lovely change from classic French Knots 😊

Day 4 – The Branches
Stitch the branch stems first and then add the pine needles. I stitched some pine needles into the branch stem, and stitch others underneath by angling your needle so they appear beneath the branch.

Day 5 – The Orange Inner
Stitch the orange inner with the two orange thread colours. I angled these rows of stitches outward toward the edge of the orange.

Day 6 – The Segments, Pith & Peel
Today, we’re adding the segment lines, and a couple of rows of stitches (one for the pith and one for the peel).

We’re halfway through Advent already! 🎄🪡

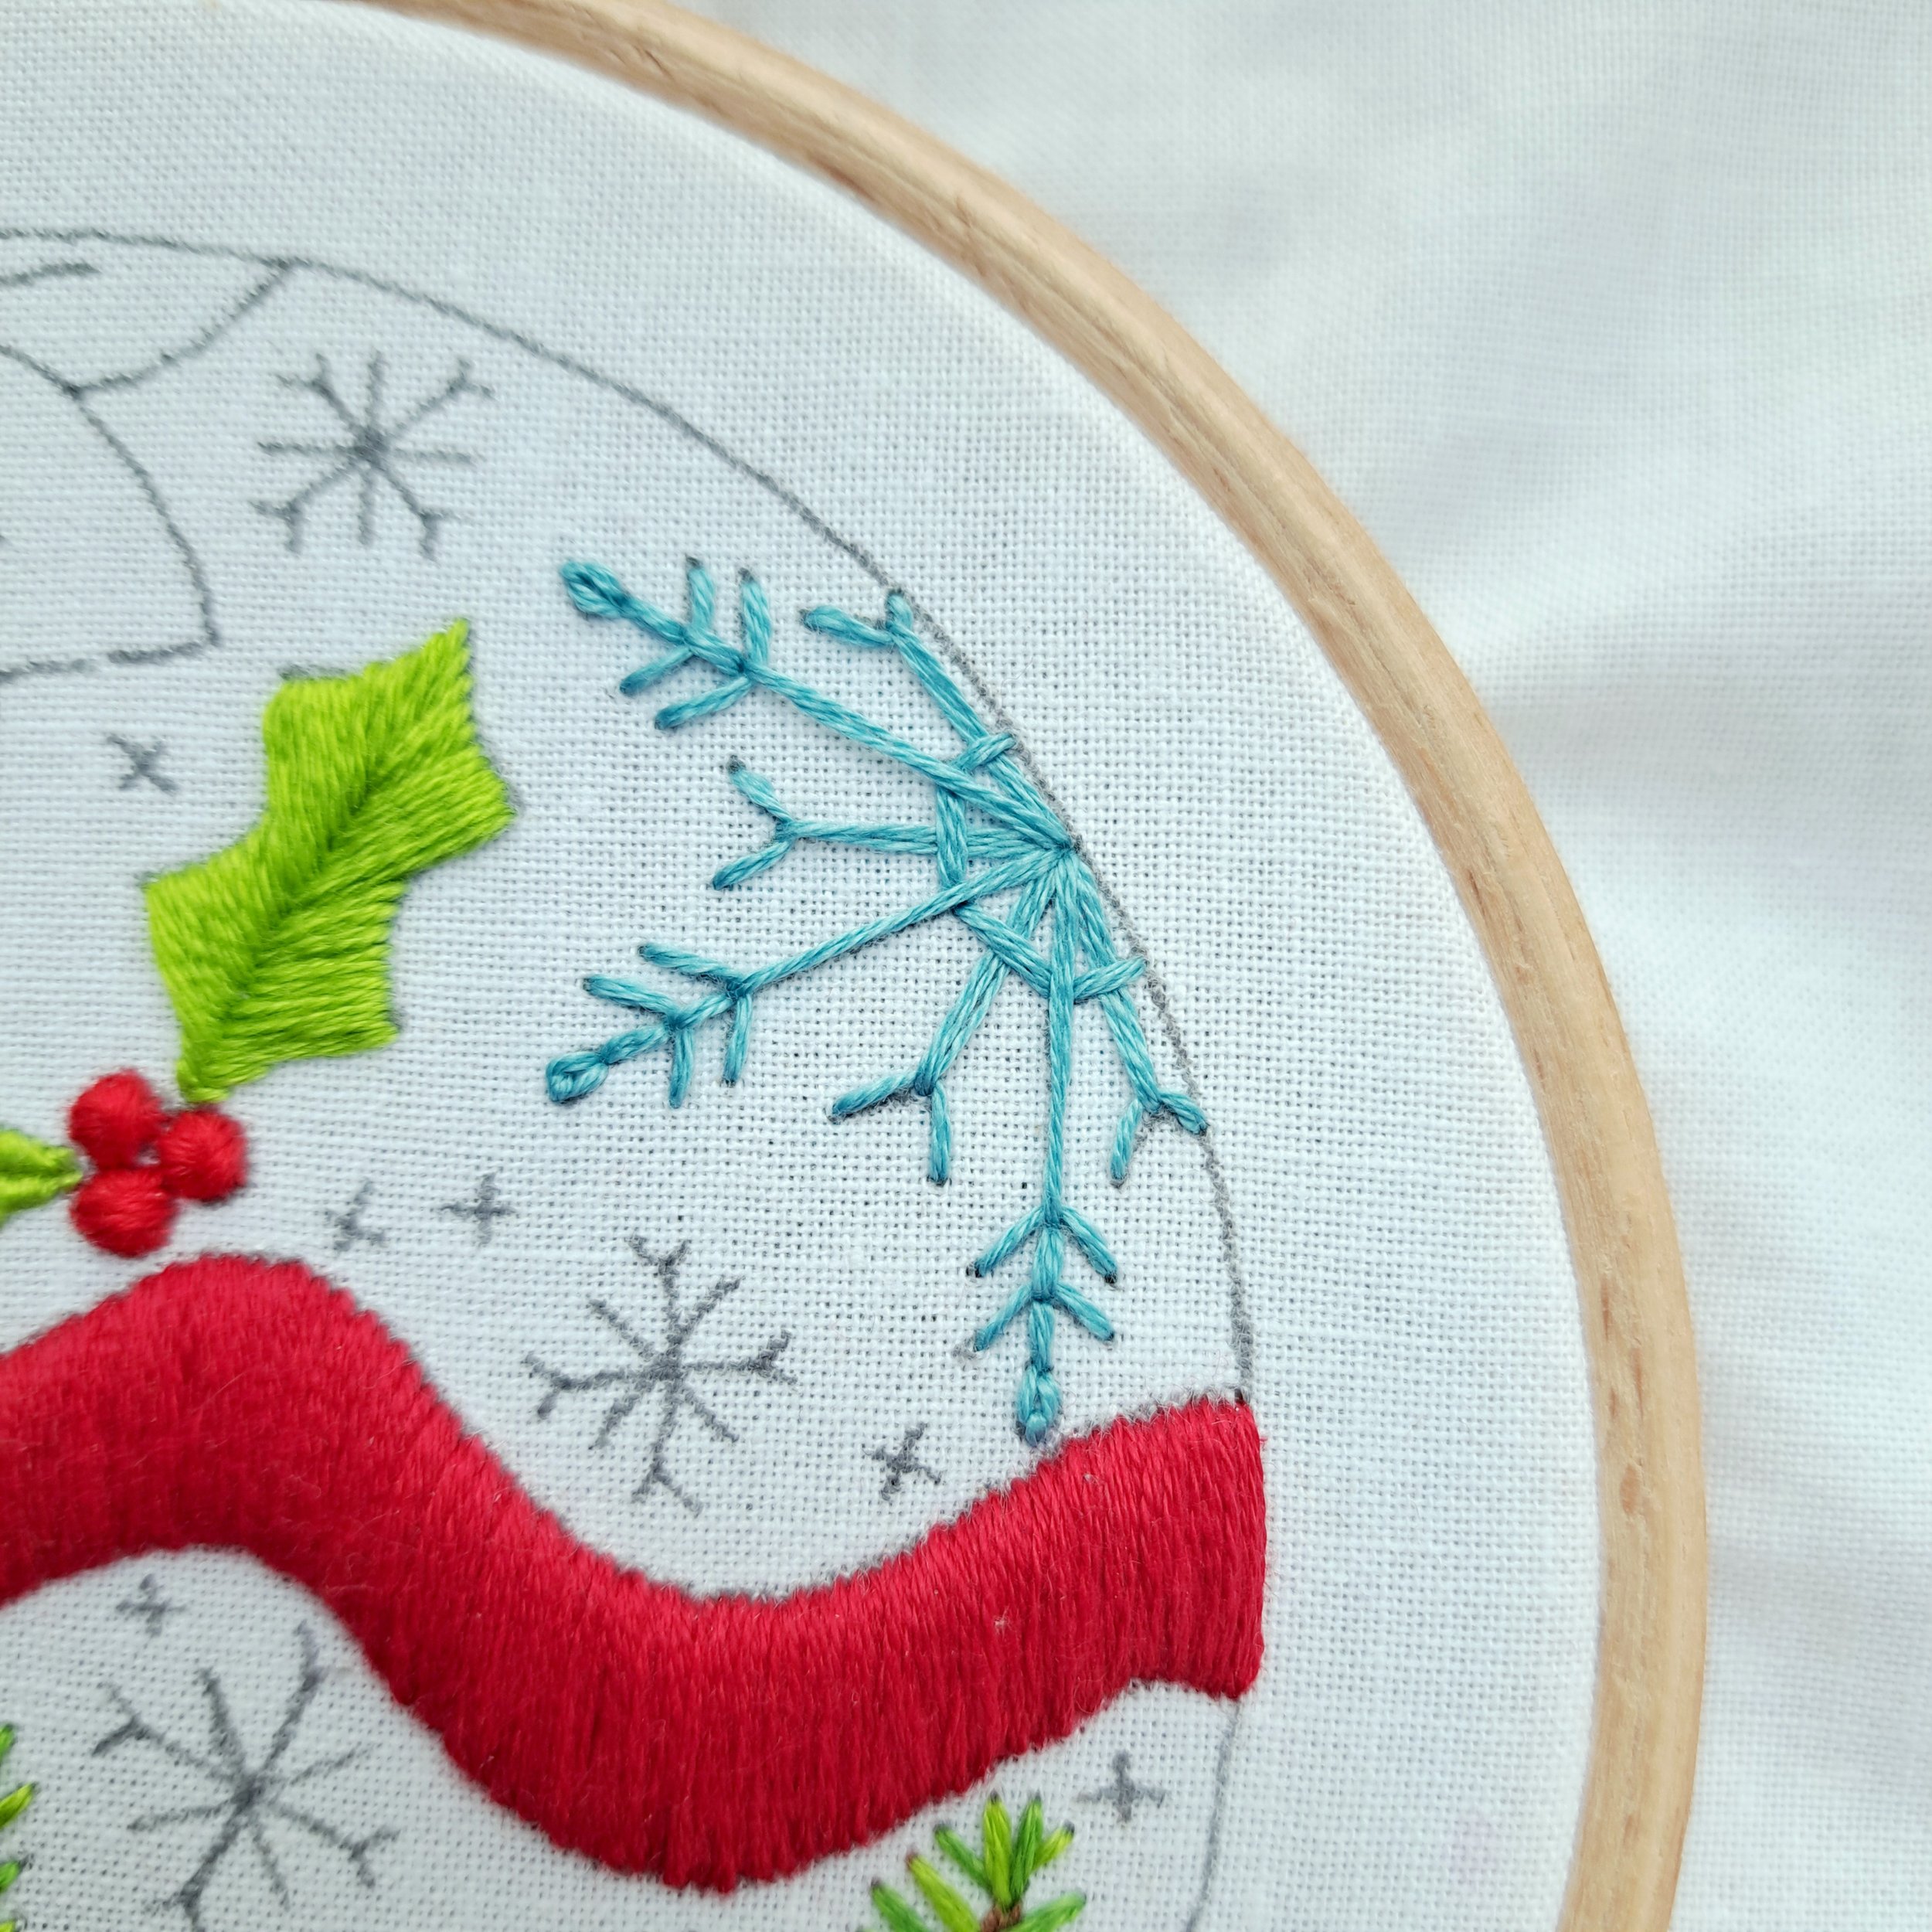
Day 7 – The Big Snowflake
We’re using a few stitches today to make this snowflake. But don’t worry - just take it one step at a time and follow the instructions.
Day 8 – The Poinsettia Red Leaves
We’re just stitching the red leaves on the Poinsettia today. Your instruction book will explain how to use the solid and dashed lines to help guide your stitches here.

Day 9 – The Poinsettia Green Leaves
We’re stitching these green leaves in the same way as the red ones – just with fewer stands so they look like they’re further back.

Day 10 – The Poinsettia Flower
Today we’re going to finish the poinsettia by stitching the flower in the centre.
✨ A Few French Knot Tips:
• Take it slow 😊 Pull the thread through nice and slowly. If it starts to twist, you can untwist it before it turns into a knotty mess.
• Dangle your thread and needle regularly to let the thread untwist itself. Twisted thread = knots (and not the lovely French knot kind of knots) 🪡
• Before pulling the needle through, slide the wraps down so they’re snug against the fabric🪡
• If you’re going for neater look, stitch each knot in the same way direction. But sometimes, I like a more random look 😊
Day 11 – The Rosehips
There are a few stitching steps to follow for these rosehips – but they’re definitely worth it!
✨ Oh, we’re nearly there! Just 1 last stitching day to go to finish this year’s advent!

Day 12 – The Small & Tiny Snowflakes
The final stitching day is here! 🎄🥹 We’ve made it! Now it’s time for the finishing touches - stitching all the remaining snowflakes ❄️ There are two different types to stitch, and both are nice and simple - perfect for this last day ❄️
✨ A Little Tip:
To avoid thread shadows showing through on the front, I tied off and started each snowflake anew. It does take a little extra time, but after all the work we’ve put in, I think it’s completely worth it 😊

So, with Day 12 stitched, that means it’s Christmas! 🎉 Now all that’s left is to turn our stitching into a beautiful hanging bauble 🎄

Finishing Your Embroidery in a 4” Display Hoop
Place your embroidered fabric in the 4” display hoop, making sure your stitches reach the outer edges. Position the screw at the top of the design and pull the fabric tight before fully tightening the hoop.
Trim away any excess fabric, leaving about 4cm around the hoop. Stitch a running stitch about 1cm in from the edge, leaving unknotted tails at the start and end. Gently pull the tails to gather the fabric neatly, then tie a knot to secure it.
Take a look at this little video to see exactly how I do it…

Finally, thread the red and white cotton cord (included in your kit) through the top of your hoop and tie a knot to create a hanger. And just like that, your beautiful Advent bauble is ready to display for Christmas! 🎄

Now all that’s left… is to stand back and admire your beautiful bauble! 🎄✨ I had such fun stitching mine, and I really hope you enjoyed making yours too!
Please do share your progress and tag me on social media - I’d absolutely love to see it! Enjoy your stitching! 🥰
Merry Christmas! 🎄🎅
Until next time,
Liz x