How I Stitched the Duck Panel: A Beginners Step-by-Step Guide
This time I went deliberately simple. I used just four stitches and a handful of thread colours (yes - not quite my usual!), because I wanted to create a panel that absolute beginners can follow easily and still finish with something really pretty.
For this hoop I mostly followed the printed outlines, filling only a few areas, and I did sneak in a couple of tiny extra details (I couldn’t help myself). Don’t worry - they’re super easy too.
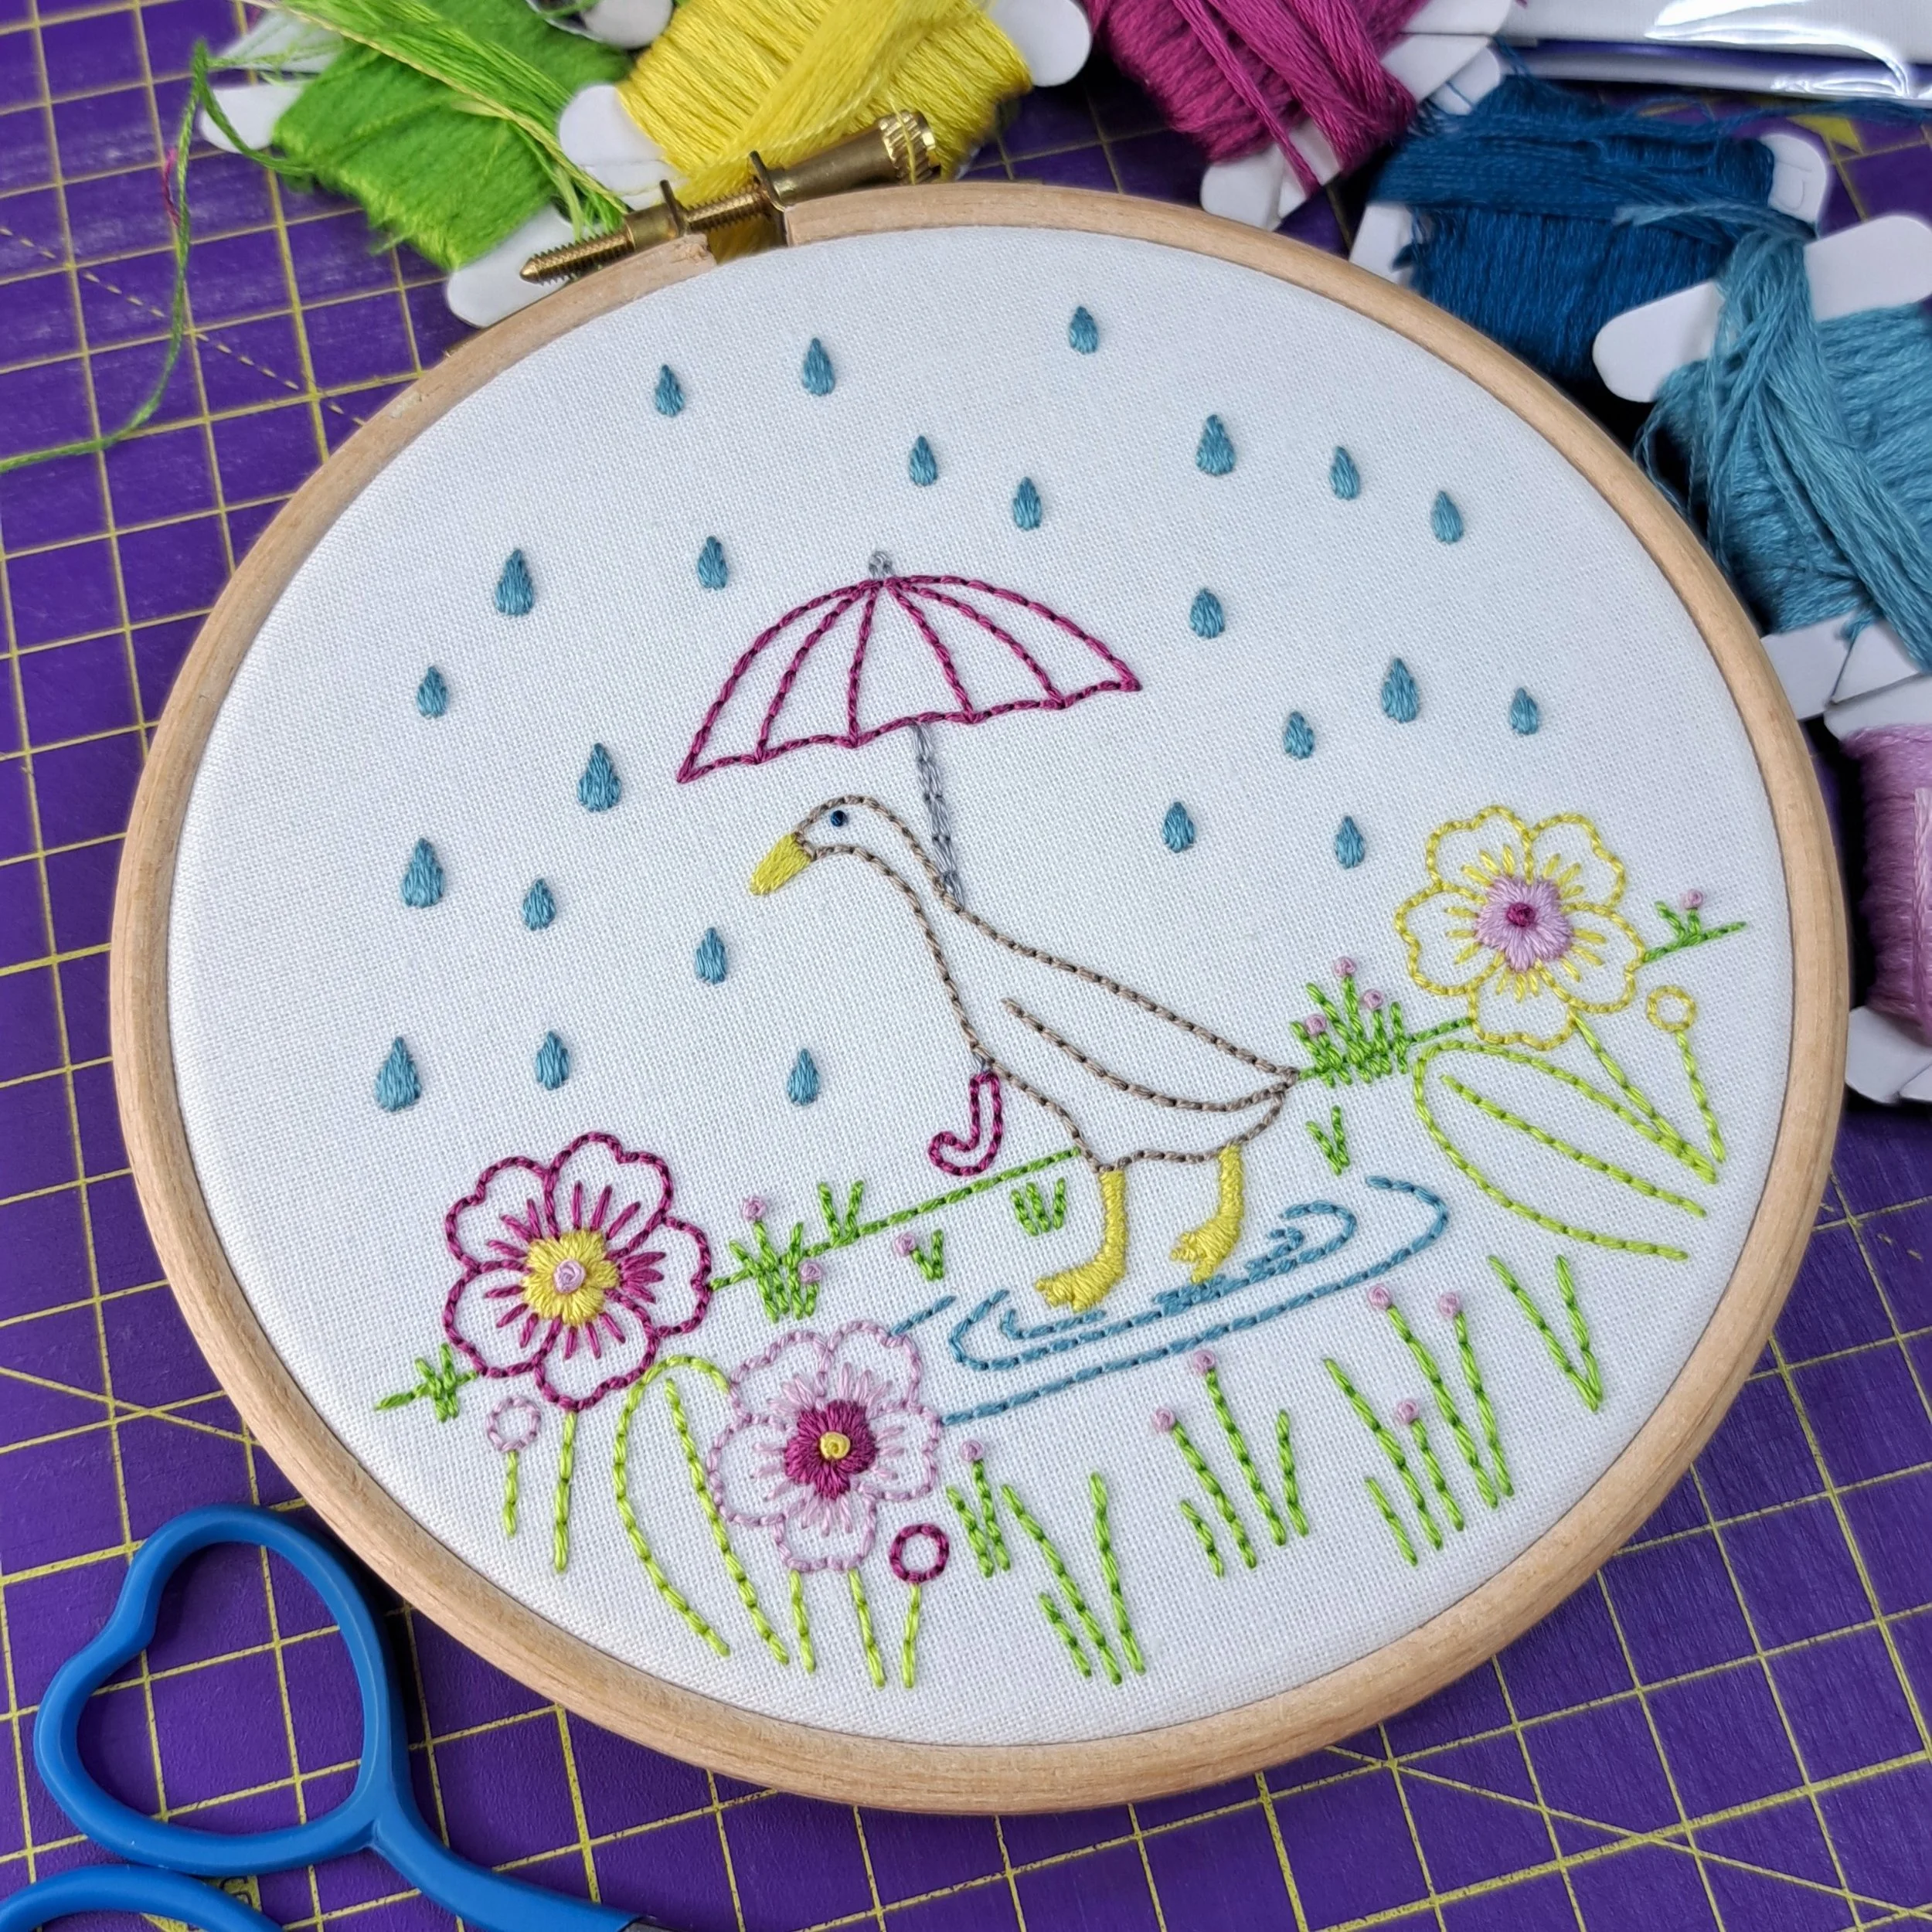
This design is one of the most popular in my panel range - and it always makes me grin. My own runner ducks look exactly like this when they’re having a good splosh in a puddle (minus the umbrella 😏), and those little primroses at the front are pure springtime cheer.
If you’ve just stumbled across me and my panels - hello and welcome! I’m Liz: illustrator, maker and stitcher behind Bluebell Love. I’ve been stitching for years, and like most stitchers I’ve collected a rather impressive thread stash - some bought because the colour caught my eye, some leftover from kits, a few gifts, and a couple I’m convinced mysteriously appeared 😏. If that sounds familiar, you’re in the right place.
That’s exactly why I made these pre-printed embroidery panels - pop one into a hoop and get stitching straight away, using all those lovely threads that deserve to be seen and used (not hidden away in a drawer!).
And just like with all of my embroidery panels… there are no rules 😄. Use your favourite colours, switch stitches if something doesn’t float your boat, and stitch as much or as little as you like - outlines only, a few pops of colour, or go full-on and cover it all.
For this panel I used nine thread colours from my stash, but honestly you could do it with far fewer - the whole point was to show how simple it can be. I stitched much of this one live at my recent in-person events (so much fun!), and the majority was stitched with beginners in mind.
Now that the duck is all stitched up, I’ll walk you through exactly how I stitched it: the stitches I used, thread and needle choices, and little tips to help along the way. I’ve written the stitching section stitch-by-stitch rather than element-by-element to keep things snappy - perfect for beginners who want clear, simple guidance.
Let’s get stitching! 🪡
What You’ll Need
Time to gather your supplies! Here’s everything you’ll want on hand to start on your duck embroidery panel:
A Duck embroidery panel
A 5” embroidery hoop
Some extra white fabric (to double up inside your hoop)
Embroidery needles (I’ll chat about sizes below)
A selection of embroidery threads
A pair of sharp scissors
And of course… a nice hot cuppa ☕ (or two!) 🤭
Don’t worry - I’ll talk through each of these in more detail so you know exactly what I used and why.
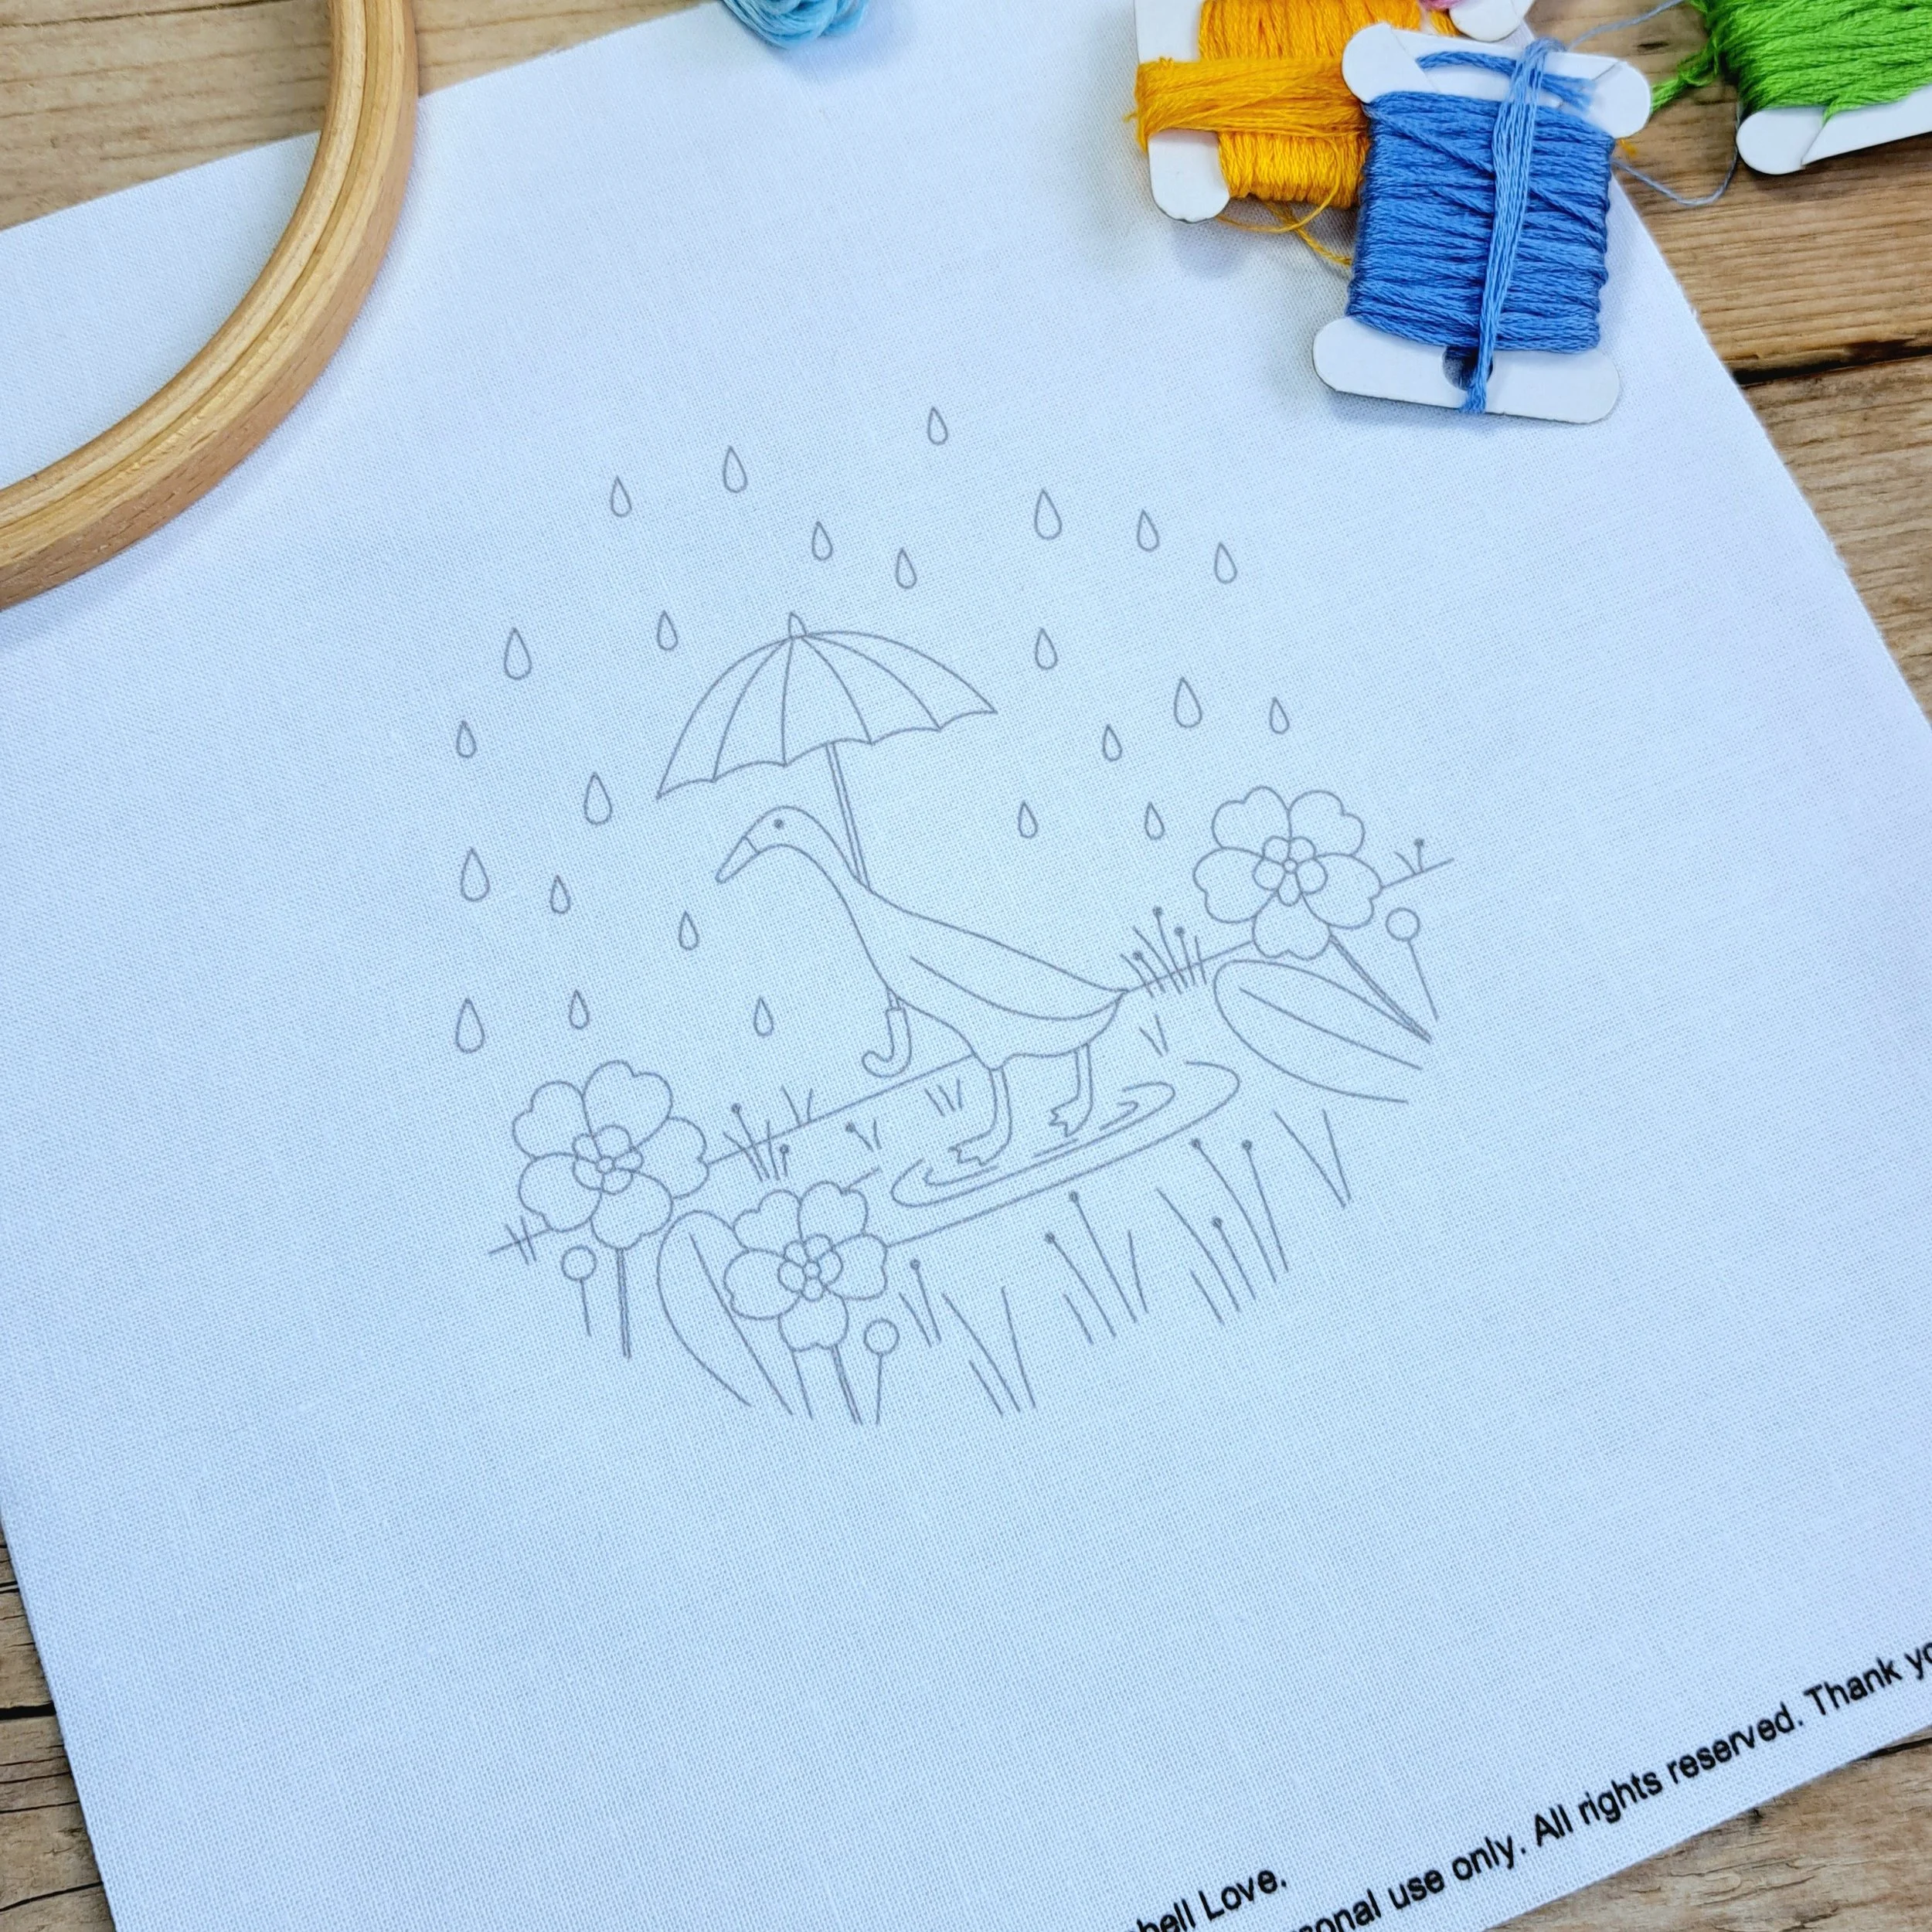
A Duck Embroidery Panel
First up, you’ll need one of my Duck embroidery panels. This design was illustrated by me and printed onto 100% cotton fabric using eco-friendly, water-based pigment inks - all made right here in the UK 🌿
You can grab your panel from my shop here:
It’s also available as part of a Panel Pack, which includes a 5” hoop and extra backing fabric — perfect if you’re just starting out or want everything bundled together.
A 5” Embroidery Hoop
This design fits snugly in a 5” hoop. I always recommend using a hardwood hoop - they’re more durable and hold the fabric at a more consistent tension. Being a natural material, wooden hoops sometimes have little quirks, but hardwood ones grip the fabric better and usually have fewer gaps.
Extra White Fabric
I highly recommend doubling up your fabric in the hoop!
I didn’t do this when I stitched the Rabbit Panel - and honestly, I wish I had 😬 For the duck, I added a plain white cotton layer behind the printed panel, and it made such a difference. Especially if you’re keeping the background white, this trick keeps it looking crisp and stops thread tails from showing through.
It also helps hold the tension nice and firm - so if you can, definitely go with two layers of fabric!
Embroidery Needles
The right needle can make a huge difference in how easy it is to stitch and how neat your stitches look.
Embroidery needles come in different sizes, and here’s what to keep in mind:
Larger needles: Best for stitching with all 6 strands of embroidery thread. They make bigger holes in the fabric, so if you’re using fewer strands your stitches can shift or leave gaps.
Smaller needles: Great for finer stitching with 1-2 strands, but harder to pull through if you’ve got too many strands threaded.
To keep things simple, I’ve put together a needle pack in my shop with six needles in three sizes:
Large – for 6 strands
Medium – for 3–4 strands
Small – for 1–2 strands
I’ll refer to these sizes throughout the guide to help you follow along easily.
For this embroidery, I kept it really simple: 3 strands throughout, using just the medium-sized needle.
🧵 You can grab a needle pack from my shop here:
Embroidery Threads
For this project I used a mix of Anchor and DMC 6-stranded cotton threads - both are brilliant quality with colours that stay vibrant over time.
I pulled shades from my (very full!) thread stash, but feel free to choose colours that suit your own vision. A rough plan can be handy, but honestly, don’t be afraid to change your mind as you stitch - sometimes a new colour just feels right.
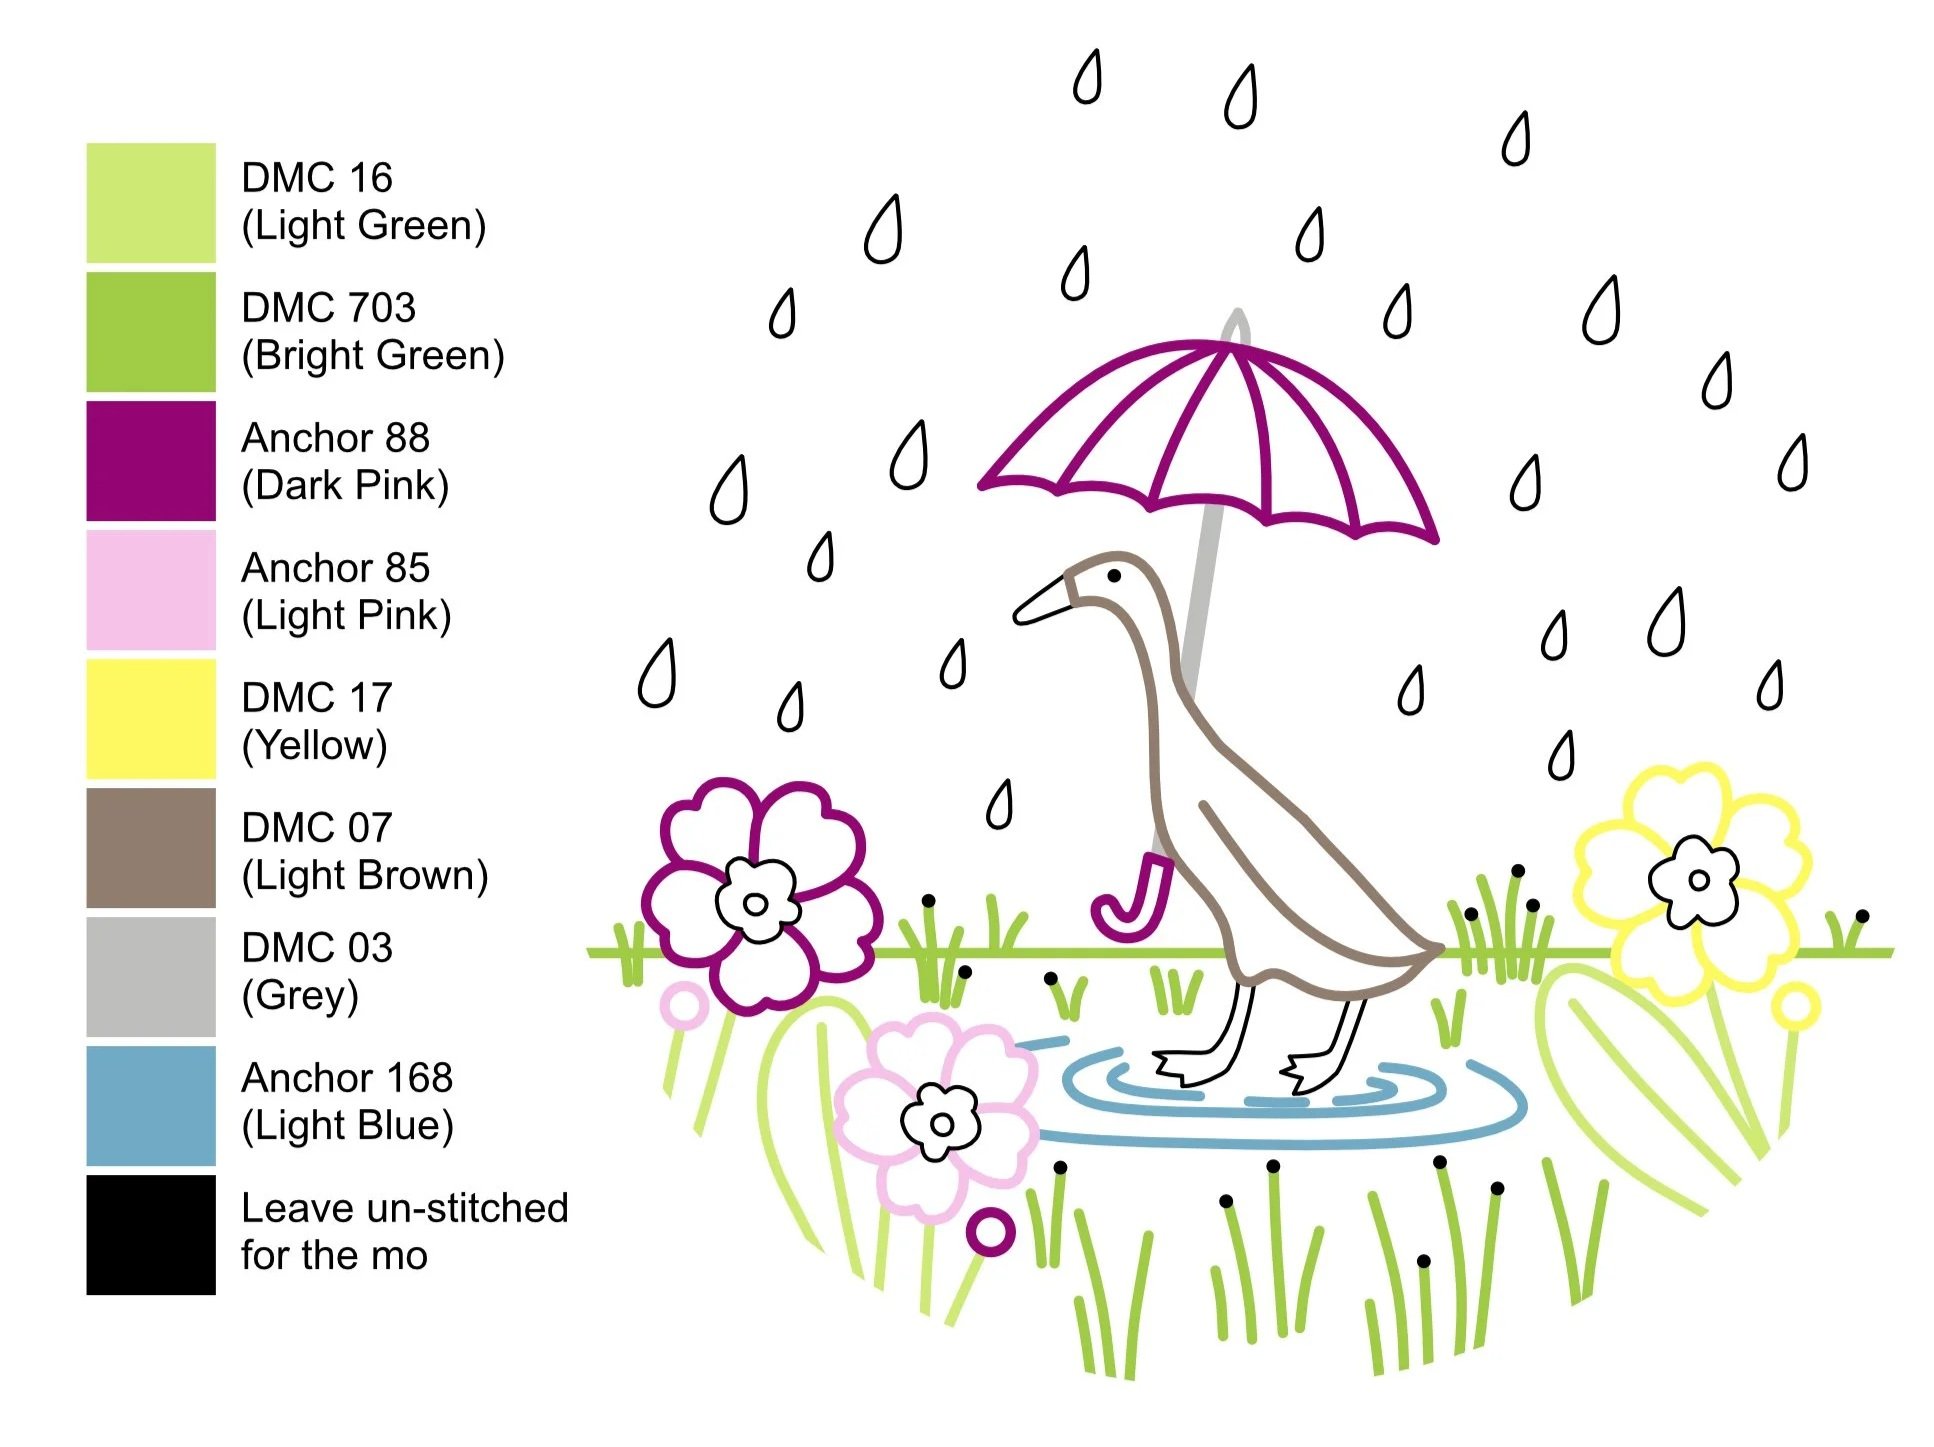
Here are the 9 shades I used:

DMC 16 – Light Green
DMC 703 – Bright Green
Anchor 88 – Dark Pink
Anchor 85 – Light Pink
DMC 17 - Yellow
DMC 07 – Light Brown
DMC 03 - Grey
Anchor 168 – Light Blue
Anchor 170 – Dark Blue (just a tiny bit for the ducks eye)
Both Anchor and DMC use numbered codes, so if you’d like to match exactly, just look for these numbers. But remember - this is your duck! Pick the colours that make you happy 😊
Scissors
Any sharp scissors will do the job, but embroidery scissors are ideal. Their small, pointed blades make it easier to trim threads cleanly and snip into tight spaces without fraying the ends. If you don’t have embroidery scissors, no stress - any small, sharp pair from your sewing kit will work just fine.
A Nice Hot Cuppa
I’m a tea girl… but you do you! 😊☕
2. The Stitches
For this duck panel I kept things super simple and used just four stitches:
Backstitch
Satin Stitch
French Knots
Straight Stitch
That said, you absolutely don’t have to use all (or even any!) of these. I love using different stitches to add texture, but if there’s one you don’t enjoy… well, life’s too short to be stitching things we don’t love ✨
So feel free to swap in stitches you do like instead. Or, if you’re feeling adventurous, add in a few extras! Most importantly: have fun with it 😊
If you’d like a little extra help with any of these stitches, check out my ‘Stitch of the Week’ page – it’s a growing library of tutorial videos. Not every stitch may be up just yet, but I’m adding to it regularly!
3. Let’s Start Stitching
First things first: pop your duck embroidery panel (with that extra backing fabric) into your hoop, making sure everything is nice and taut. I always aim for that satisfying drum-like tension - it keeps stitches neat and helps stop puckering.
How to Get That Drum Tension:
Lay the fabric over the inner hoop, then press the outer hoop down on top.
Gently pull the fabric edges outside the hoop to smooth out any wrinkles.
Tighten the screw mechanism until the hoop feels secure.
Give the fabric one final little tug all the way around for extra tightness.
Your fabric should now feel tight like a drum - just the way we want it - and ready for stitching!
✨ A little Tip:
Keep an eye on the tension as you stitch. It can loosen a bit with stitching. If that happens, just pause and re-tighten before carrying on.
4. Step-by-Step Stitching Guide
You can really start stitching anywhere you like. If there’s a part of the design you’re excited about, just dive straight in! That said, I usually recommend working from the background forward - it helps the foreground elements sit neatly on top, making the whole piece look more seamless. But honestly, since this design is mostly stitched along the outlines, you can happily jump around as you go.
This time, I’m sharing the guide a little differently: instead of walking through the order I stitched, I’m grouping it stitch by stitch. That way, you can master one stitch at a time before moving on - perfect if you’re a beginner.
I’ll also sprinkle in some tips and close-ups of my own stitching along the way.
✨ For this embroidery, I used 3 strands of thread throughout.
Okay, onto the stitching!
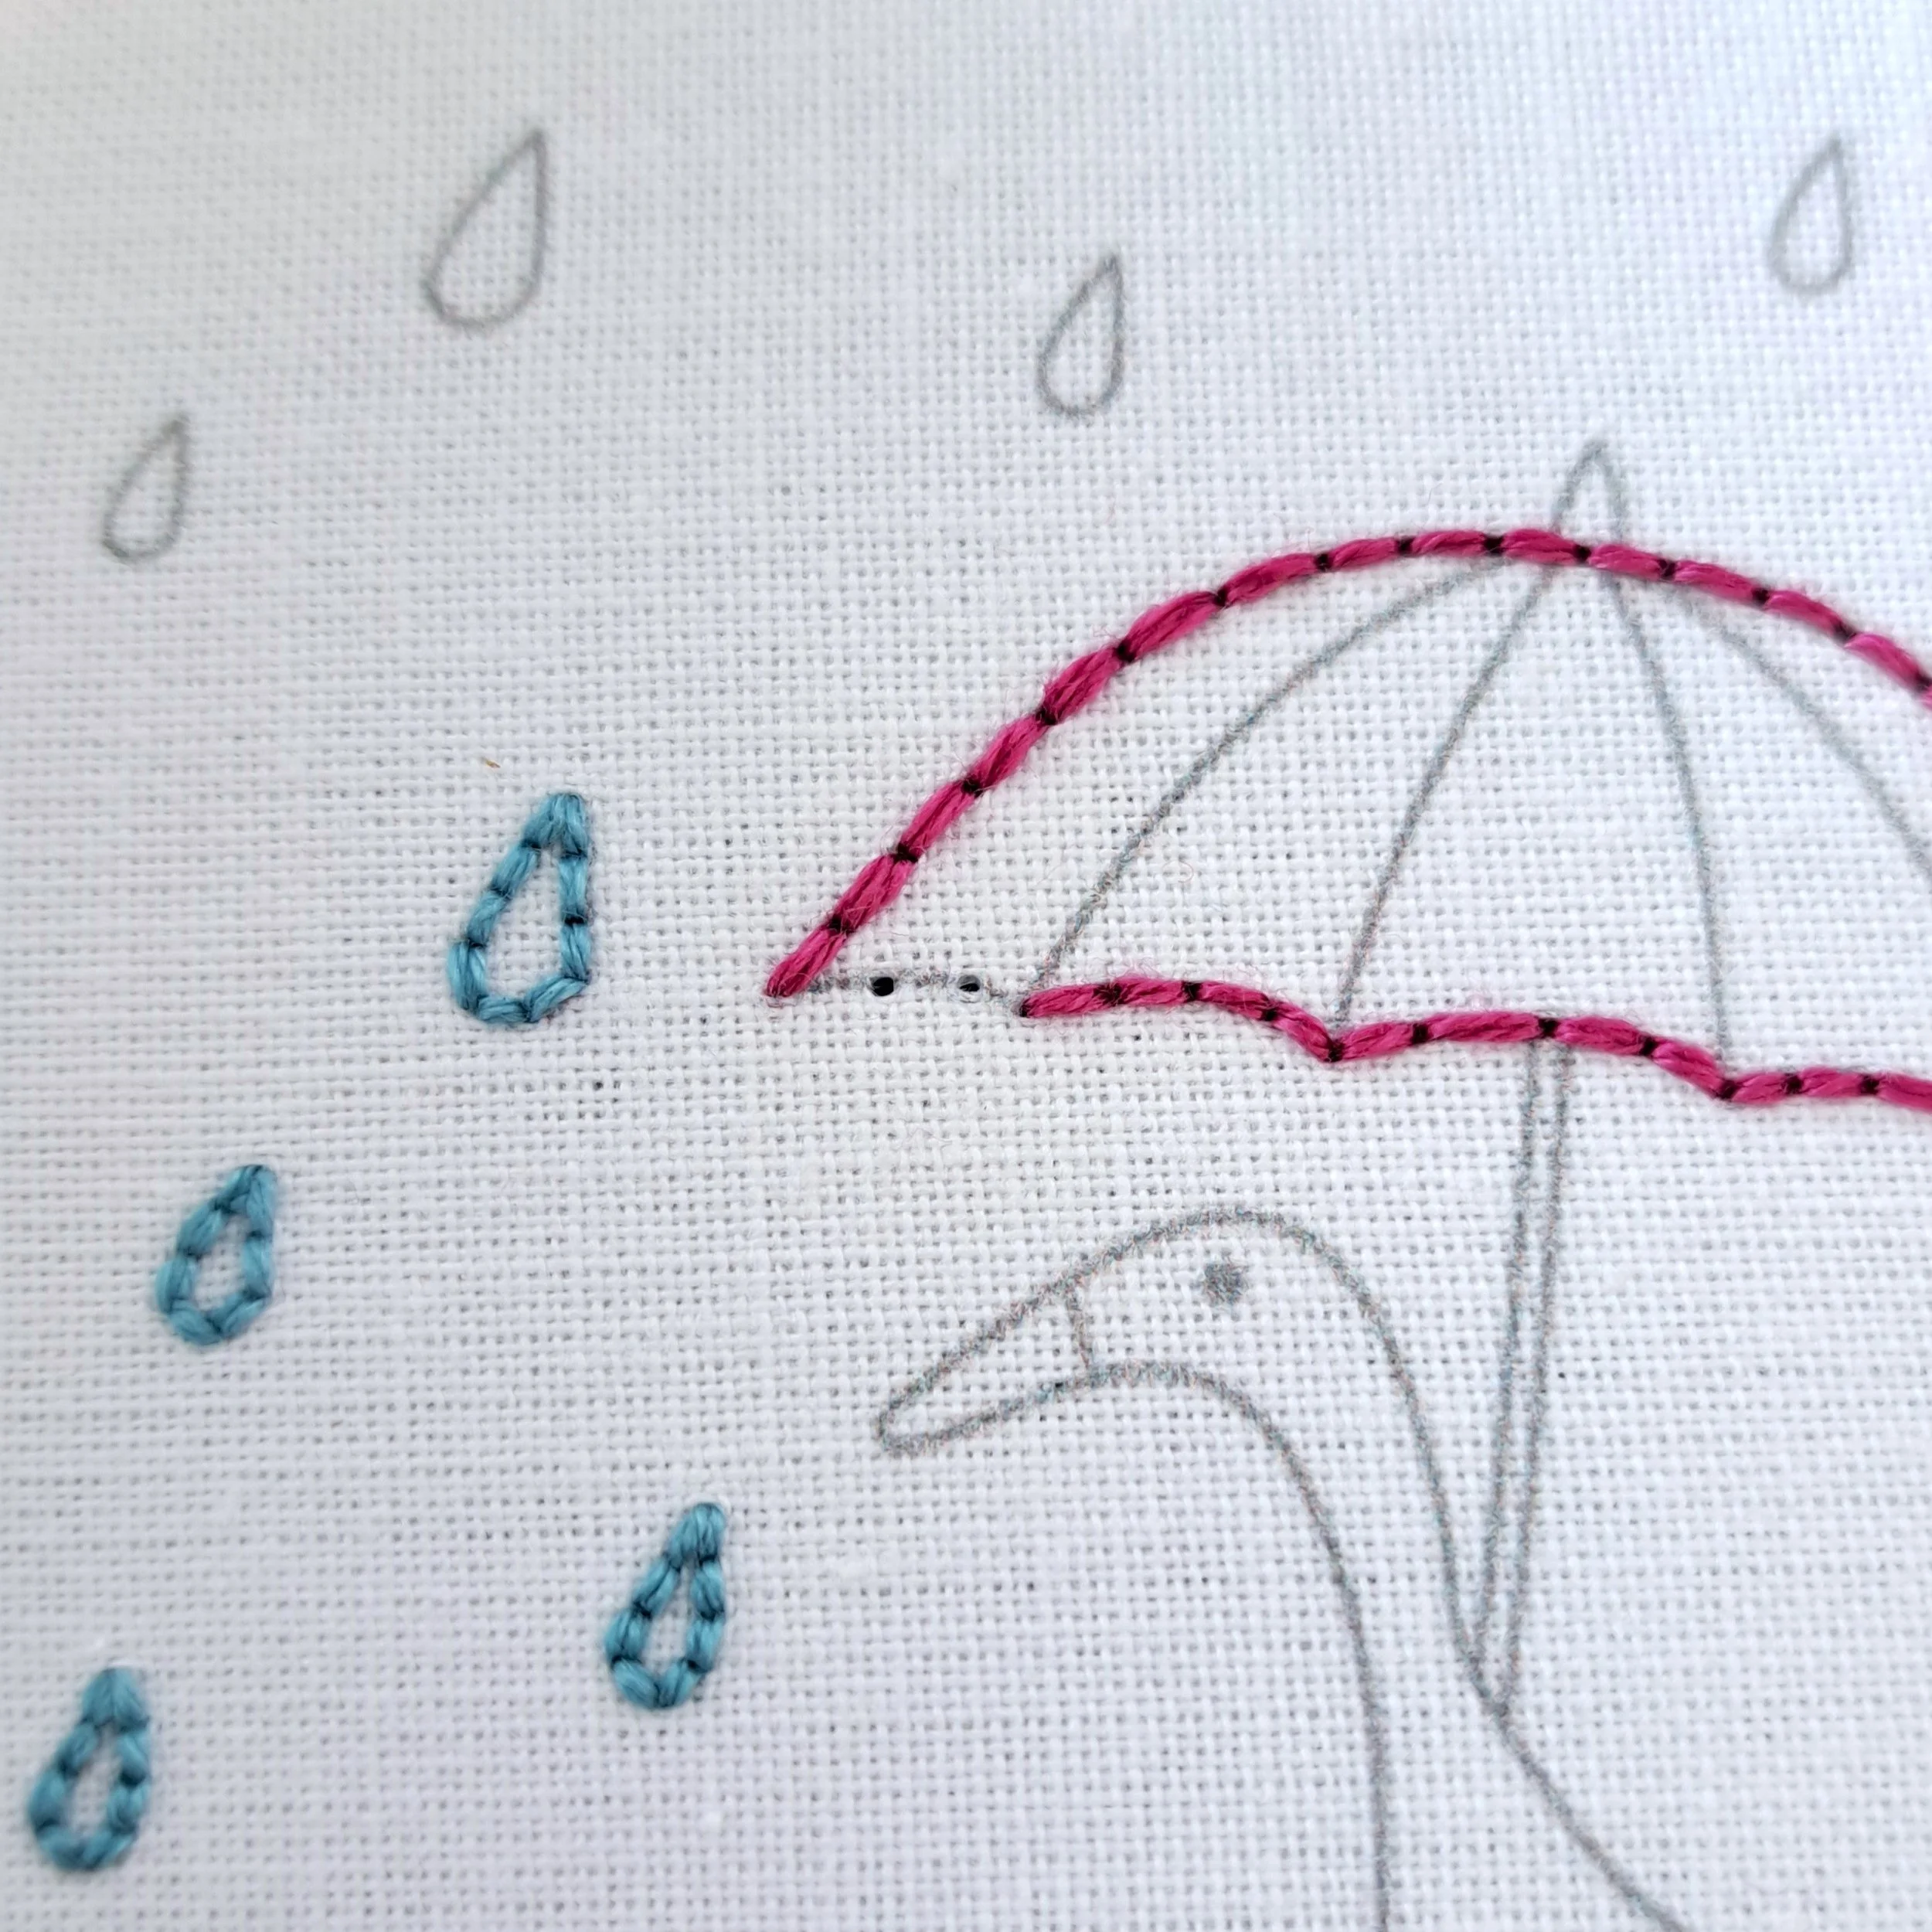
The Backstitches
Let’s start with the Backstitches. I used backstitch for all the outline stitching in this design. It’s such a lovely basic stitch and a great staple to know. The idea is simple: bring your needle up about a stitch length away, then go back down in the same hole where the previous stitch ended. Keep stitching backward into the last stitch, and you create a smooth, continuous line.
This stitch is included in my Stitch of the Week video tutorial bank, so if you want a little extra guidance, you can check that out to see exactly how it’s done.
✨ A few little tips:
Traditionally, backstitches are kept at an even length - but for curved lines (and we have quite a few here!) smaller stitches will help everything look smooth.
To help space your stitches, I sometimes make little guide holes along the line first. If you need to readjust, just stroke them gently with your needle and they’ll “erase” nicely.
For grass blades, primrose leaves, and stems at the front of the design, I tried making slightly bigger stitches to bring them forward. I’ll be honest - I naturally revert to smaller stitches 🙈. Looking at it now, it’s not very obvious, but it’s a fun detail to experiment with if you like.
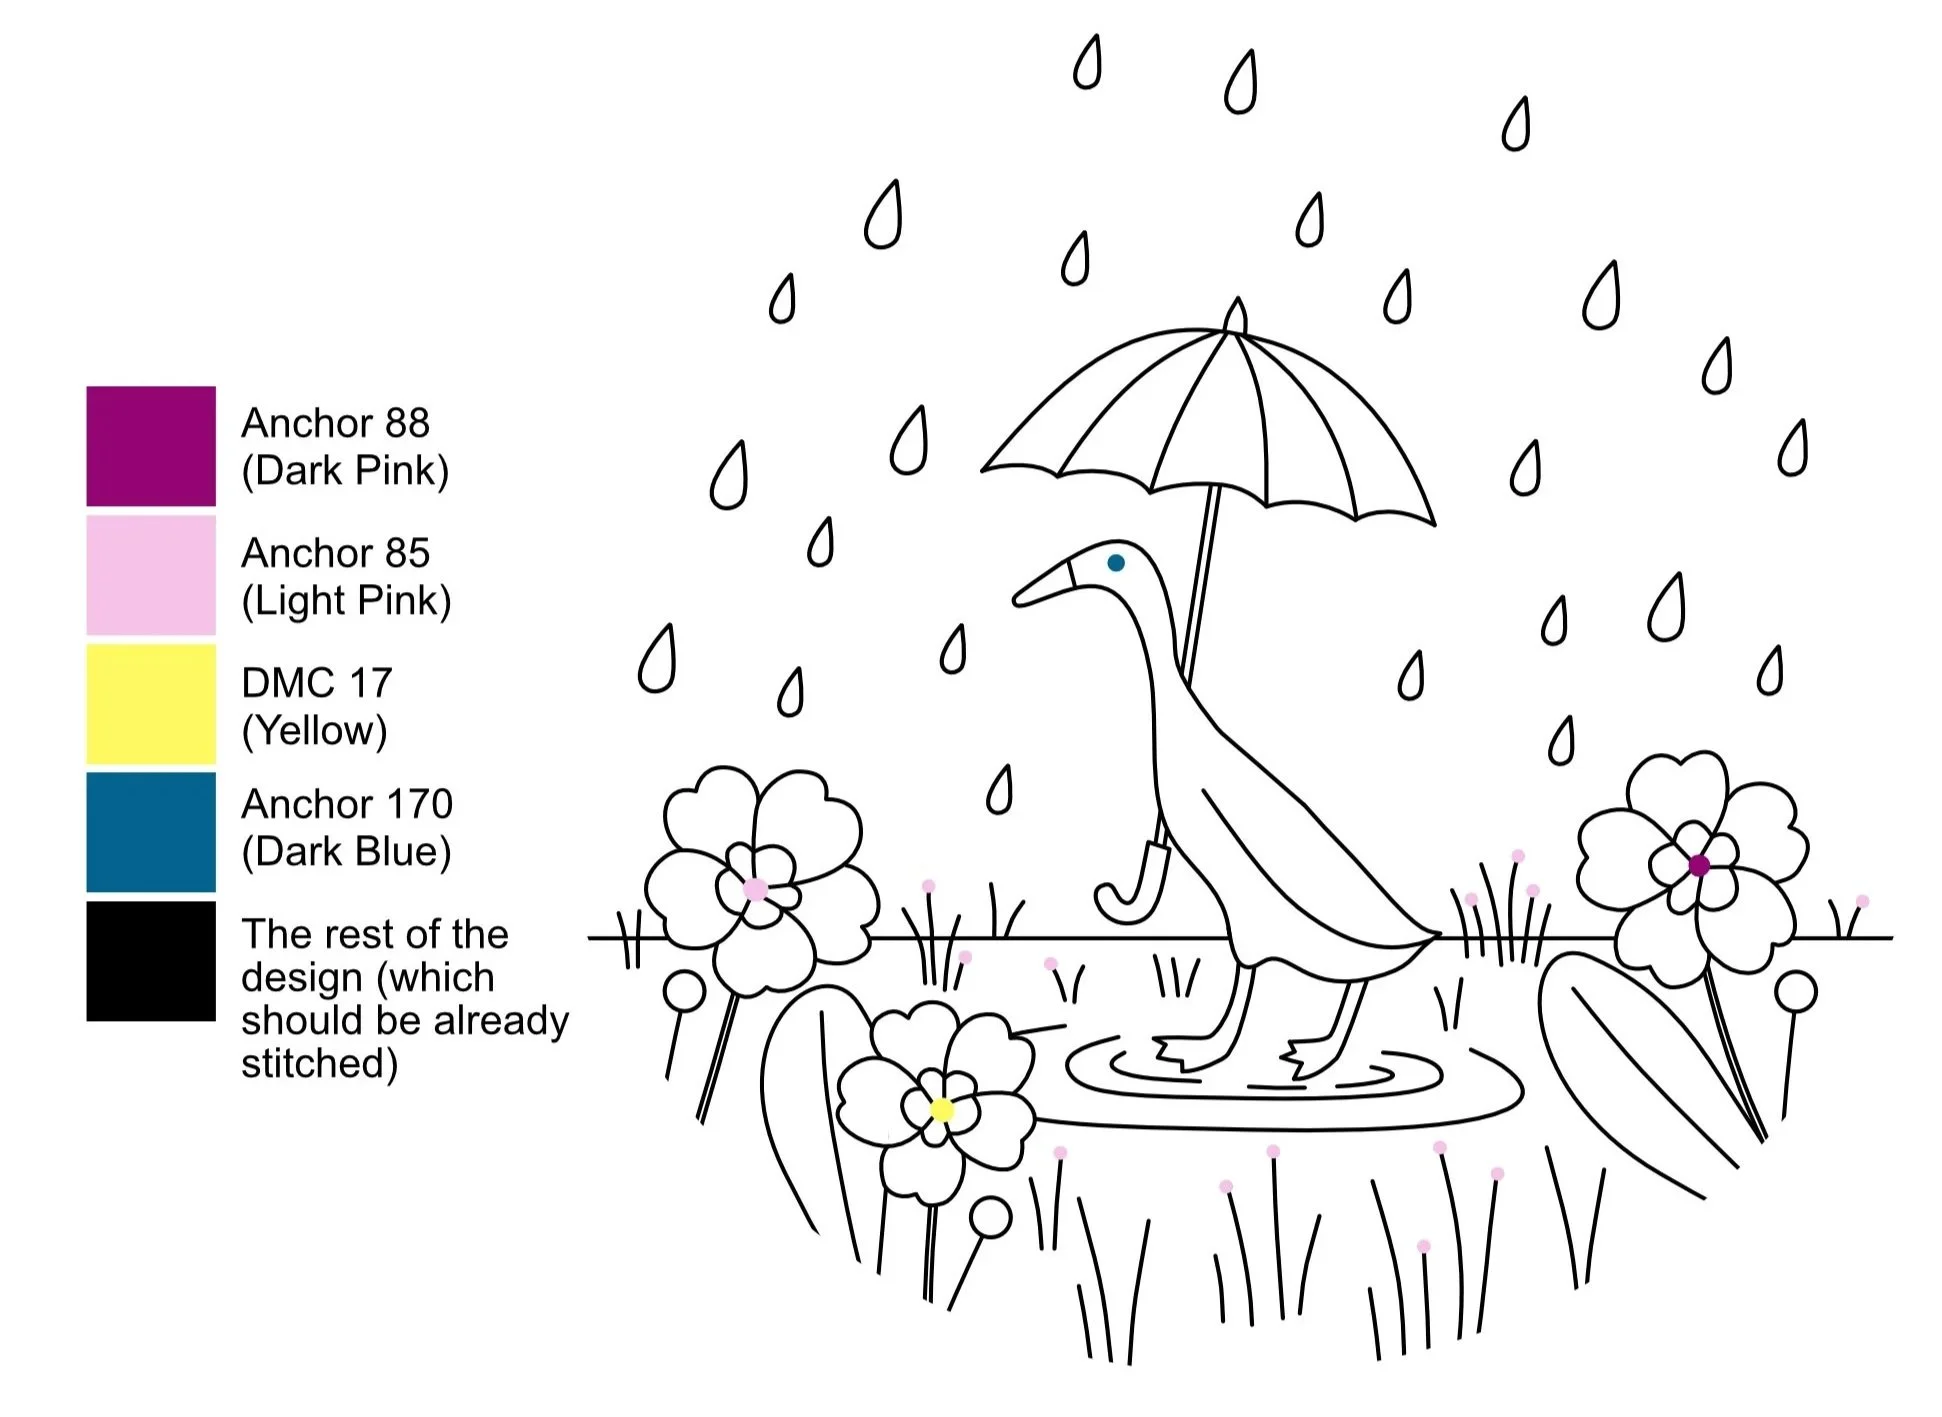
This diagram shows all the areas stitched with backstitch, along with the thread colours I used. Remember, I stitched everything here with 3 strands.
These are the little holes I sometimes make to show me where to pop my stitches in.

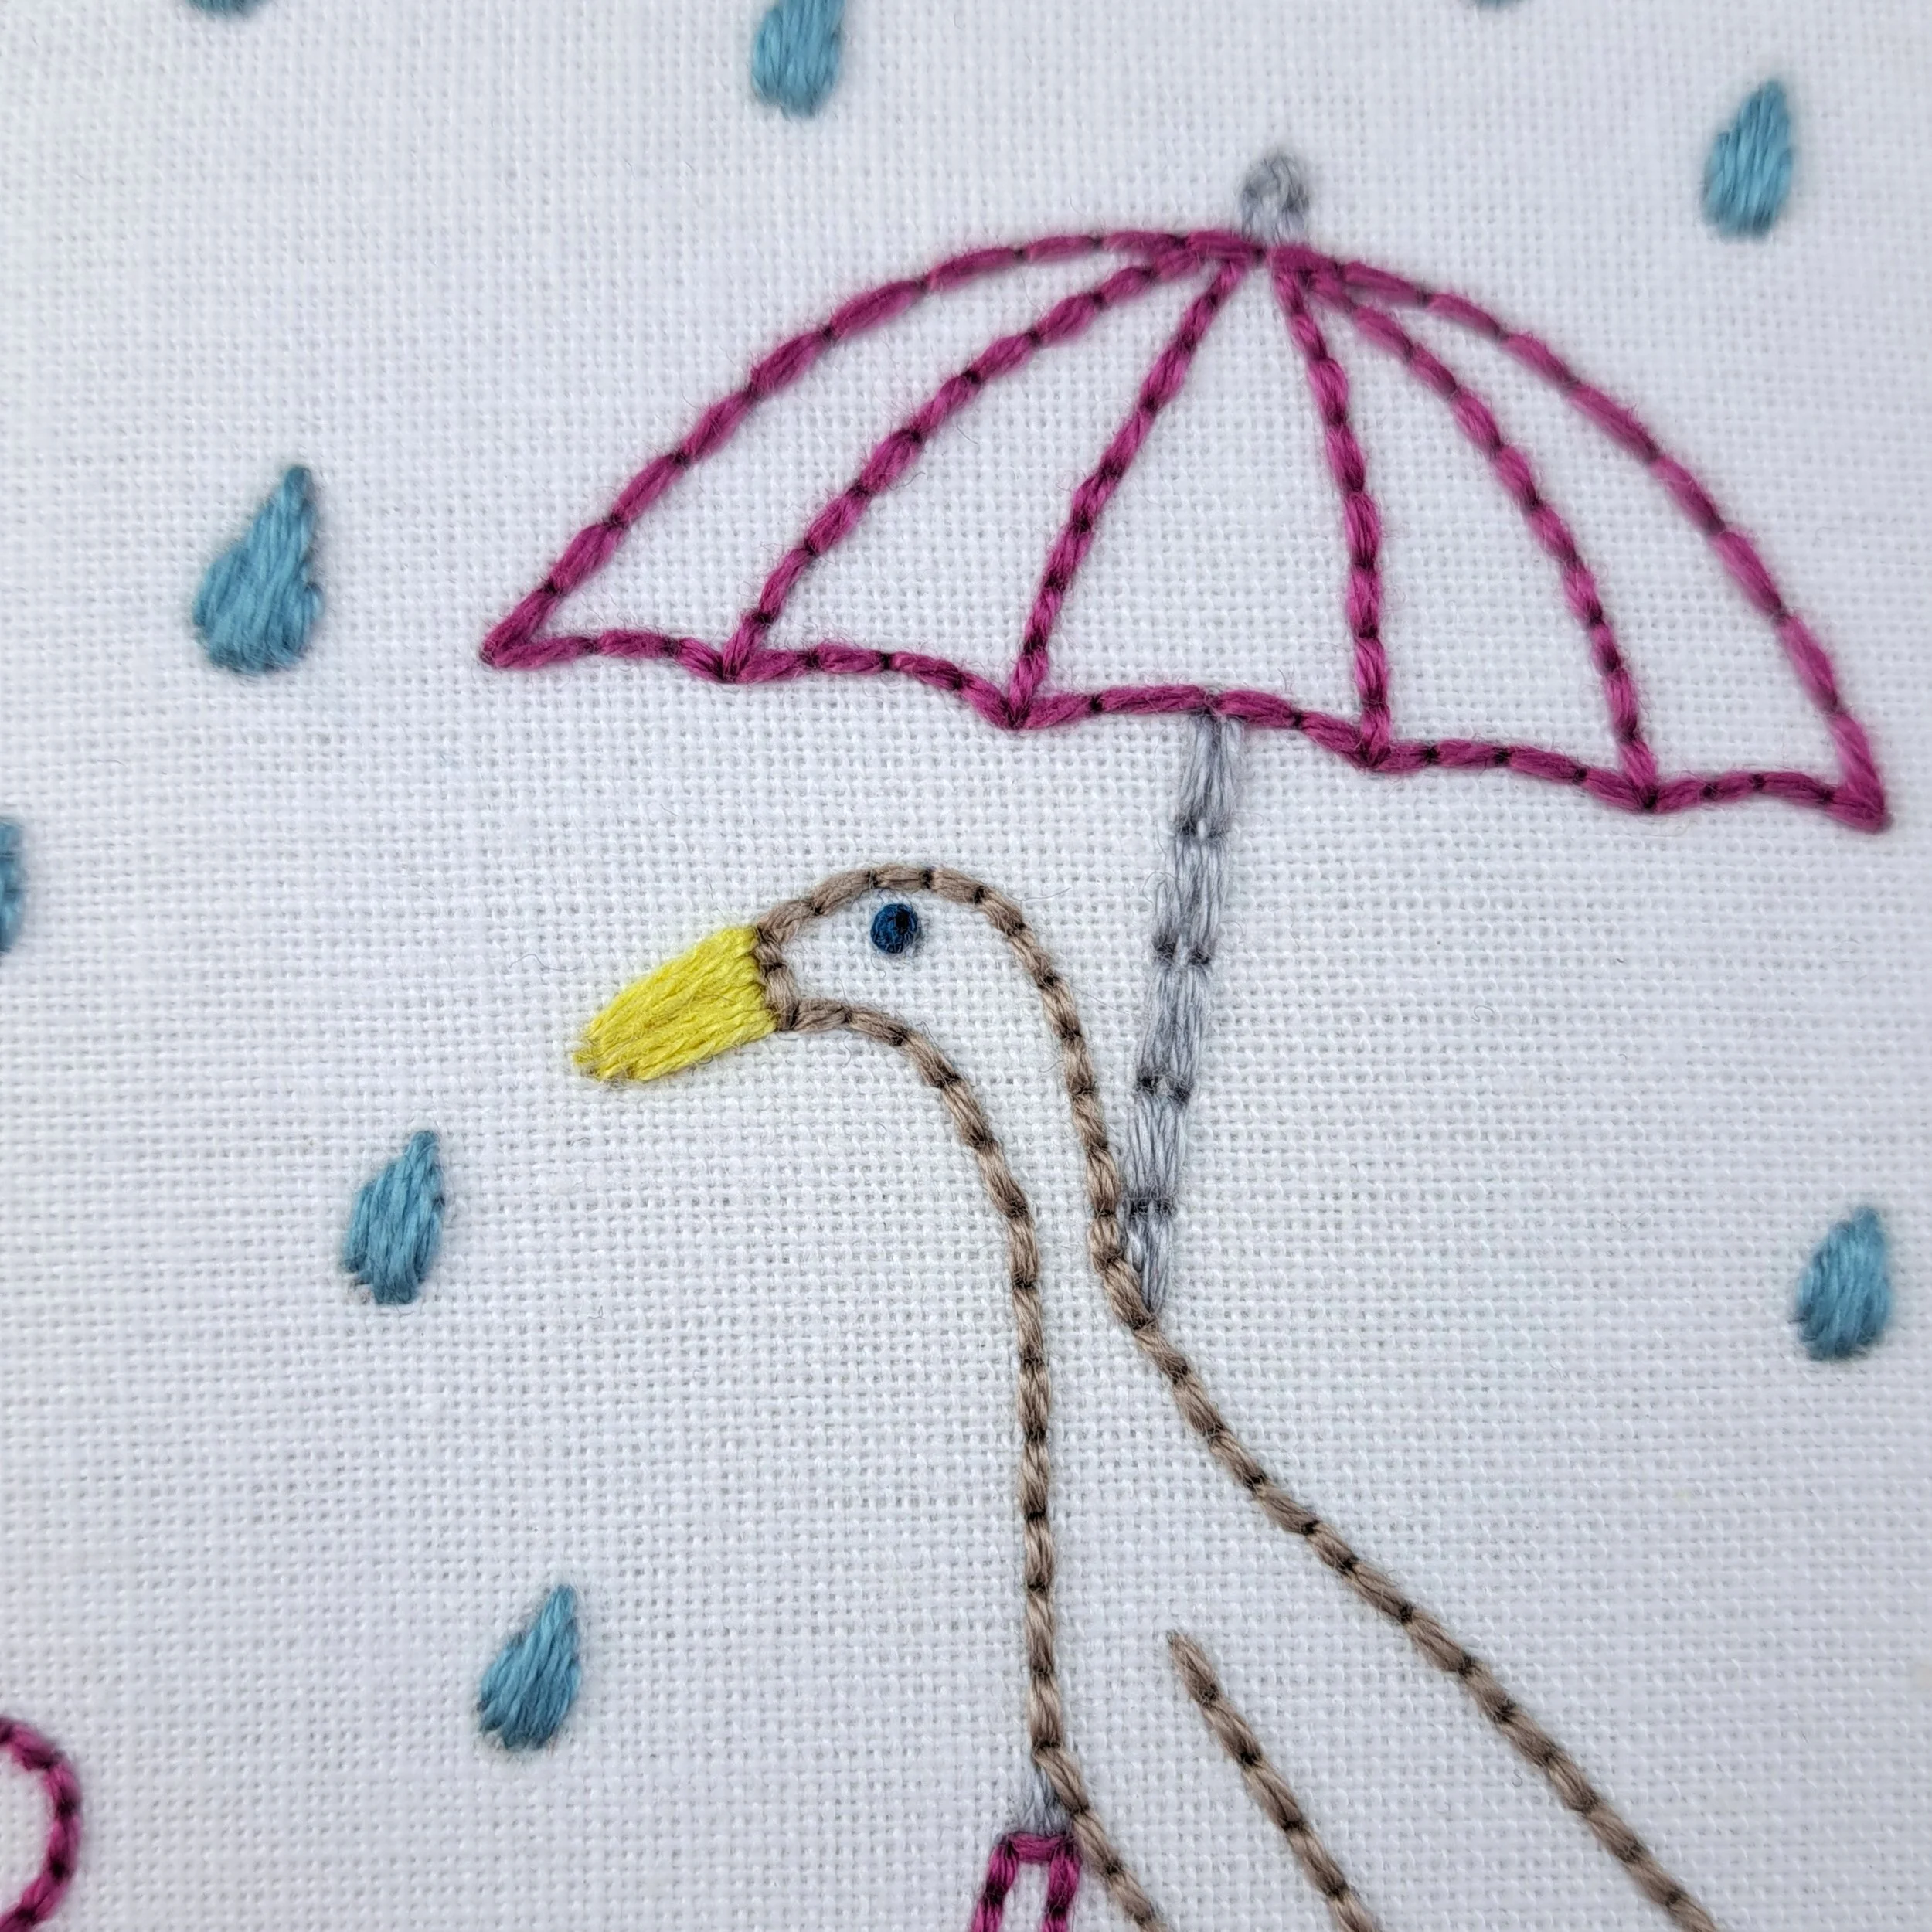
I stitched a couple of rows of slightly longer Backstitches for the umbrella handle.

My Backstitches for the grasses at the front are longer than the ones I stitched for the grasses towards the back.
At first I did Backstitch the ducks feet, legs and beak too - but I unpicked it to use a different stitch instead.
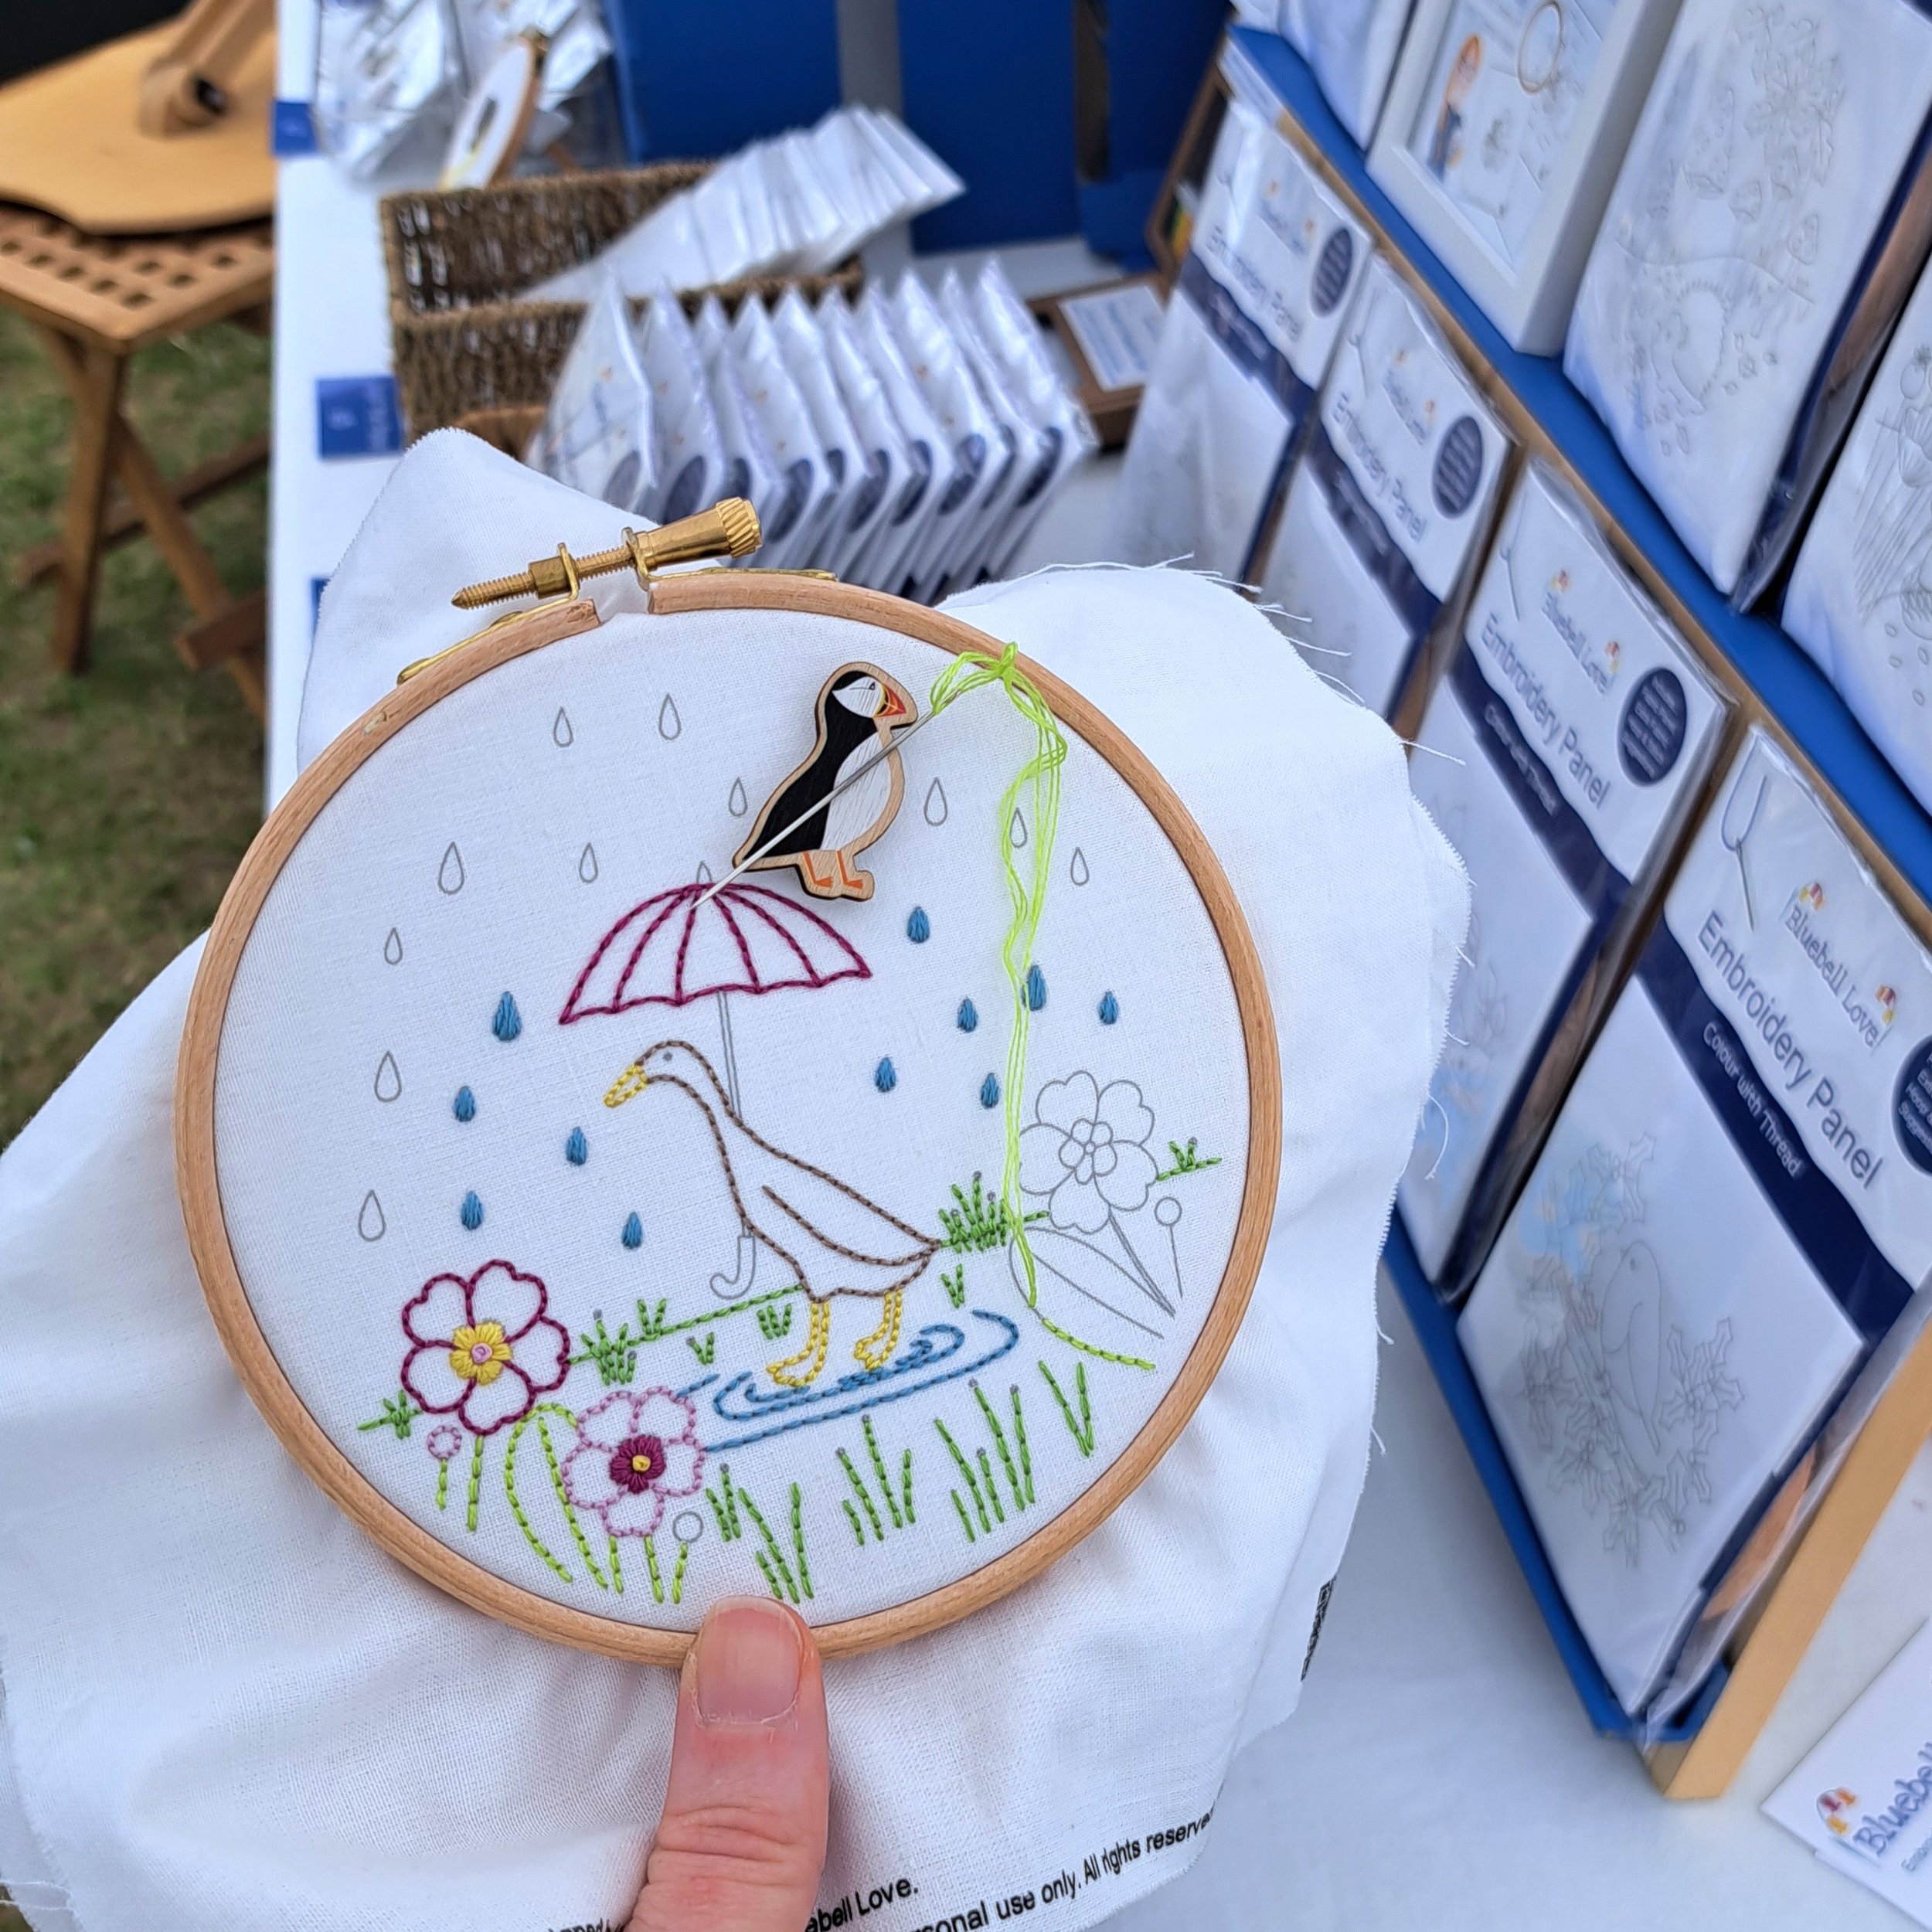
I stitched much of this one live at my recent in-person events - doesn’t it look so cute with one of my puffin needle minders? 🥰

✨ Enjoying the blog so far?
I’ve poured a lot of time and stitches into this one, so if you’re finding it helpful and feel like leaving a little Ko-fi tip, you can do that below – no pressure at all though! 💛
Now back to the stitching…
The Satin Stitch
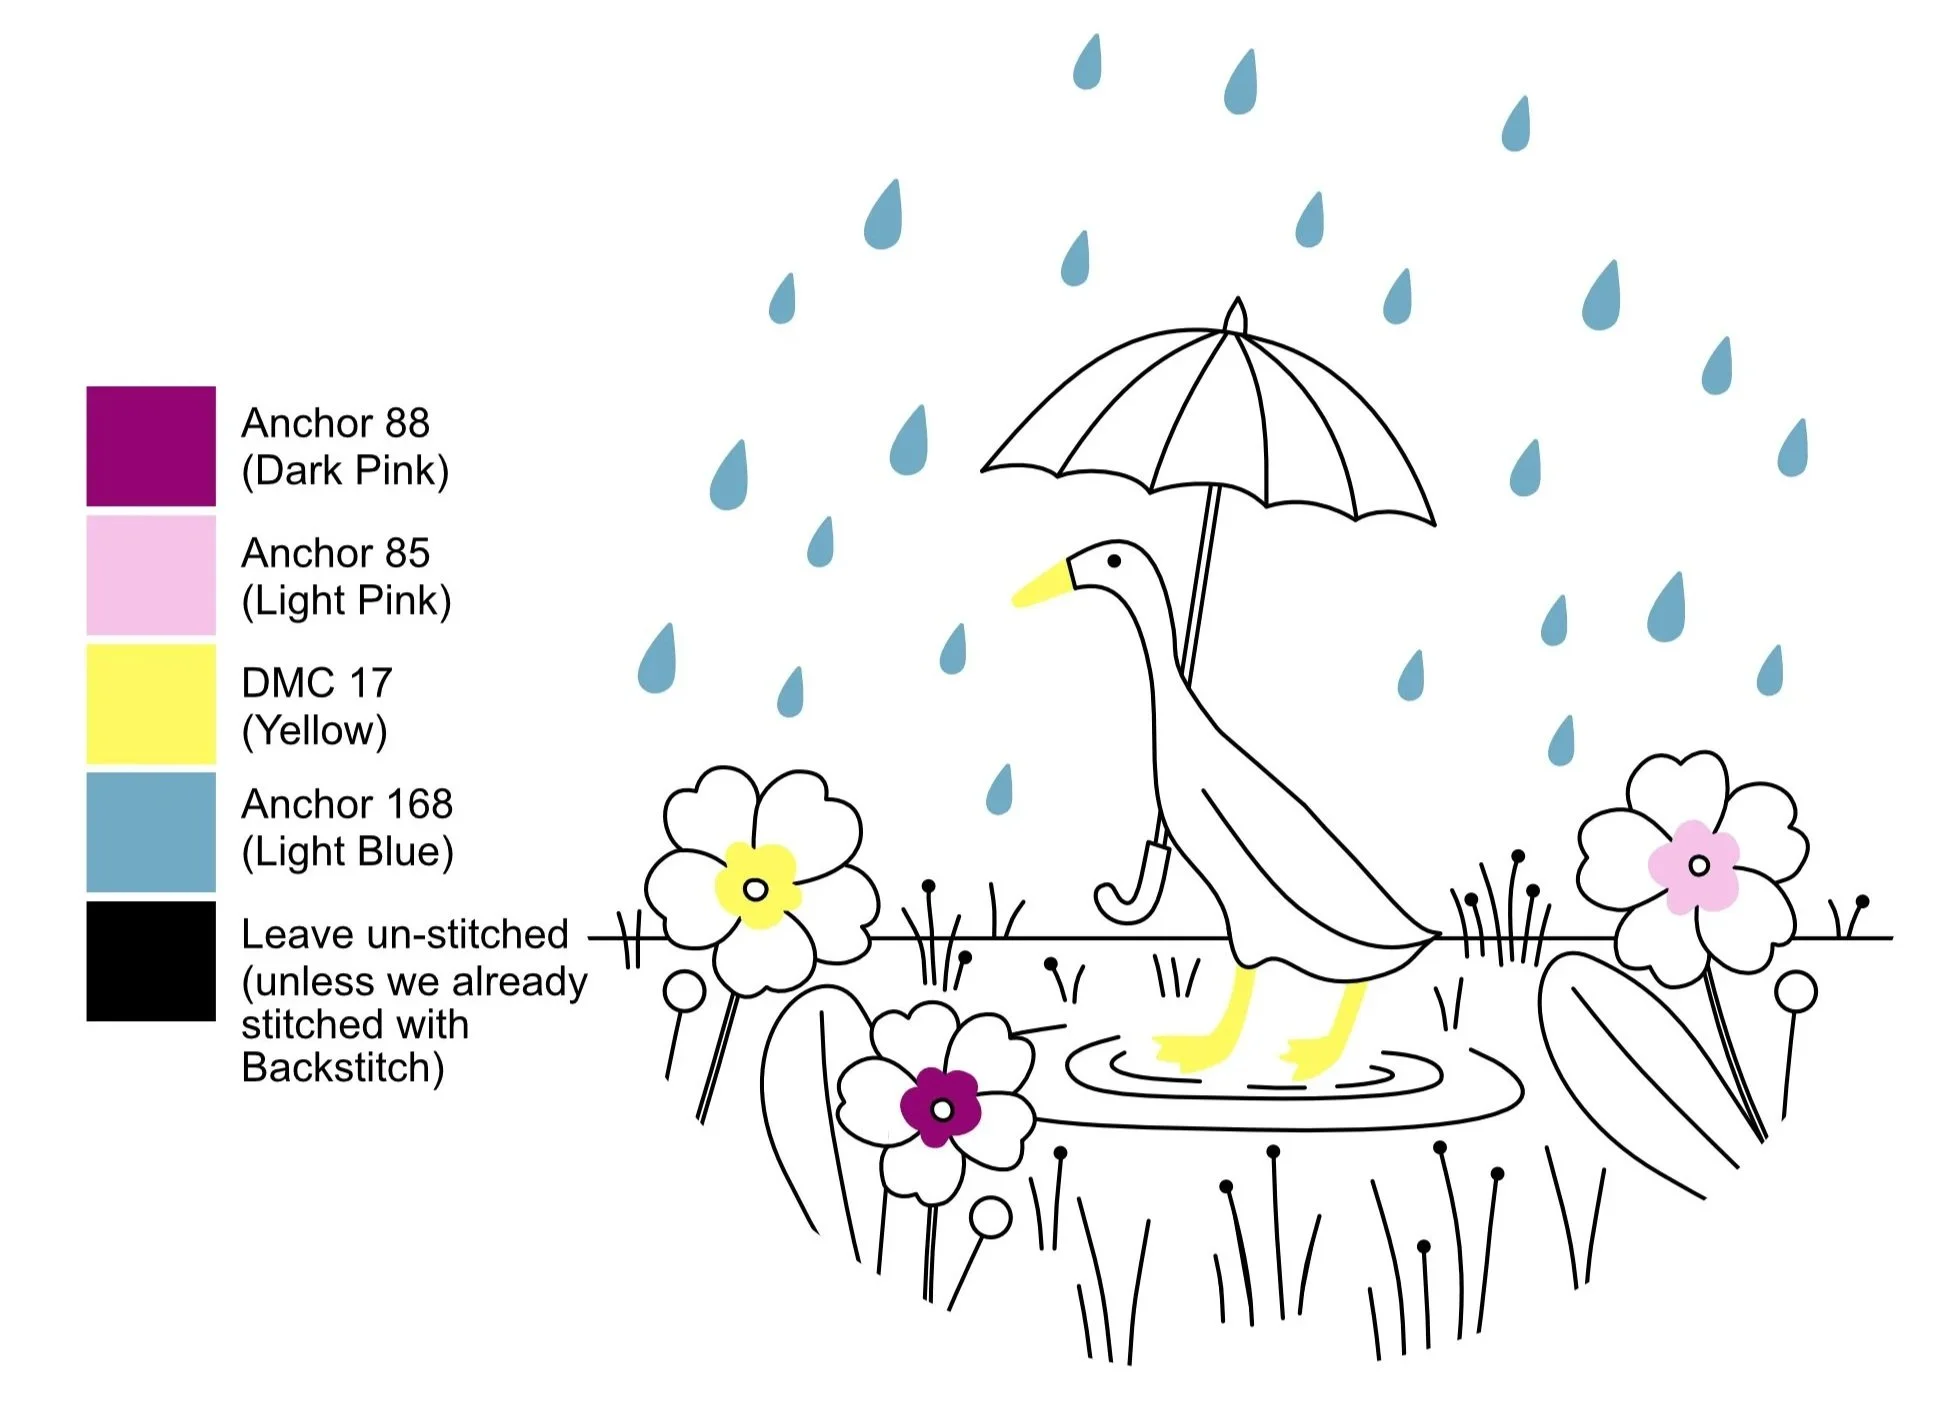
Originally, I was thinking of stitching this entire design with just backstitch - and I did stitch a few of the raindrops that way - but they were a little fiddly and just weren’t looking quite as cute. So, I decided to add satin stitch. It’s another fab basic stitch: basically straight stitches that all lie flat next to each other, completely covering the fabric underneath.
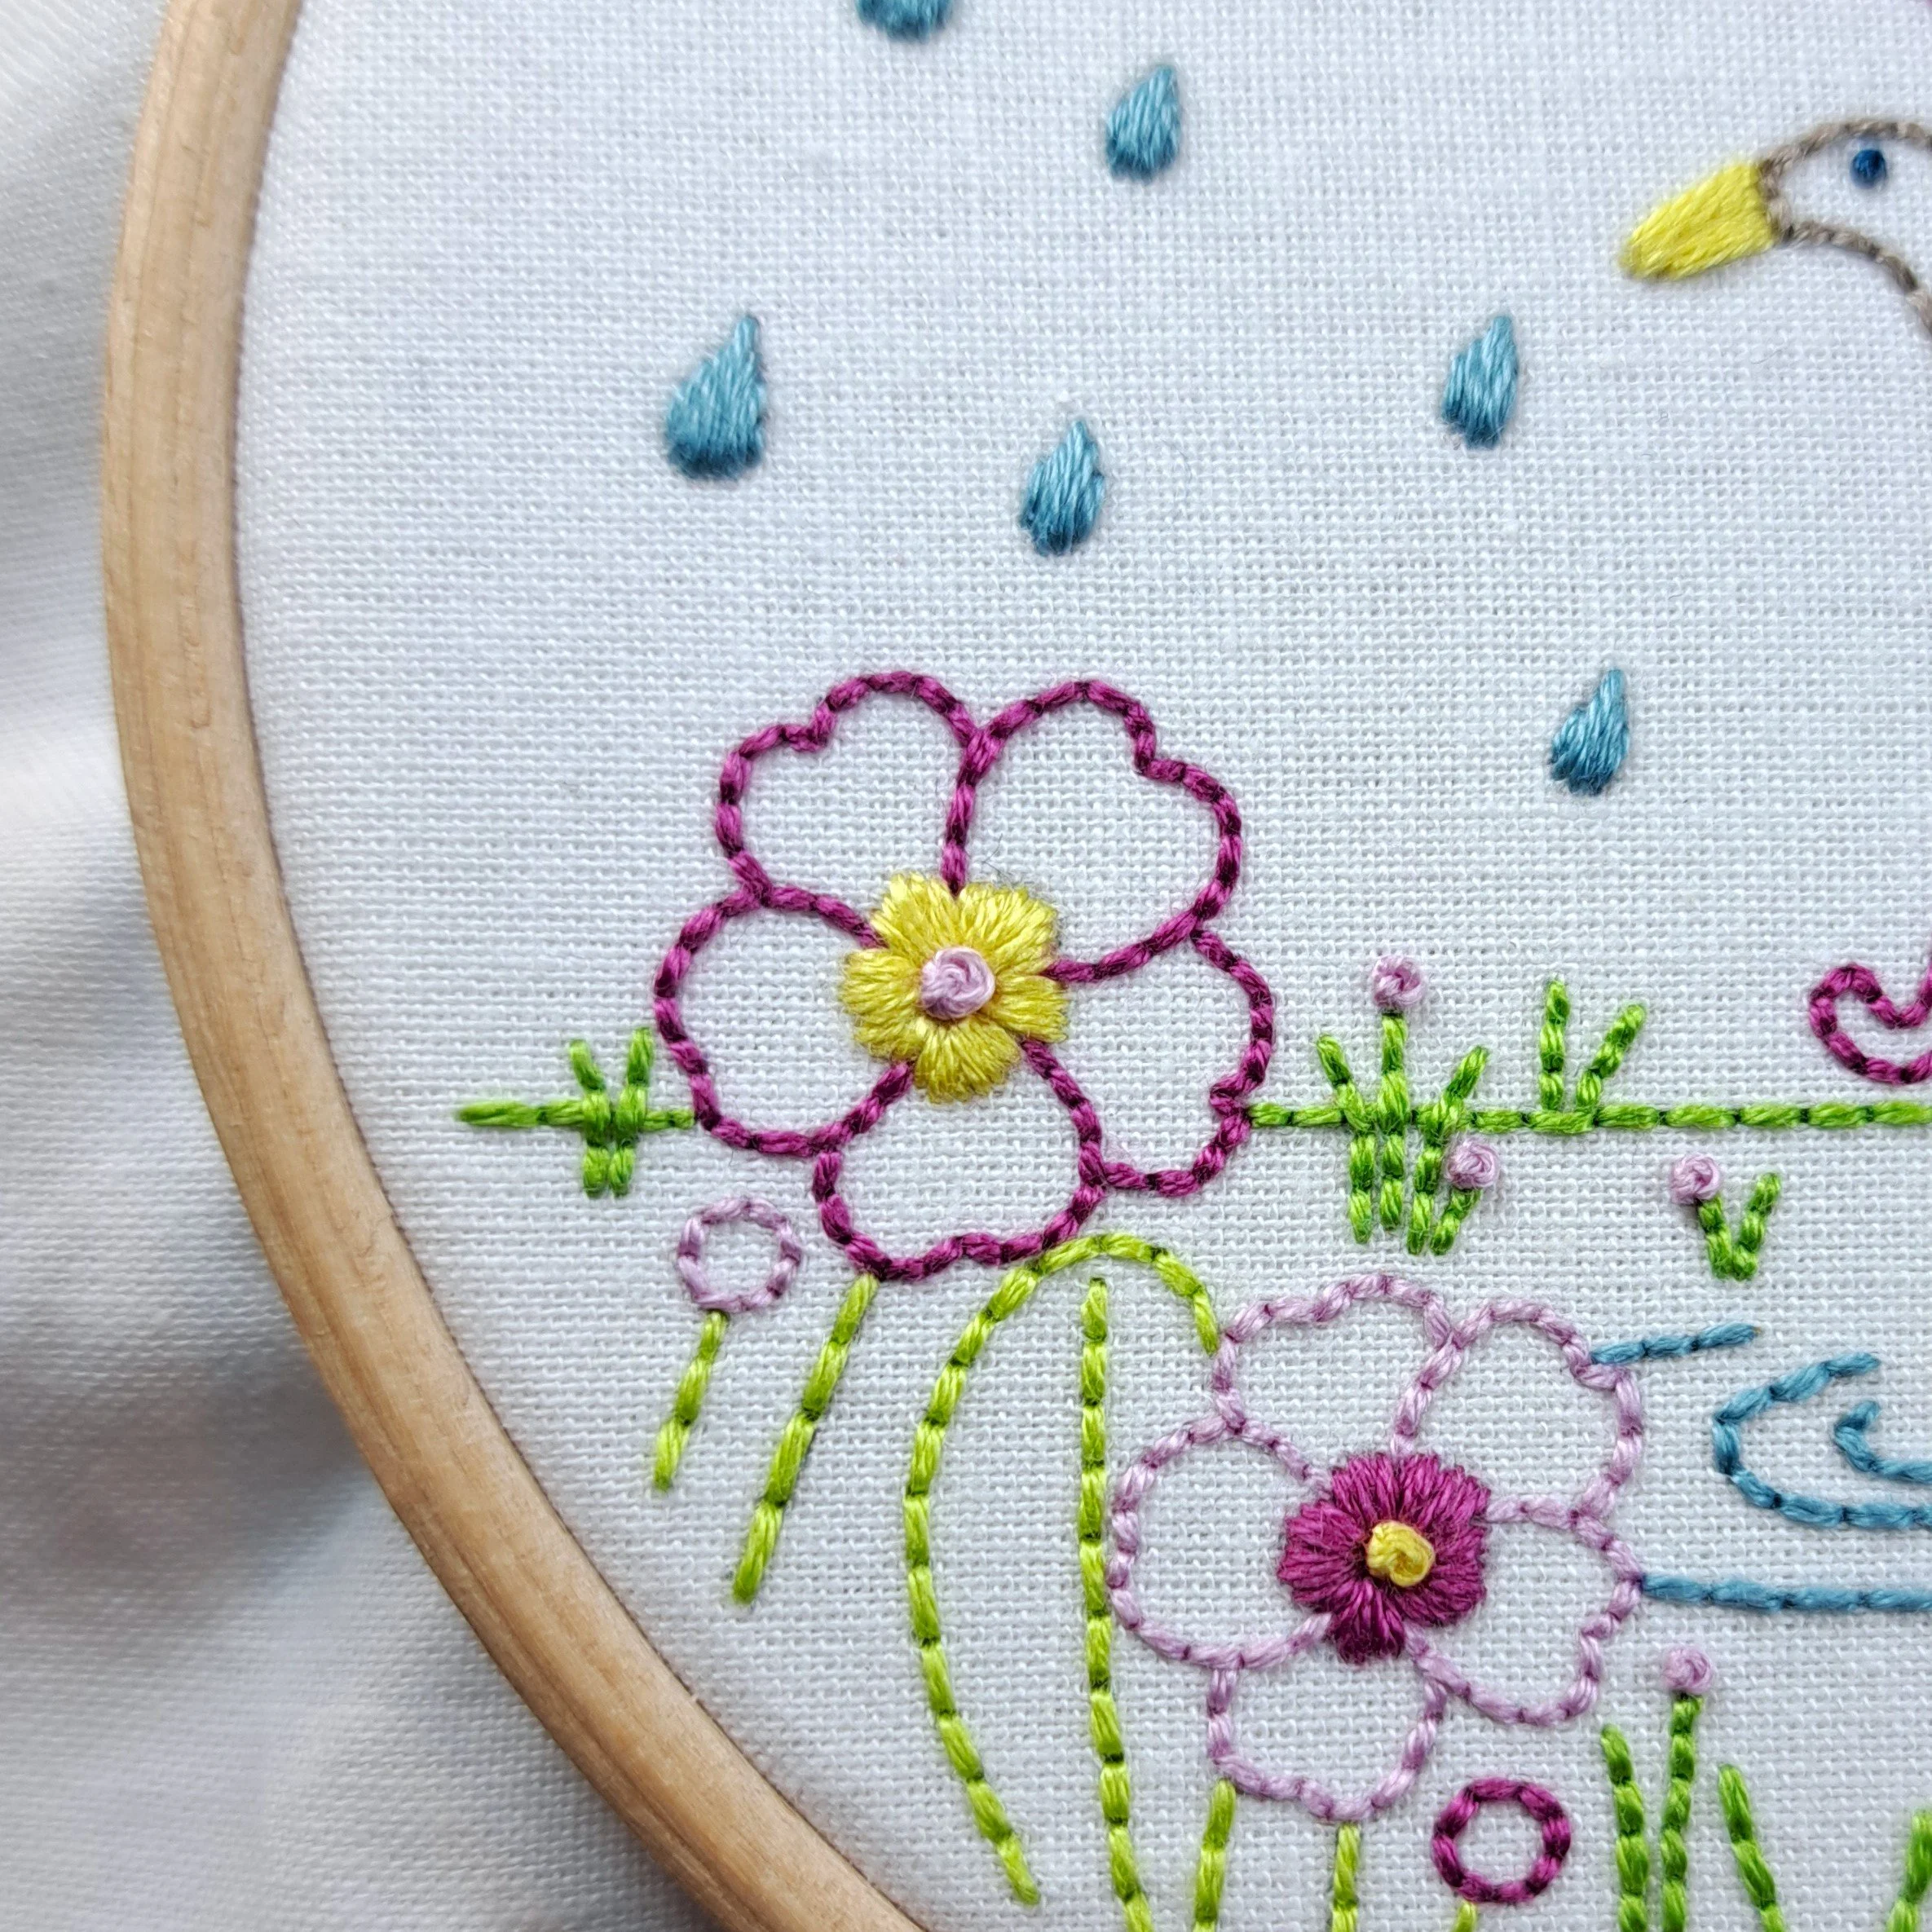
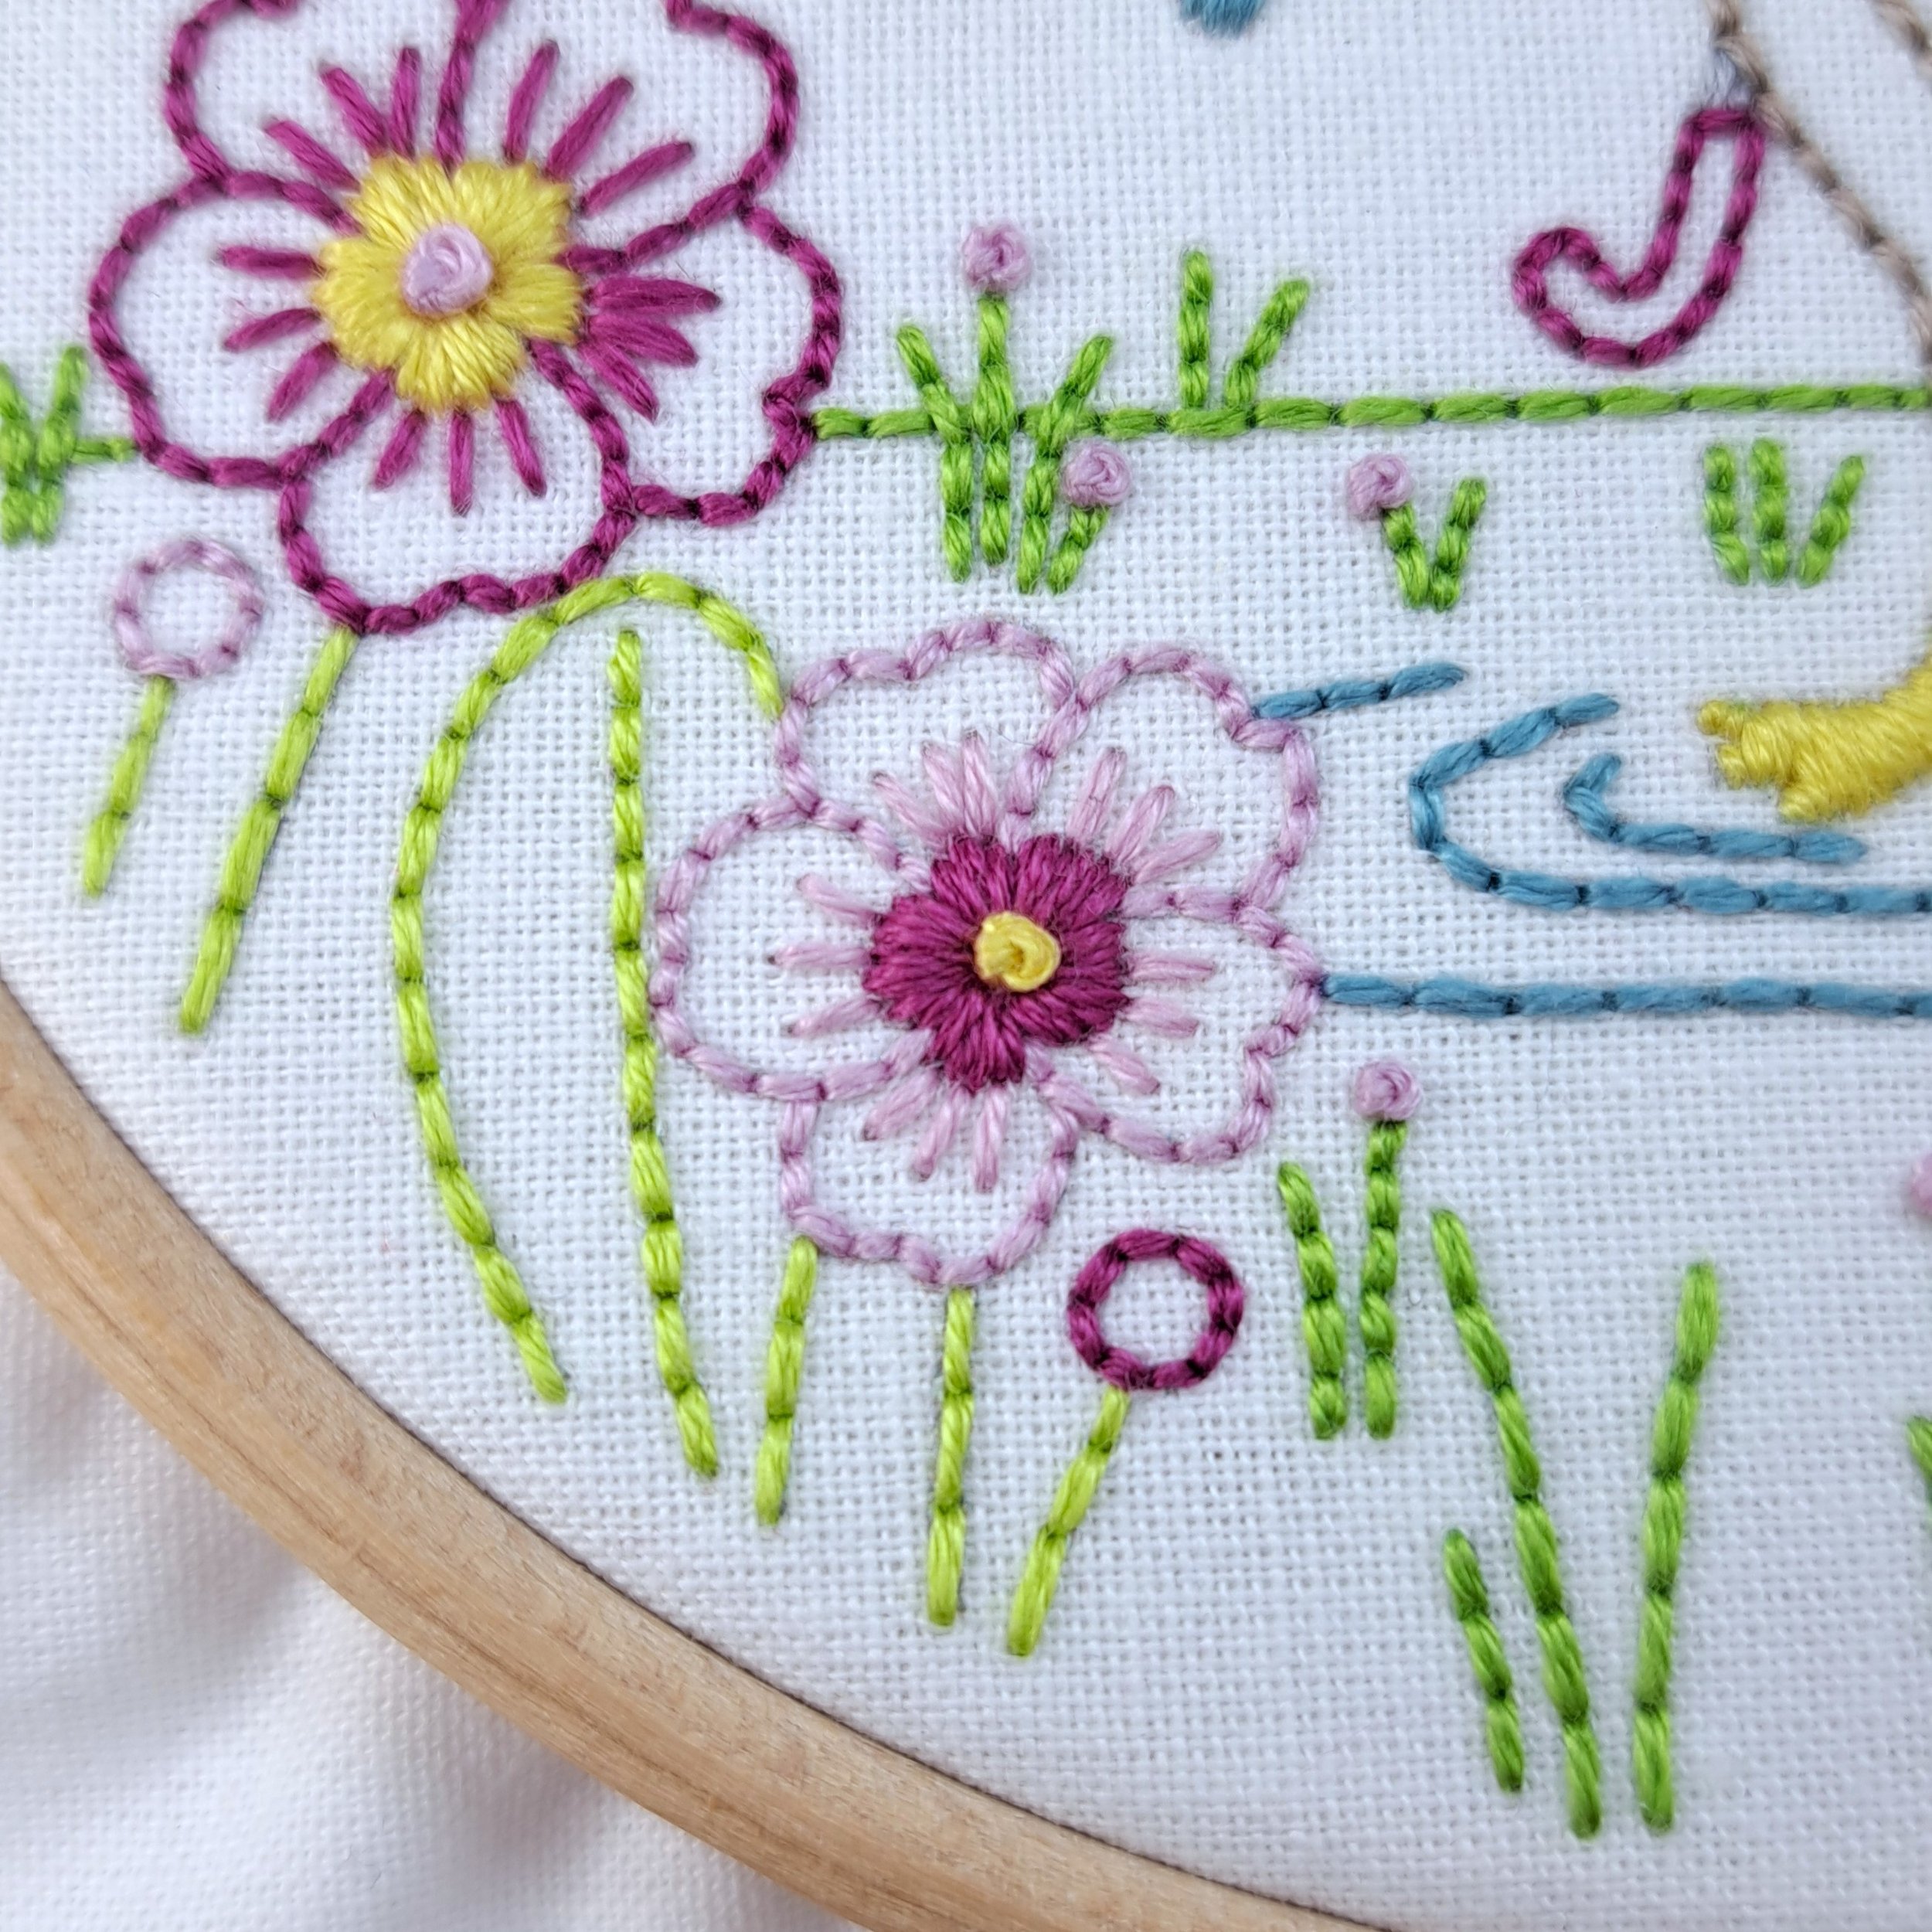
I used 3 strands again and filled in all of the raindrops, the duck’s beak, feet, and legs, as well as the flower petal centres with satin stitch.
✨ A few little tips:
I started and stopped each raindrop individually. You could travel from drop to drop, but even with doubled-up fabric, I didn’t want any thread shadows showing through. It would have been quicker to travel, but I think it’s worth taking your time here.
Satin stitch on curved shapes can be tricky, especially tight curves - it can get a little bulky. To solve this, I use a mix of full and partial satin stitches. For the small flower centres, I stitched one full satin stitch, then a shorter “¾ length” stitch next, and then another full stitch over the bottom of that short one. It helps keep everything smooth and neat.
This diagram shows all the areas stitched with satin stitch and the thread colours I used. Again, I stitched everything with 3 strands.


The French Knots
Now, I know a lot of people get a little frustrated with French knots (I can hear you crying, “Noooo, not French knots!”), but really, they just need a bit of practice and a little patience. I absolutely love them — they add such a lovely texture to any embroidery. If you’re not quite on Team “Love Them” yet, check out my Stitch of the Week video tutorial for some extra guidance and tips.
I used French knots for the duck’s eye, the tiny flowers, and the centres of the primrose flowers. I also varied the knot sizes by adjusting the number of thread wraps:
Duck’s eye – 1 wrap
Tiny flowers – 2 wraps
Primrose flower centres – 3 wraps
This diagram shows all the areas stitched with French knots and the thread colours I used. I stitched everything with 3 strands.

✨ Something else you might want to try:
If you’ve seen my lighthouse blog, you’ll know I turned some flowers into little daisies with lazy daisy stitches — you could do the same here with the tiny flowers if you fancy!
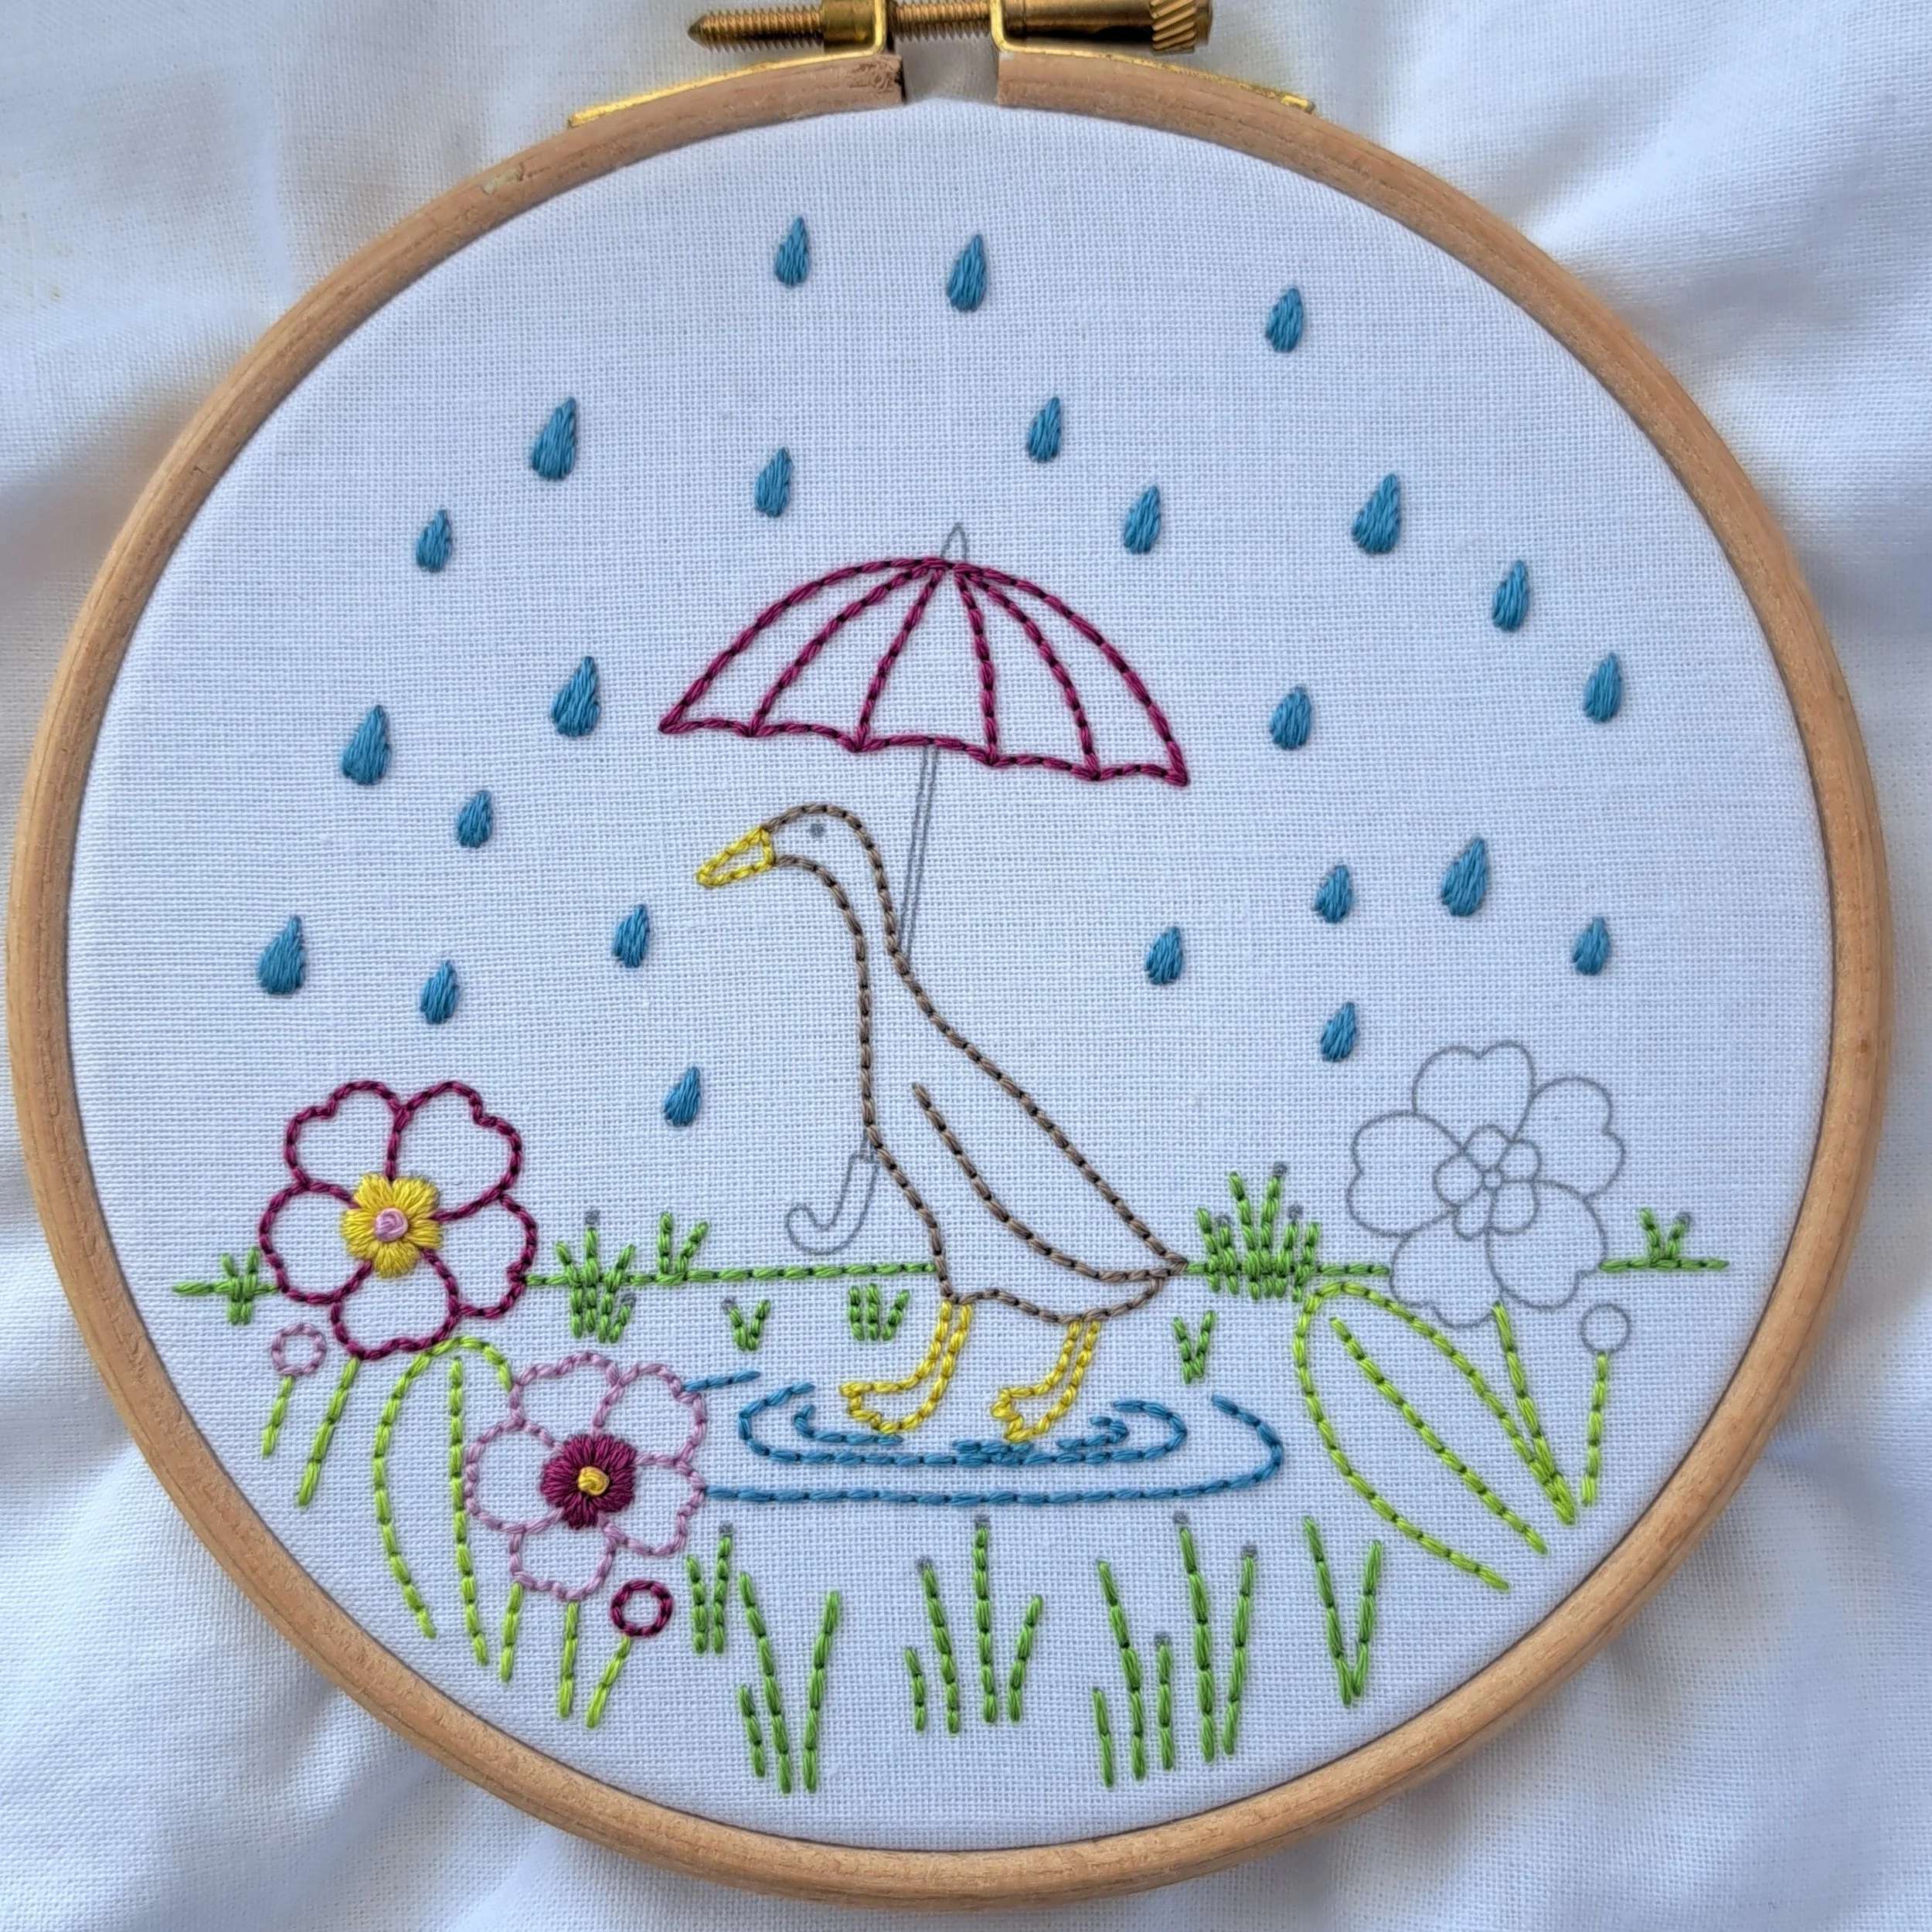
And now this adorable duck is fully stitched! 🪡 But I couldn’t resist adding a little extra to the primrose petals too.

This is how its looking after all the stitching so far.
The Straight Stitches
These little lines aren’t part of the printed design, but one of the fun things about my embroidery panels is that you can add as much (or as little) as you like. I just wanted to fill the primrose petals a bit more, so I added three little straight stitches to each petal to finish them off nicely.
[images – close up of stitching]

And that’s it!
We’ve finished stitching this one, and I think it looks absolutely adorable.

5. Finishing and Displaying your Embroidery
You can frame your finished embroidery right in the hoop you used for stitching - one of my favourite ways to display projects! To do this, trim away the excess fabric, leaving a few centimetres all around.
Next, stitch a running stitch about 1 cm from the fabric edge using 6 strands of thread, leaving unknotted tails at both the start and finish. Gently pull these tails to gather the fabric, then tie a knot to hold it in place.
I’ll show you exactly how to do this in this video (it’s a Christmas one, sorry about that! 🙈 but the process is exactly the same):
The best part about this method is that it’s not permanent! If you decide to add more to your embroidery later, you can easily remove the running stitches and keep stitching until you’re happy with your design.
Then, step back and admire your beautiful stitching!

I hope you loved this project as much as I did!
I’ll be stitching my way through all of my new embroidery designs (I launched 14 of them earlier this year!) and will be adding similar blog posts along the way. Of course, you can have fun stitching them straight away! If you need a bit of guidance, the Panel Packs come with stitch suggestion sheets, and many of the techniques from my hand-printed panels still apply to these new designs.
You can find them all here……….
And don’t forget to tag me on social media when you show off your beautiful work—I’d absolutely love seeing your stitching! Enjoy your stitching!

If you enjoyed this blog and would like to support my work, feel free to visit my Ko-fi and leave a tip - every little bit helps keep the creativity flowing! 🌸
Enjoy your stitching!
Until next time,
Liz x