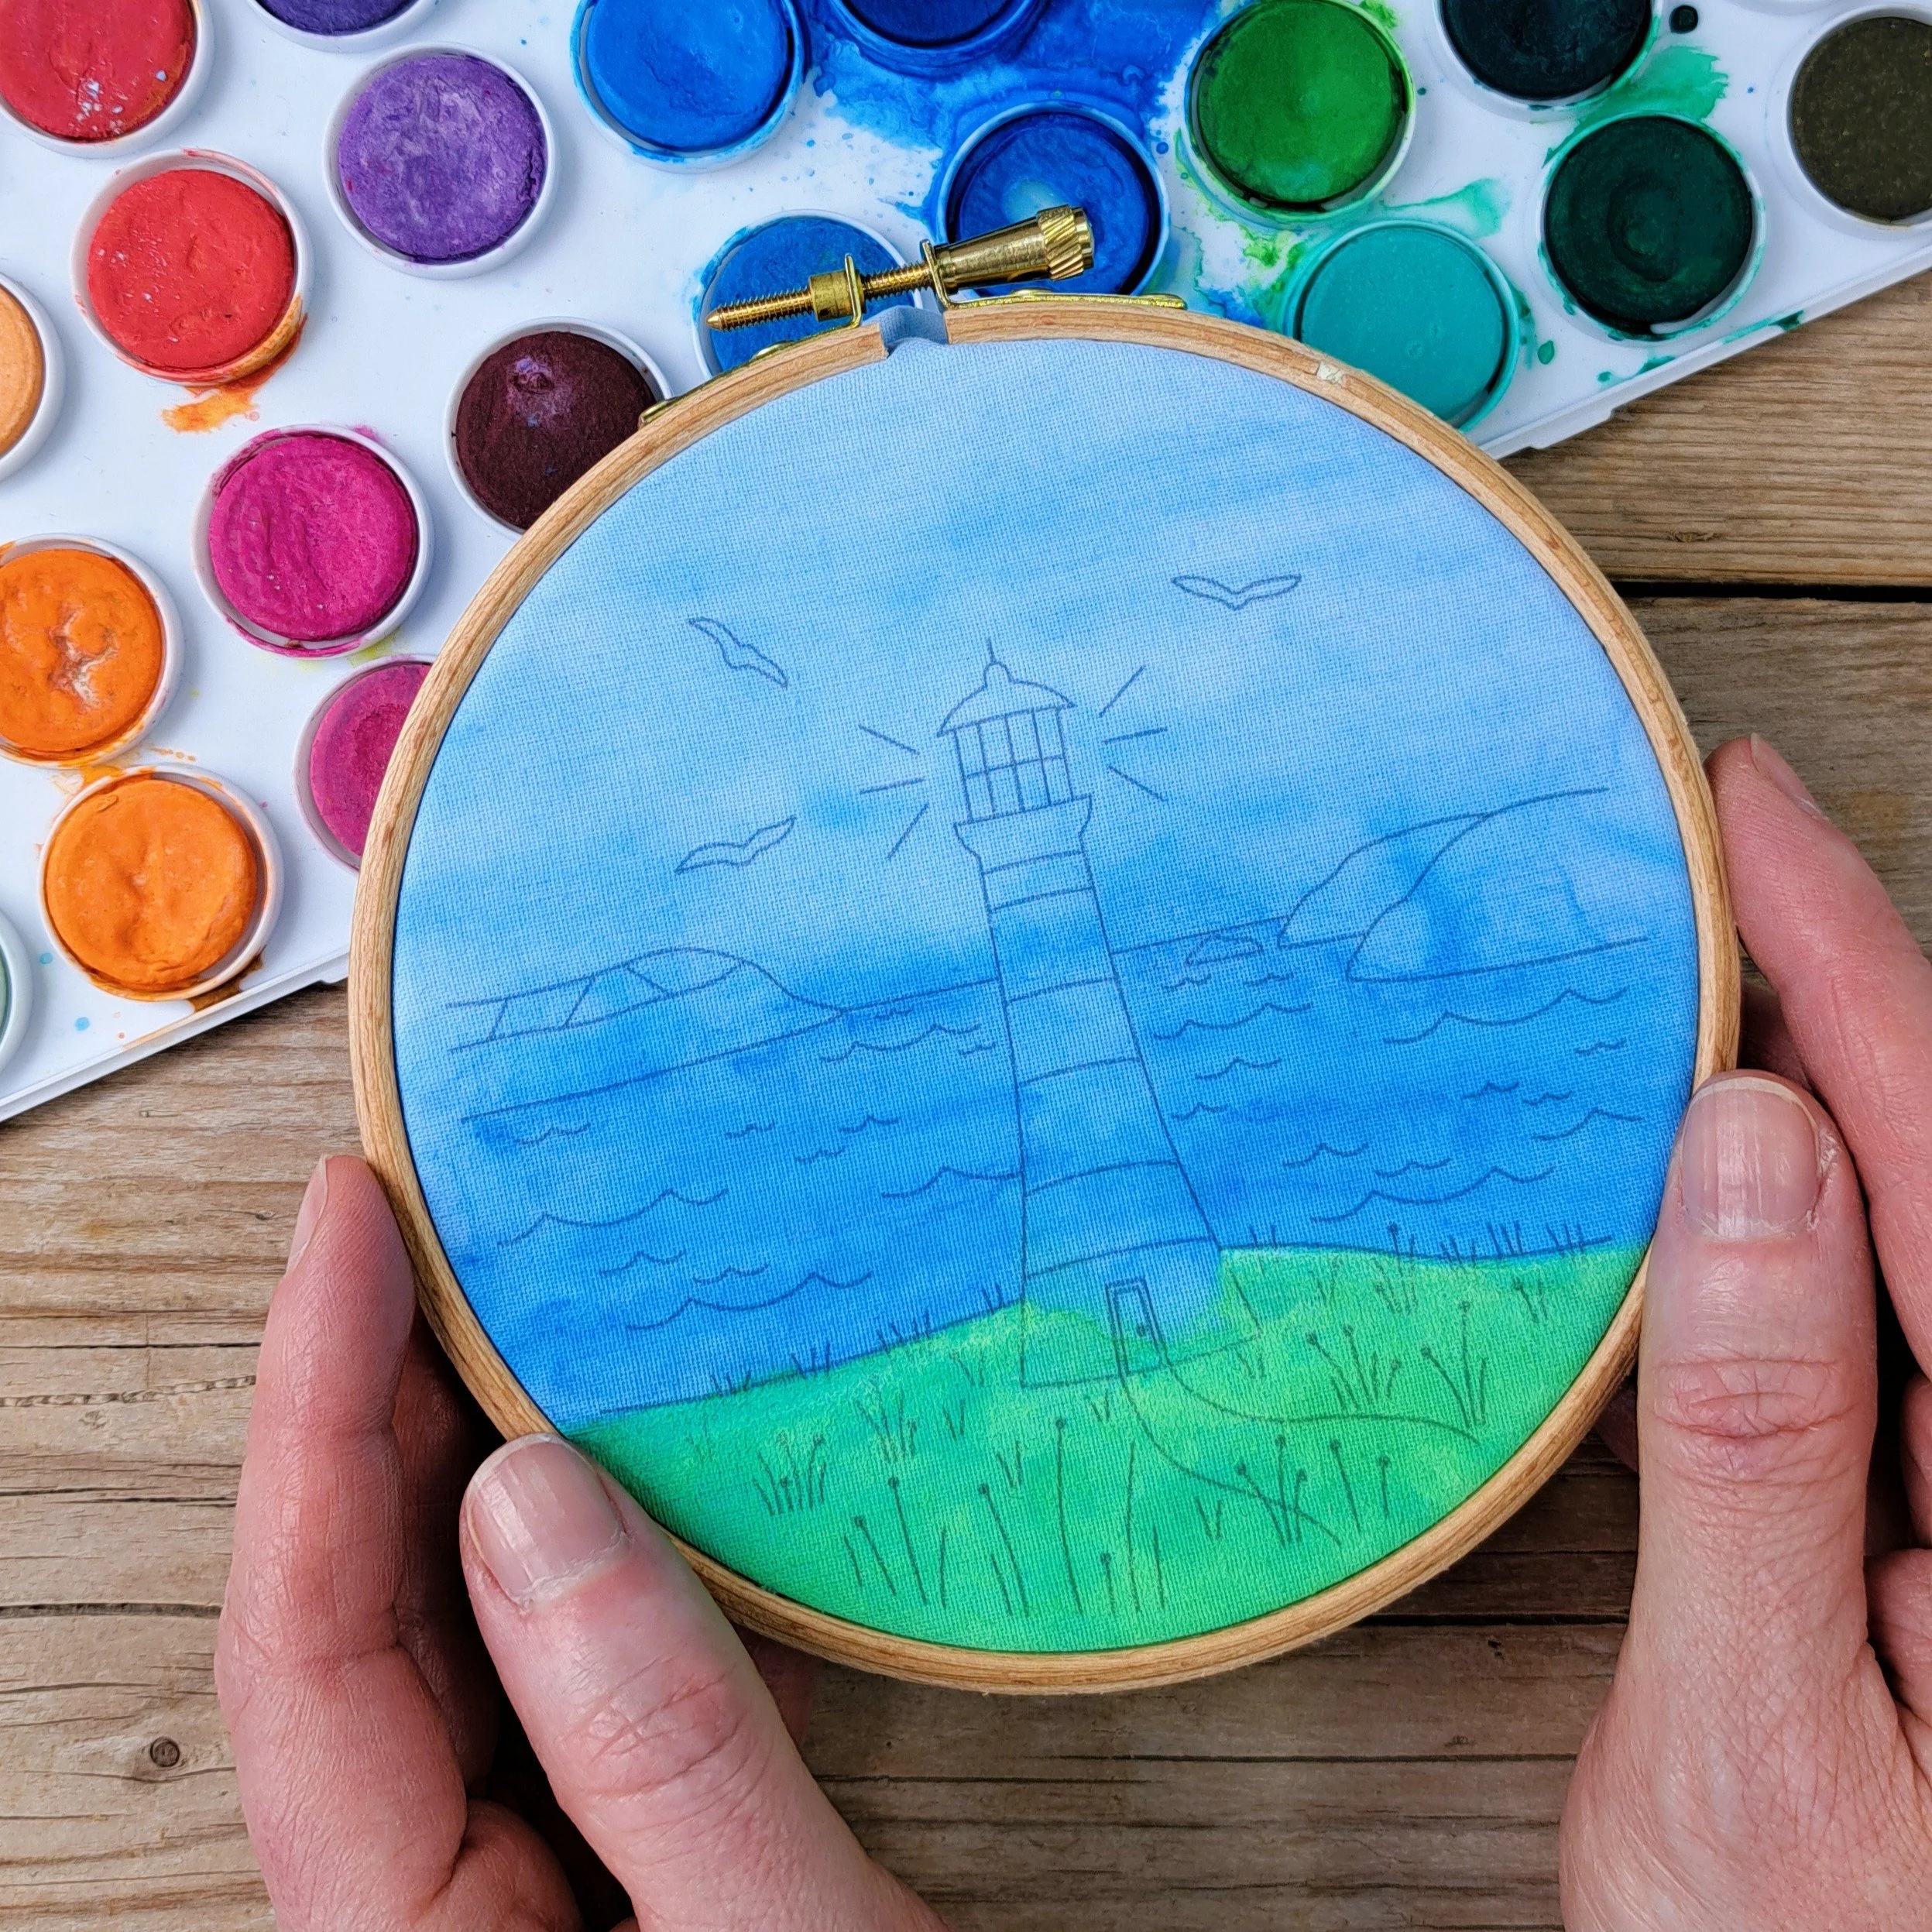
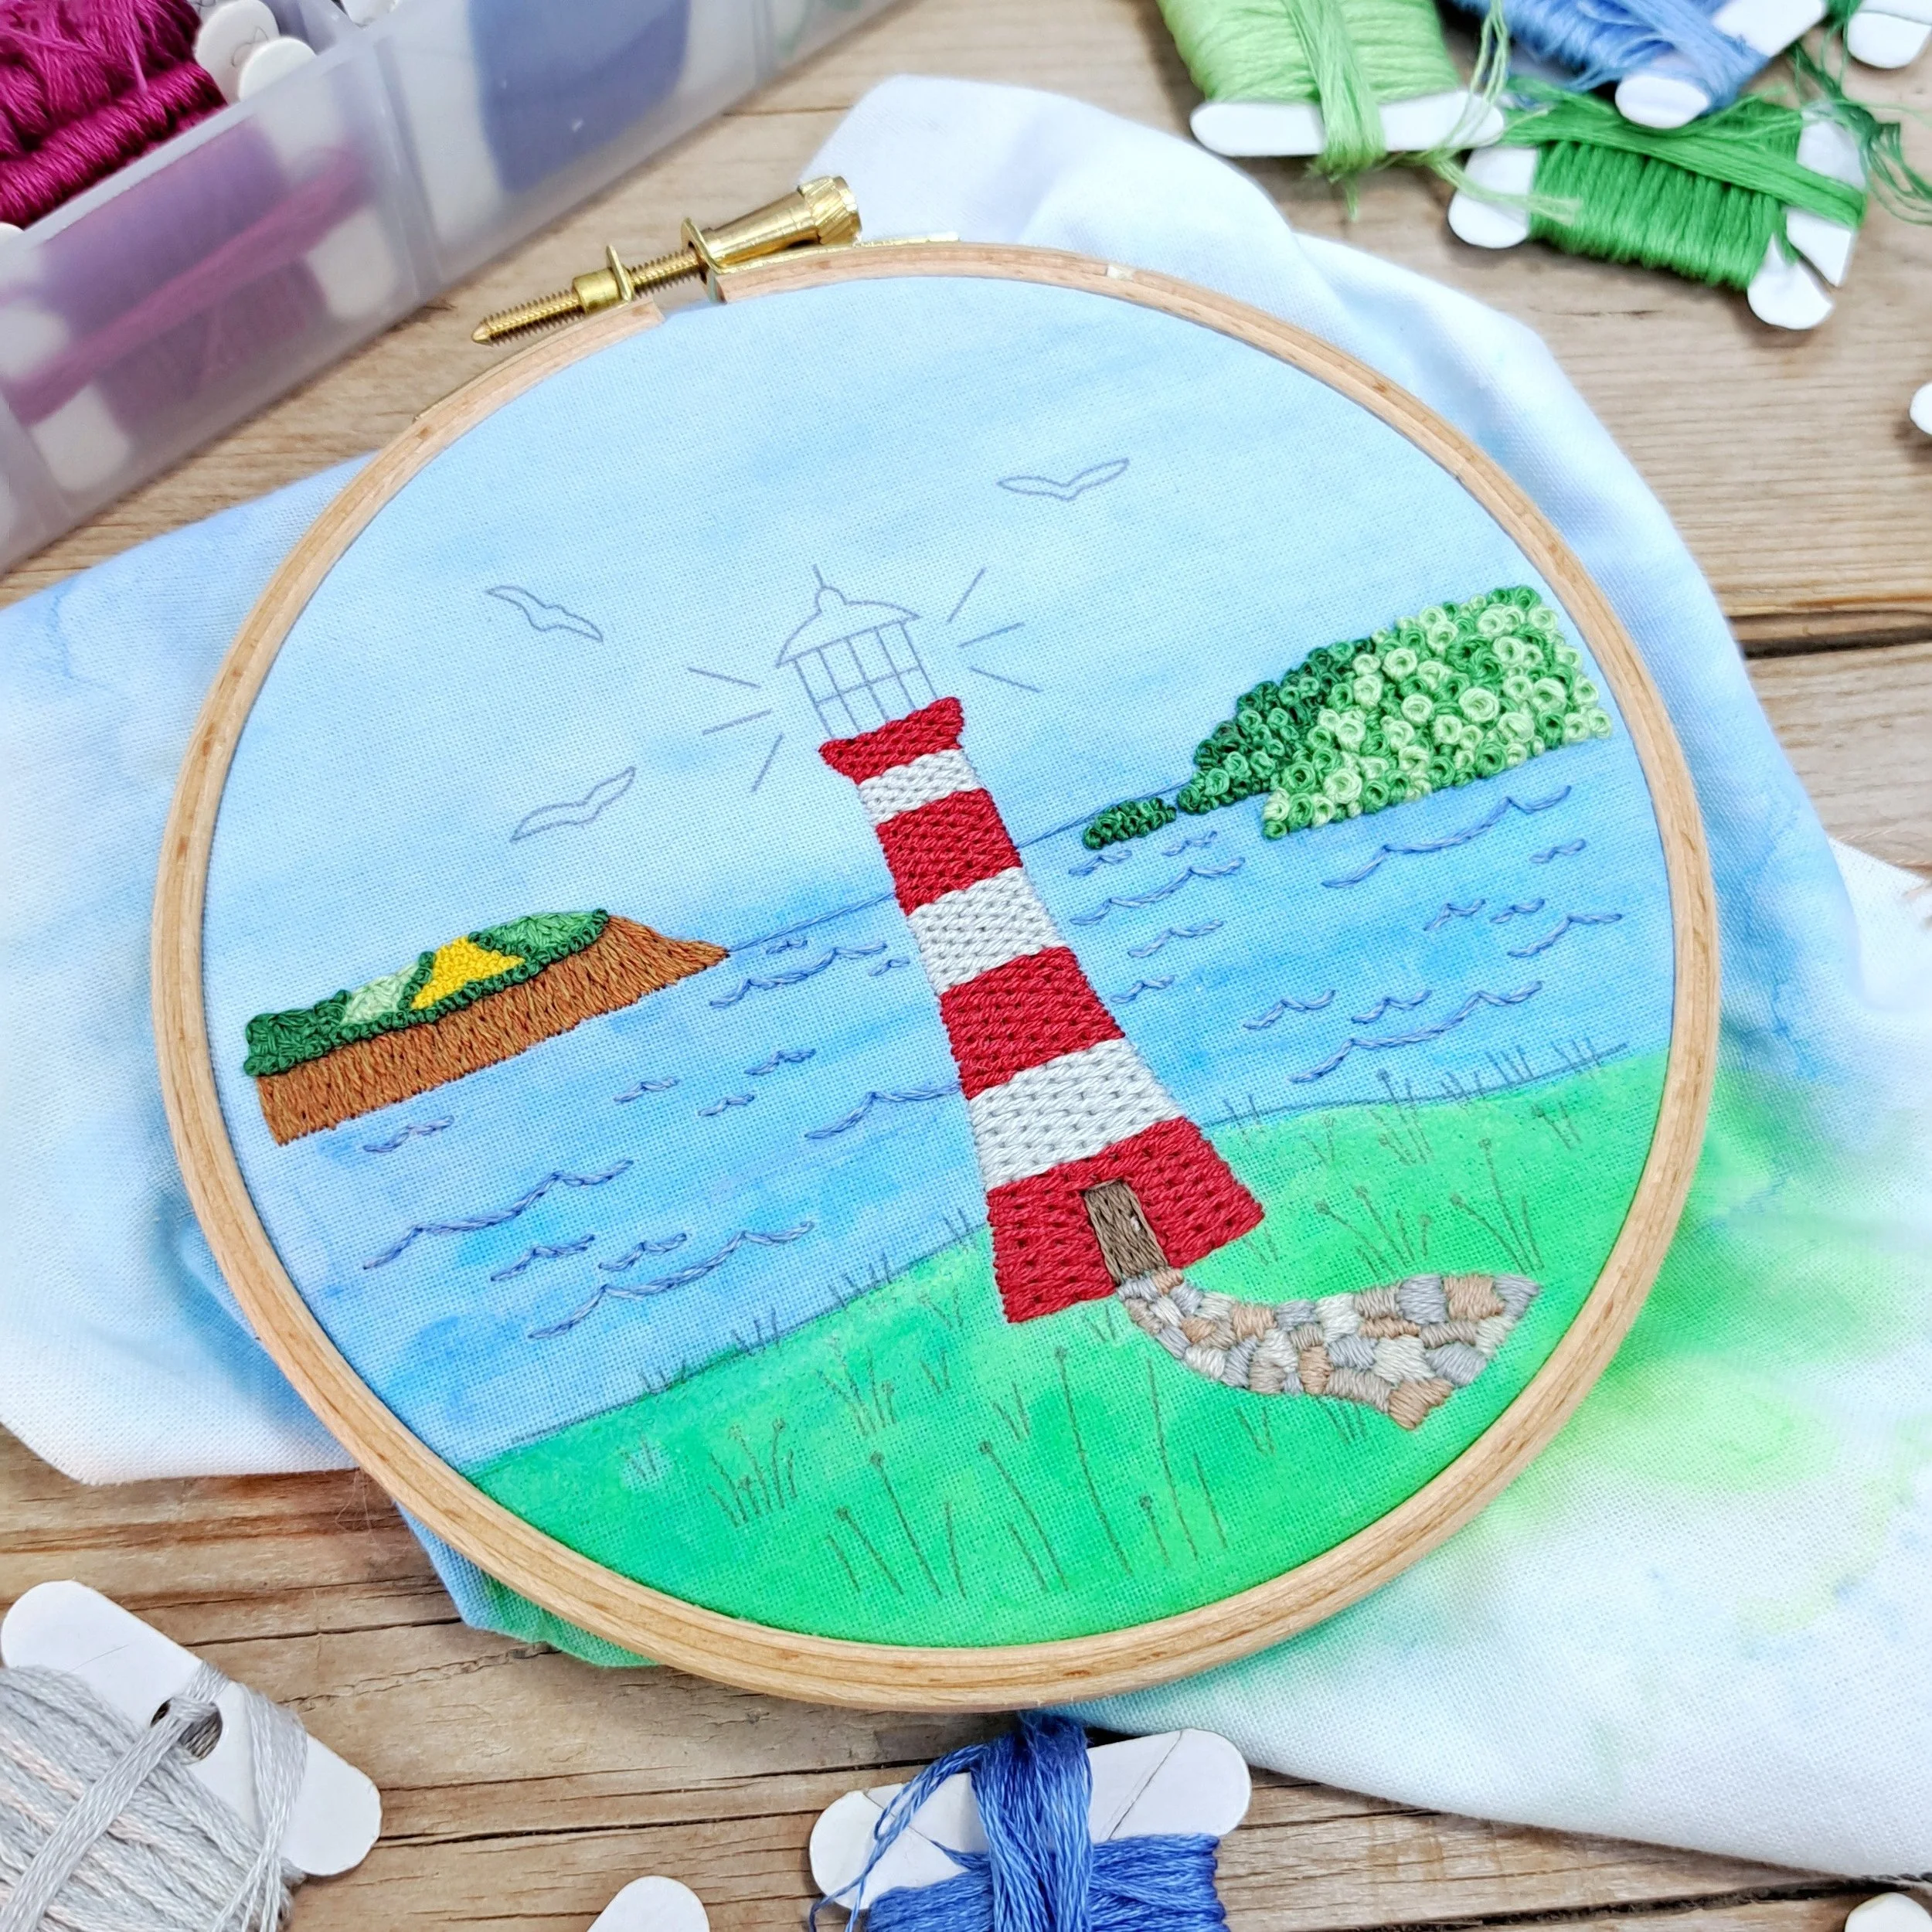
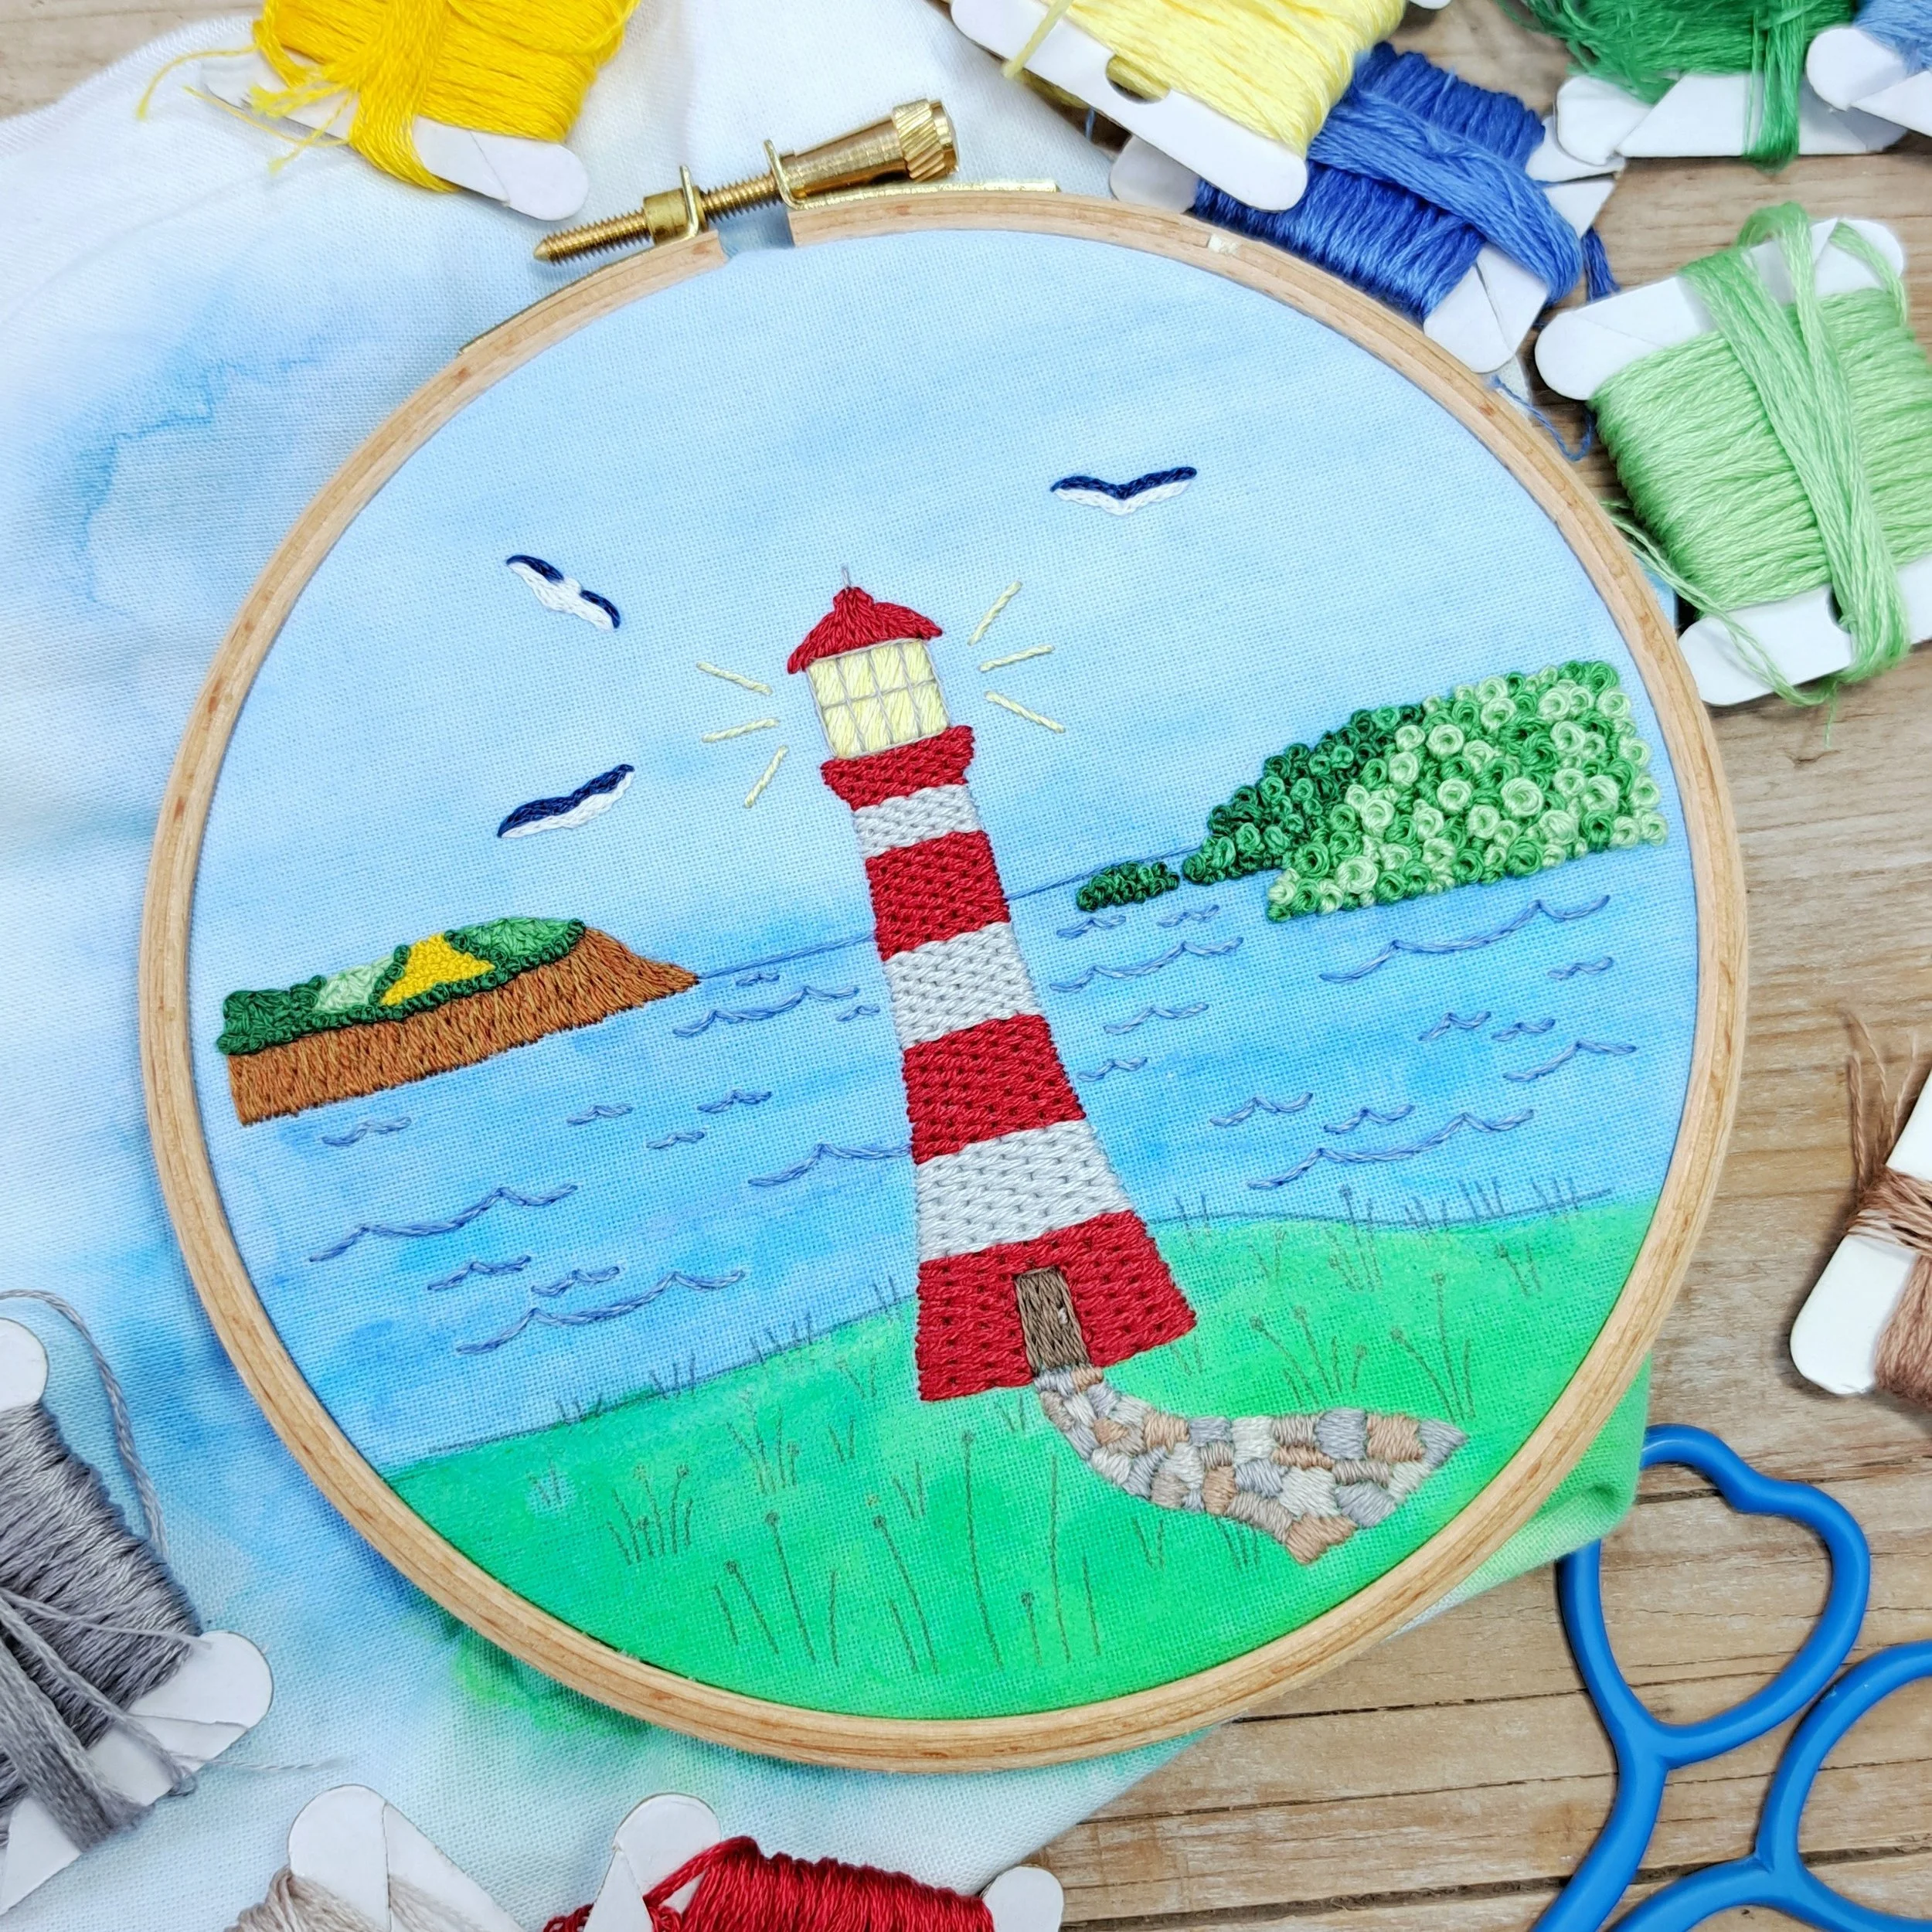
How I Stitched the Lighthouse Panel: A Step-by-Step Guide
This wasn’t the embroidery panel I thought I’d be stitching next – I was planning to do one of the birds (which I’m still really excited about, so that one’s definitely coming soon!). But after dropping off some stock at one of my lovely stockists on the Barbican in Plymouth, Devon (Rockpool Trading – if you’re in the area, it’s absolutely worth a visit!), I suddenly felt inspired to stitch the lighthouse.
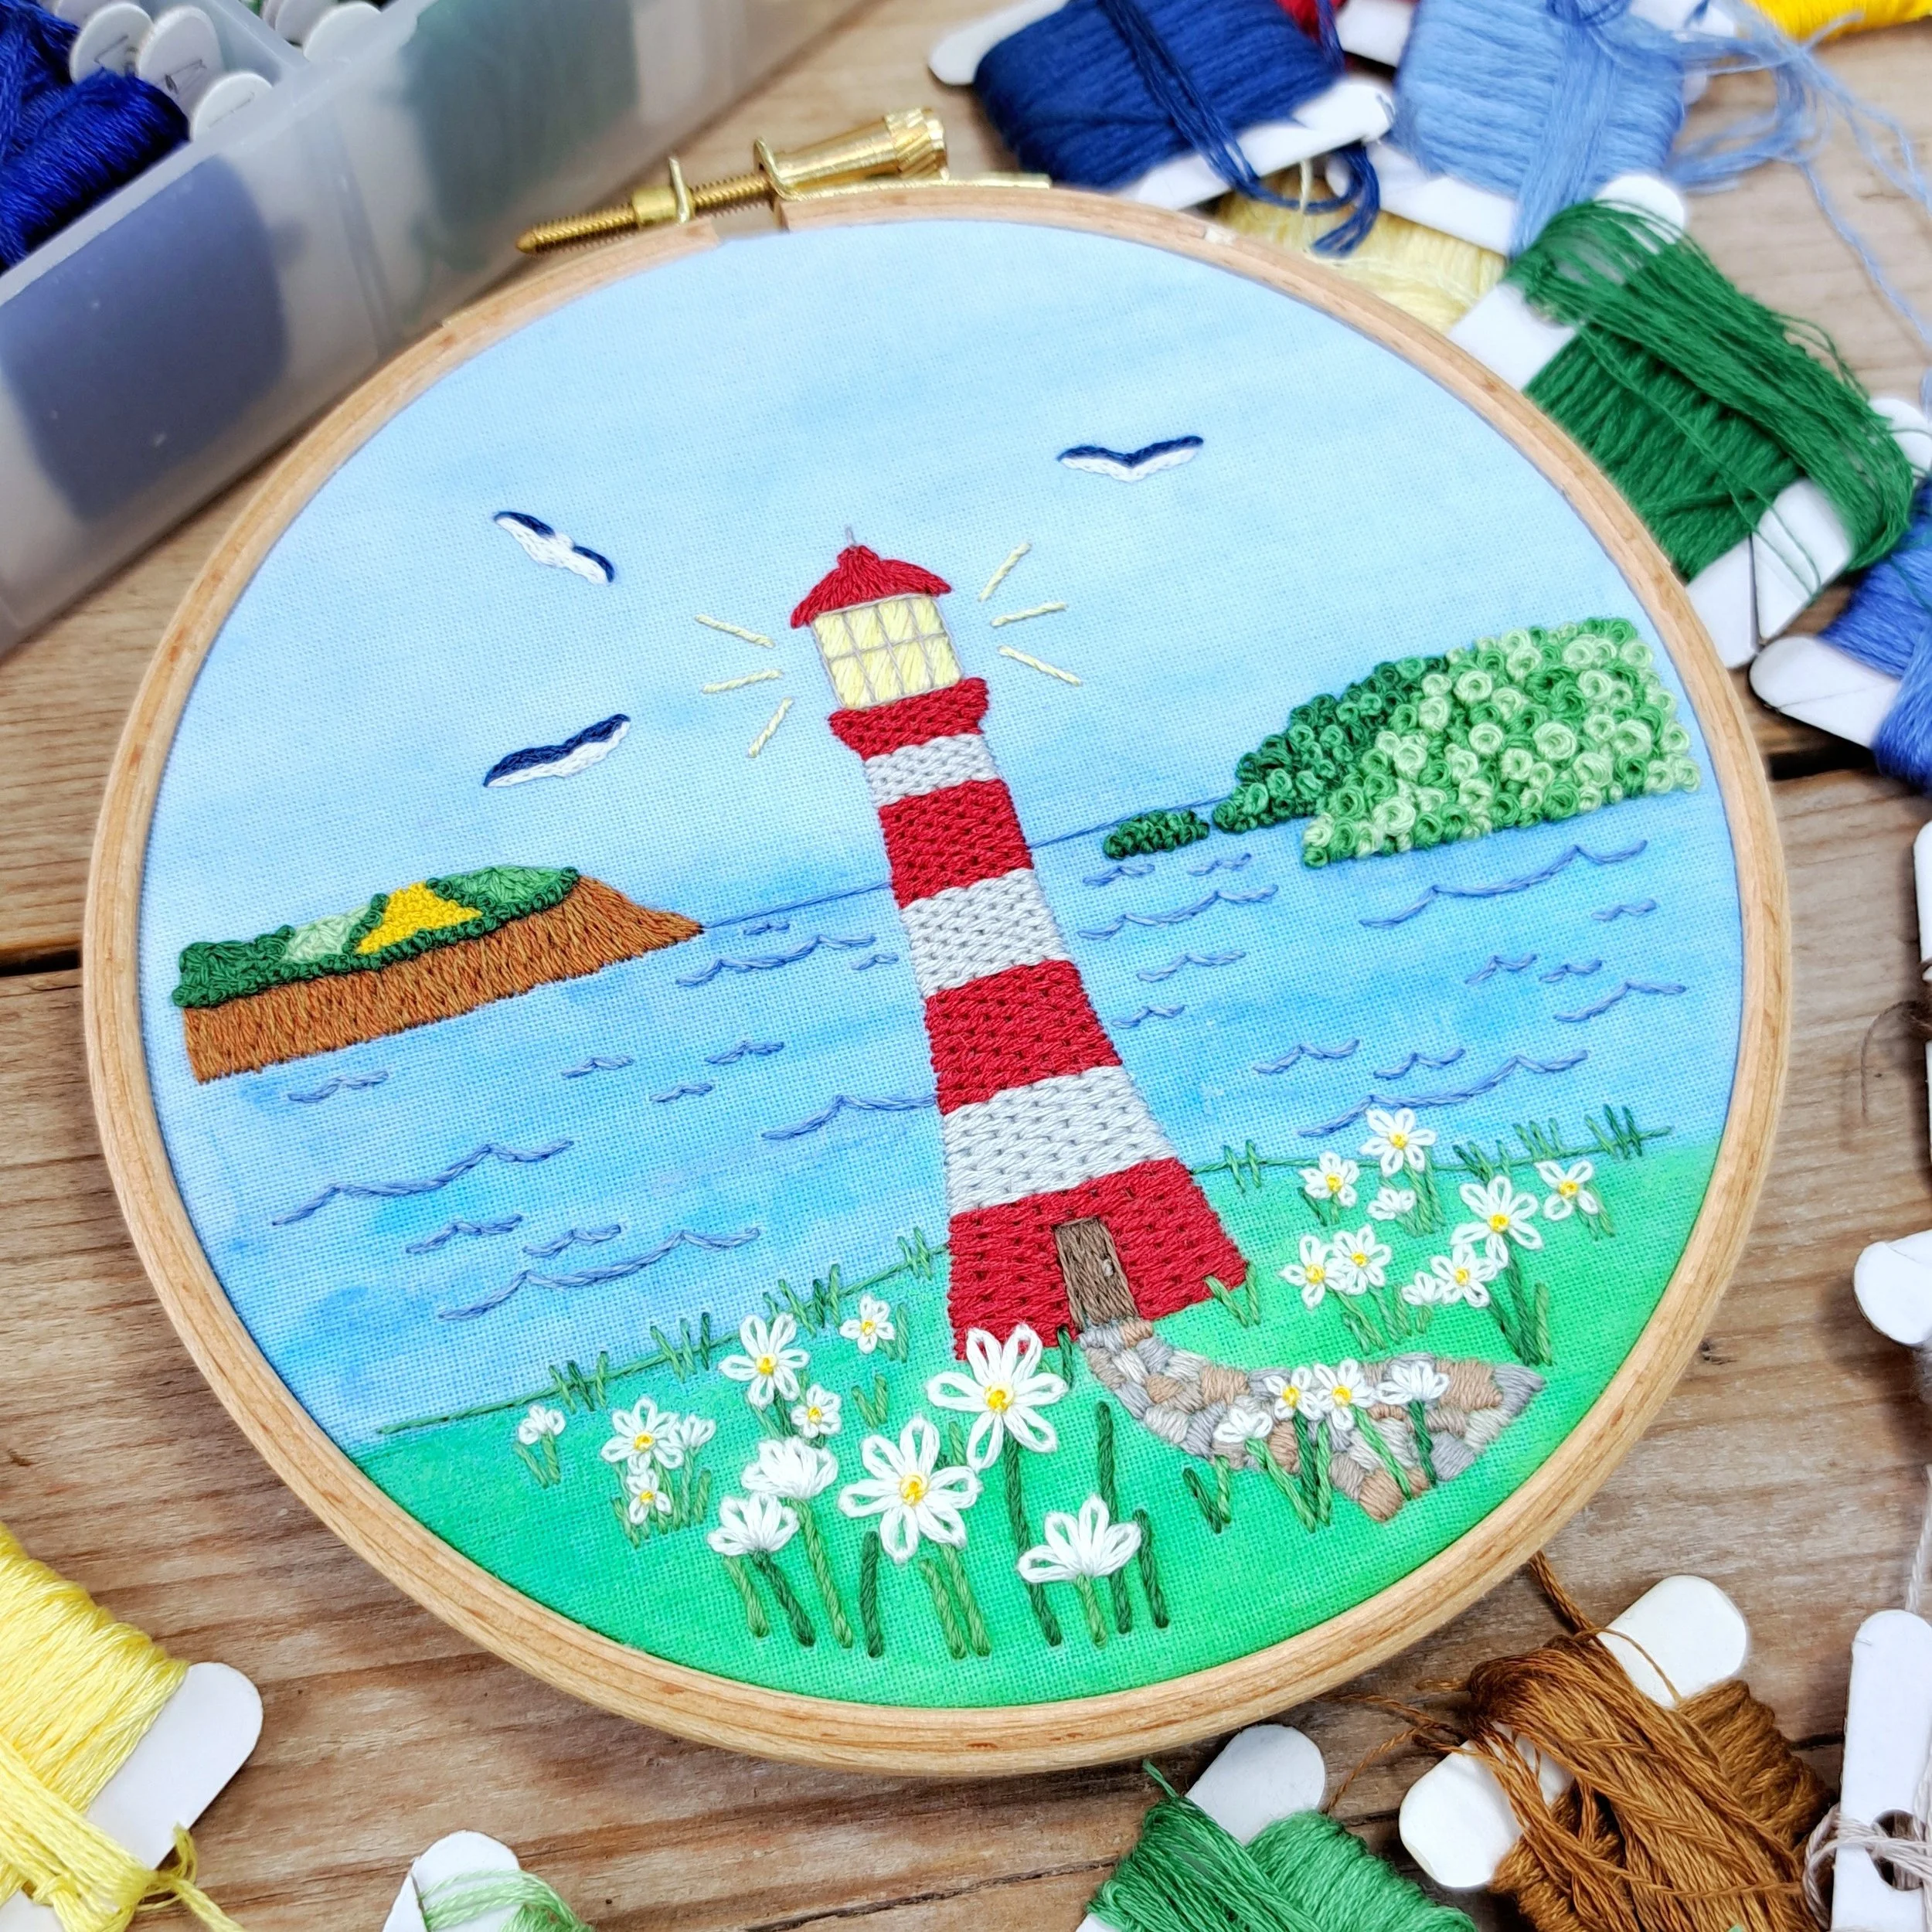
If you didn’t know, this design is based on Smeaton’s Tower, the iconic red and white lighthouse that sits proudly on Plymouth Hoe. It’s such a familiar landmark here in Devon – full of history and surrounded by gorgeous coastline – and I thought it was about time it got its moment in thread!
If you’ve just stumbled across me and my embroidery panels – hello and welcome! I’m Liz – the illustrator, maker and stitcher behind Bluebell Love. I’ve been stitching for many, many years now, and like most stitchers, I’ve built up quite the stash of embroidery threads. Some I bought because I just had to have the colour (magpie instincts), others are leftovers from kits, some were gifts, and a few I’m convinced just magically appeared 😏. And if you’re anything like me, I’m guessing you’ve got a good stash growing too!
That’s exactly why I created these embroidery panel designs – they’re pre-printed, so you can pop them straight into a hoop and get stitching, using all those lovely threads that deserve to be seen (not hidden away in a box!).
And just like with all of my embroidery panels… there are no rules 😄. Use your own colours, your favourite stitches, and stitch as much or as little as you like. Just the outlines, a few pops of colour, or cover every inch – go for it!
For this panel, I used 20 different thread colours from my stash (yes, twenty!). Of course, you don’t need that many – but the more the merrier, right? And if you’ve already got them to hand, why not use them?
Now that the lighthouse is all stitched up, I’ll walk you through exactly how I did it in this step-by-step guide. I’ll cover the stitches, threads, needle sizes, techniques, and share a few little tips along the way. I also played around with adding watercolour paint to the fabric before I started stitching – it’s a fun way to add more colour without stitching the whole hoop. I’ll show you how I did that too, but if it’s not your thing, feel free to skip ahead to the stitching part.
Let’s get stitching! 🪡
What You’ll Need
Time to gather your supplies! Here’s everything you’ll need to get started on your lighthouse embroidery panel:
A lighthouse embroidery panel
A 5” embroidery hoop
Some extra white fabric to double up inside your hoop
Embroidery needles (I’ll chat through sizes in a bit)
A selection of embroidery threads
A pair of sharp scissors
A fabric pen (I used two colours to mark out some stitching guidelines)
Watercolour paints
Paintbrushes
A cup of water (for the paints)
A plastic sheet to protect your surface (I used a bin liner – anything waterproof will do!)
And of course… a nice hot cuppa ☕ (or two!) 🤭
Don’t worry – I’ll talk through each of these in more detail below so you know exactly what I used and why.
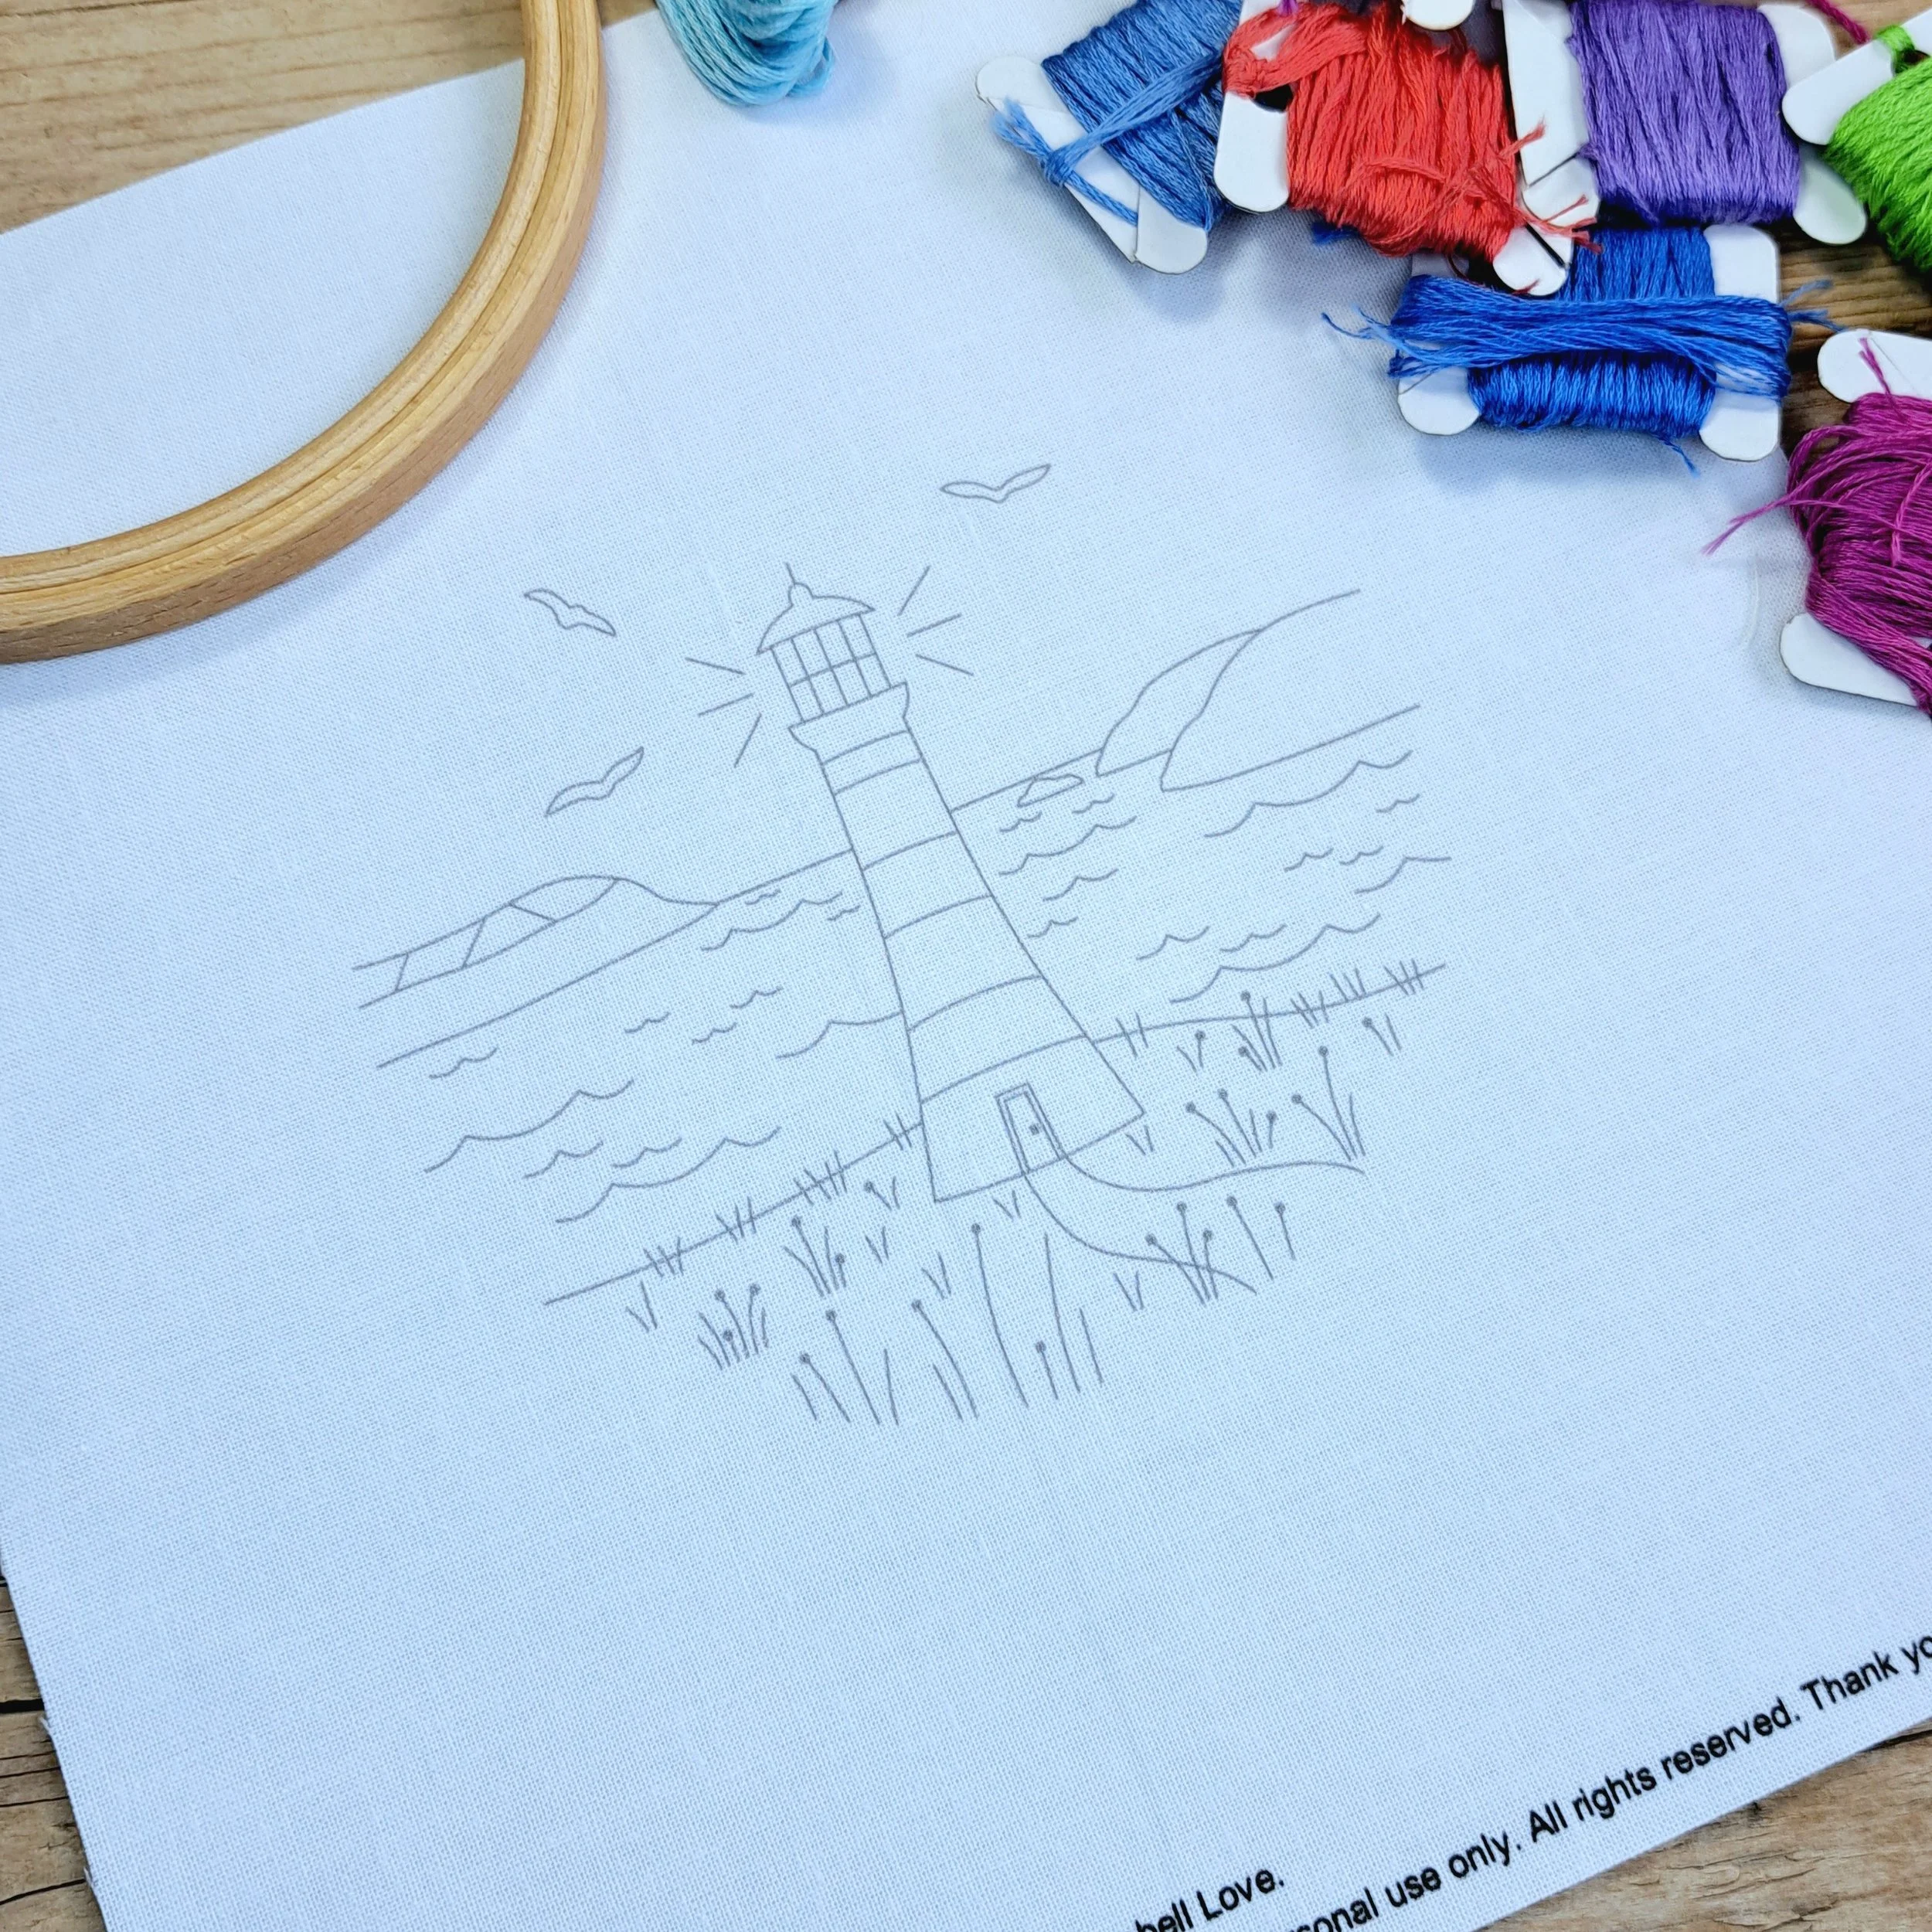
A Lighthouse Embroidery Panel
First up, you’ll need one of my Lighthouse embroidery panels. This design was digitally illustrated by me and printed onto 100% cotton fabric using eco-friendly, water-based pigment inks – all made right here in the UK 🌿
You can grab your panel from my shop here:
I also offer this design as part of a Panel Pack, which includes a 5” hoop and extra backing fabric – perfect if you’re just getting started or want everything bundled together 😊
A 5” Embroidery Hoop
This design fits snugly in a 5” hoop. I always recommend using a hardwood hoop – they’re more durable and hold a more consistent tension while stitching. Being a natural material, wooden hoops sometimes have little imperfections, but in my experience, hardwood ones tend to grip the fabric better and have fewer gaps.
Extra White Fabric
I highly recommend doubling up your fabric in the hoop!
I didn’t do this when I stitched the Rabbit Panel – and honestly, I really wish I had 😬 For this lighthouse panel, I added an extra layer of plain white cotton behind the printed panel, and it made such a difference. Especially if you’re leaving your background fabric white, this helps it stay crisper and prevents thread tails from showing through.
Even though I ended up adding watercolour to this panel, I still doubled up – it helped keep the tension nice and firm, and I didn’t want to risk the mistakes I made last time. So if you can, definitely go with two layers of fabric!
Embroidery Needles
The right needle can make a huge difference in how easy it is to stitch and how tidy your stitches turn out.
Embroidery needles come in different sizes, and here’s what to keep in mind:
Larger needles: Best for stitching with all 6 strands of embroidery thread. They create bigger holes in the fabric, so if you’re using fewer strands, your stitches might shift of leave gaps.
Smaller needles: Great for finer stitching with 1-2 strands. If used with too many strands, though, pulling the thread through smoothly can get tricky.
To keep things simple, I offer needle packs in my shop with six needles in three sizes:
Large needles: For stitching with 6 strands.
Medium needles: For stitching with 3–4 strands.
Small needles: For stitching with 1–2 strands.
I’ll refer to these sizes throughout the guide to help you follow along easily.
🧵 You can grab a needle pack from my shop here:
Embroidery Threads
For this project, I used a mix of Anchor and DMC 6-stranded cotton threads. Both are brilliant quality brands, with vibrant colours that hold up beautifully over time.
I picked my shades from my (very full!) thread stash – but feel free to choose colours that match your own vision for this little coastal scene. A rough colour plan can be handy before you start, but don’t be afraid to change your mind as you go. Sometimes a new colour just feels right in the moment!
Here’s the full list of the 20 colours I used:
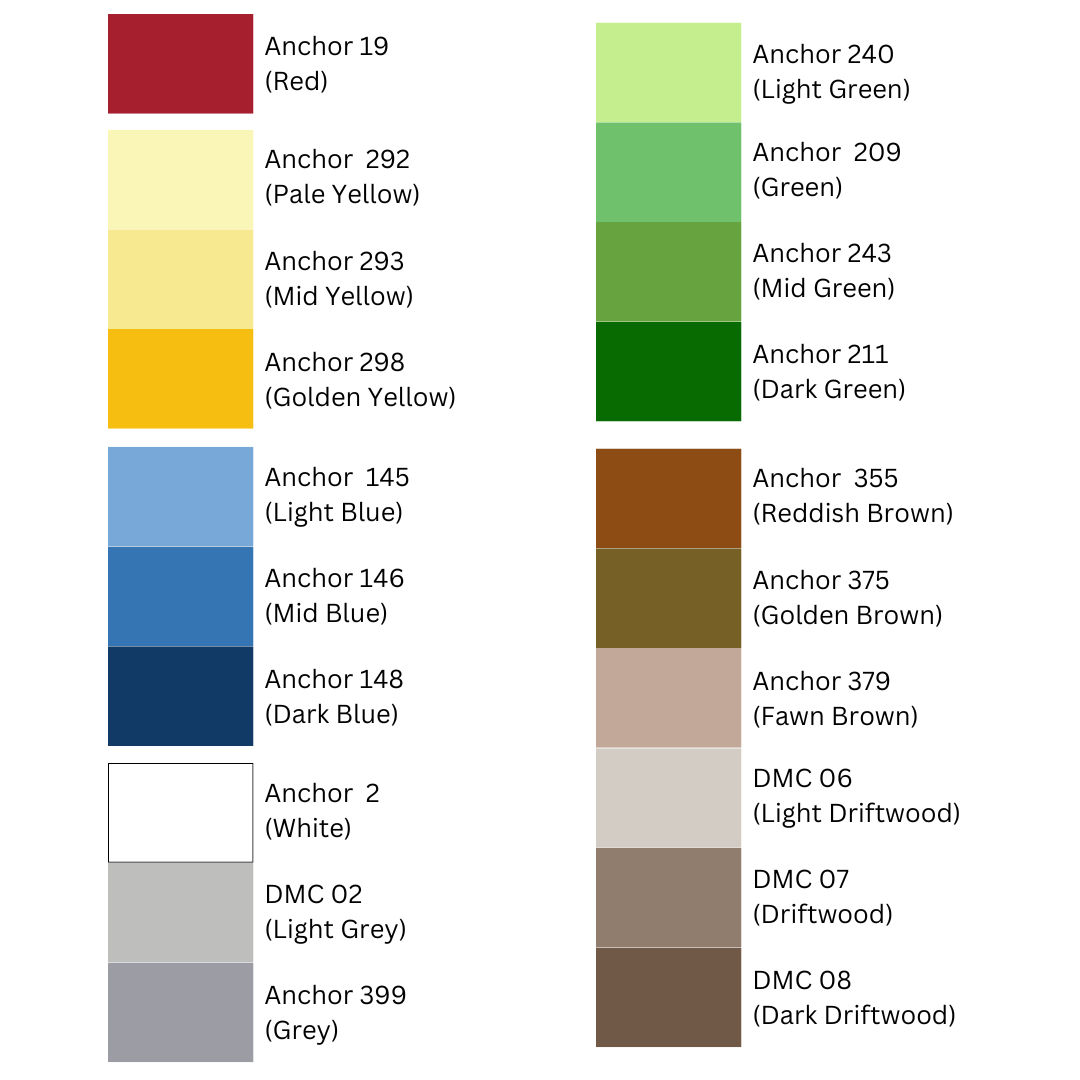
Anchor 19 - Red
Anchor 292 - Pale Yellow
Anchor 293 - Mid Yellow
Anchor 298 - Bright Yellow
Anchor 145 - Light Blue
Anchor 146 - Mid Blue
Anchor 148 - Dark Blue
Anchor 2 - White
DMC 02 - Light Grey
Anchor 399 - Grey
Anchor 240 - Light Green
Anchor 209 - Green
Anchor 243 - Mid Green
Anchor 211 - Dark Green
Anchor 355 - Reddish Brown
Anchor 375 - Golden Brown
Anchor 379 - Fawn Brown
DMC 06 - Light Driftwood
DMC 07 - Driftwood
DMC 08 - Dark Driftwood
Anchor and DMC threads are both numbered for easy reference, so if you’d like to match the colours I used exactly, just look for these numbers. But honestly – this is your project! Choose the colours that make you happy.
Scissors
Any sharp scissors will do the trick, but embroidery scissors are ideal. Their small, pointed blades help you trim threads cleanly and get into tight spaces without fraying the ends. If you don’t have embroidery scissors, no stress – any small, sharp pair from your sewing kit will work just fine.
Fabric Pen
I used two different colours of fabric pen to sketch out a few stitching guidelines on the lighthouse.
That said, since I completely covered the lighthouse in thread, you could absolutely just use a regular pencil instead. And you might find that you don’t need to draw guidelines at all – it all depends on your stitching style.
Watercolour Paints
For this project, I used a palette of watercolour paint blocks I picked up at my local craft shop. It had a lovely mix of colours – perfect for blending soft seaside tones for the lighthouse design.
You can use whatever watercolours you like: blocks, tubes, or even pencils. Just have fun with your colour choices and mix them to create the effect you want. I’d definitely recommend testing your paints on some scrap fabric first before diving straight onto your panel, just to get a feel for how the colours behave on fabric.
Paintbrushes
I used two brushes for this project:
– A larger round brush to wet the fabric
– A mid-sized brush for the actual painting
You don’t need these exact sizes – just use what you’ve got! A round brush works well for both broad washes and more detailed areas, and anything with a finer tip will be perfect for those smaller elements.
Cup of Water
Just a little container for rinsing your brush between colours – I use an old mug. Just try not to accidentally drink from it instead of your tea… but hey, it happens to the best of us 😏
A Plastic Sheet
Painting on fabric can be a bit messy, especially since the water and paint will soak through. I’d definitely recommend protecting your table with a waterproof sheet of some sort.
I just cut up a bin liner and taped it down to my desk – nothing fancy, but it does the job!
A Nice Hot Cuppa
I’m a tea girl… but you do you! 😊☕
2. Painting the Background
Watercolours are super simple to use and a lot of fun to play with. That said, they aren’t permanent, so they will wash out. This can be both a blessing and a bit of a curse. On one hand, if something doesn’t go to plan, you can just wash it out or layer over it with more paint and water to change it. But on the other hand, it’s not ideal if you’re planning to wash your embroidery once it’s finished - so mine is staying happily in its hoop on the wall!
✨ A Few Watercolouring Tips
Protect your table with a plastic sheet (I used a bin liner).
Wipe down the plastic sheet between each stage - paint and water can collect underneath, and if you don’t wipe it off, it might bleed onto the front of your fabric.
Keep holding your embroidery hoop over your fabric to check you’ve painted all the areas you want to include.
Avoid oversaturating your paints. Too much pigment can make the fabric stiff, which makes stitching trickier. Keep your paints watered down for a smoother application.
Watercolours always dry lighter than they appear when freshly painted, so I recommend testing your colours on a scrap piece of fabric first. It’s a great way to play around with techniques and get a feel for how they’ll look.
The Process
First things first: protect your table. I used a bin liner cut open and taped it tightly to my desk with masking tape. Pulling it taut helps avoid any wrinkles that could collect water or paint. Then I laid the embroidery panel on top, ready to go.
Have a Rough Plan
I knew I wanted the sea to be a darker blue, and the sky a lighter shade - but both areas with that lovely patchy, blended look that watercolours give. I’d already planned to completely stitch over the headlands, lighthouse and gulls, so I wasn’t worried about painting over those areas.
The Techniques
There are a few different ways to use watercolours on fabric. The two I used here are often called:
• Wet on Wet – where you paint onto wet fabric for a soft, blended look.
• Wet on Dry – where you paint onto dry fabric for more control over where your paint goes.
Painting the Sky and Sea
I used the wet on wet technique here since I didn’t mind if the sky and sea bled into each other a little.
First, I used my large round brush to wet the entire panel with clean water. Then I picked up paint with my smaller brush - just dipping it into the watercolour and gently brushing it onto the fabric.
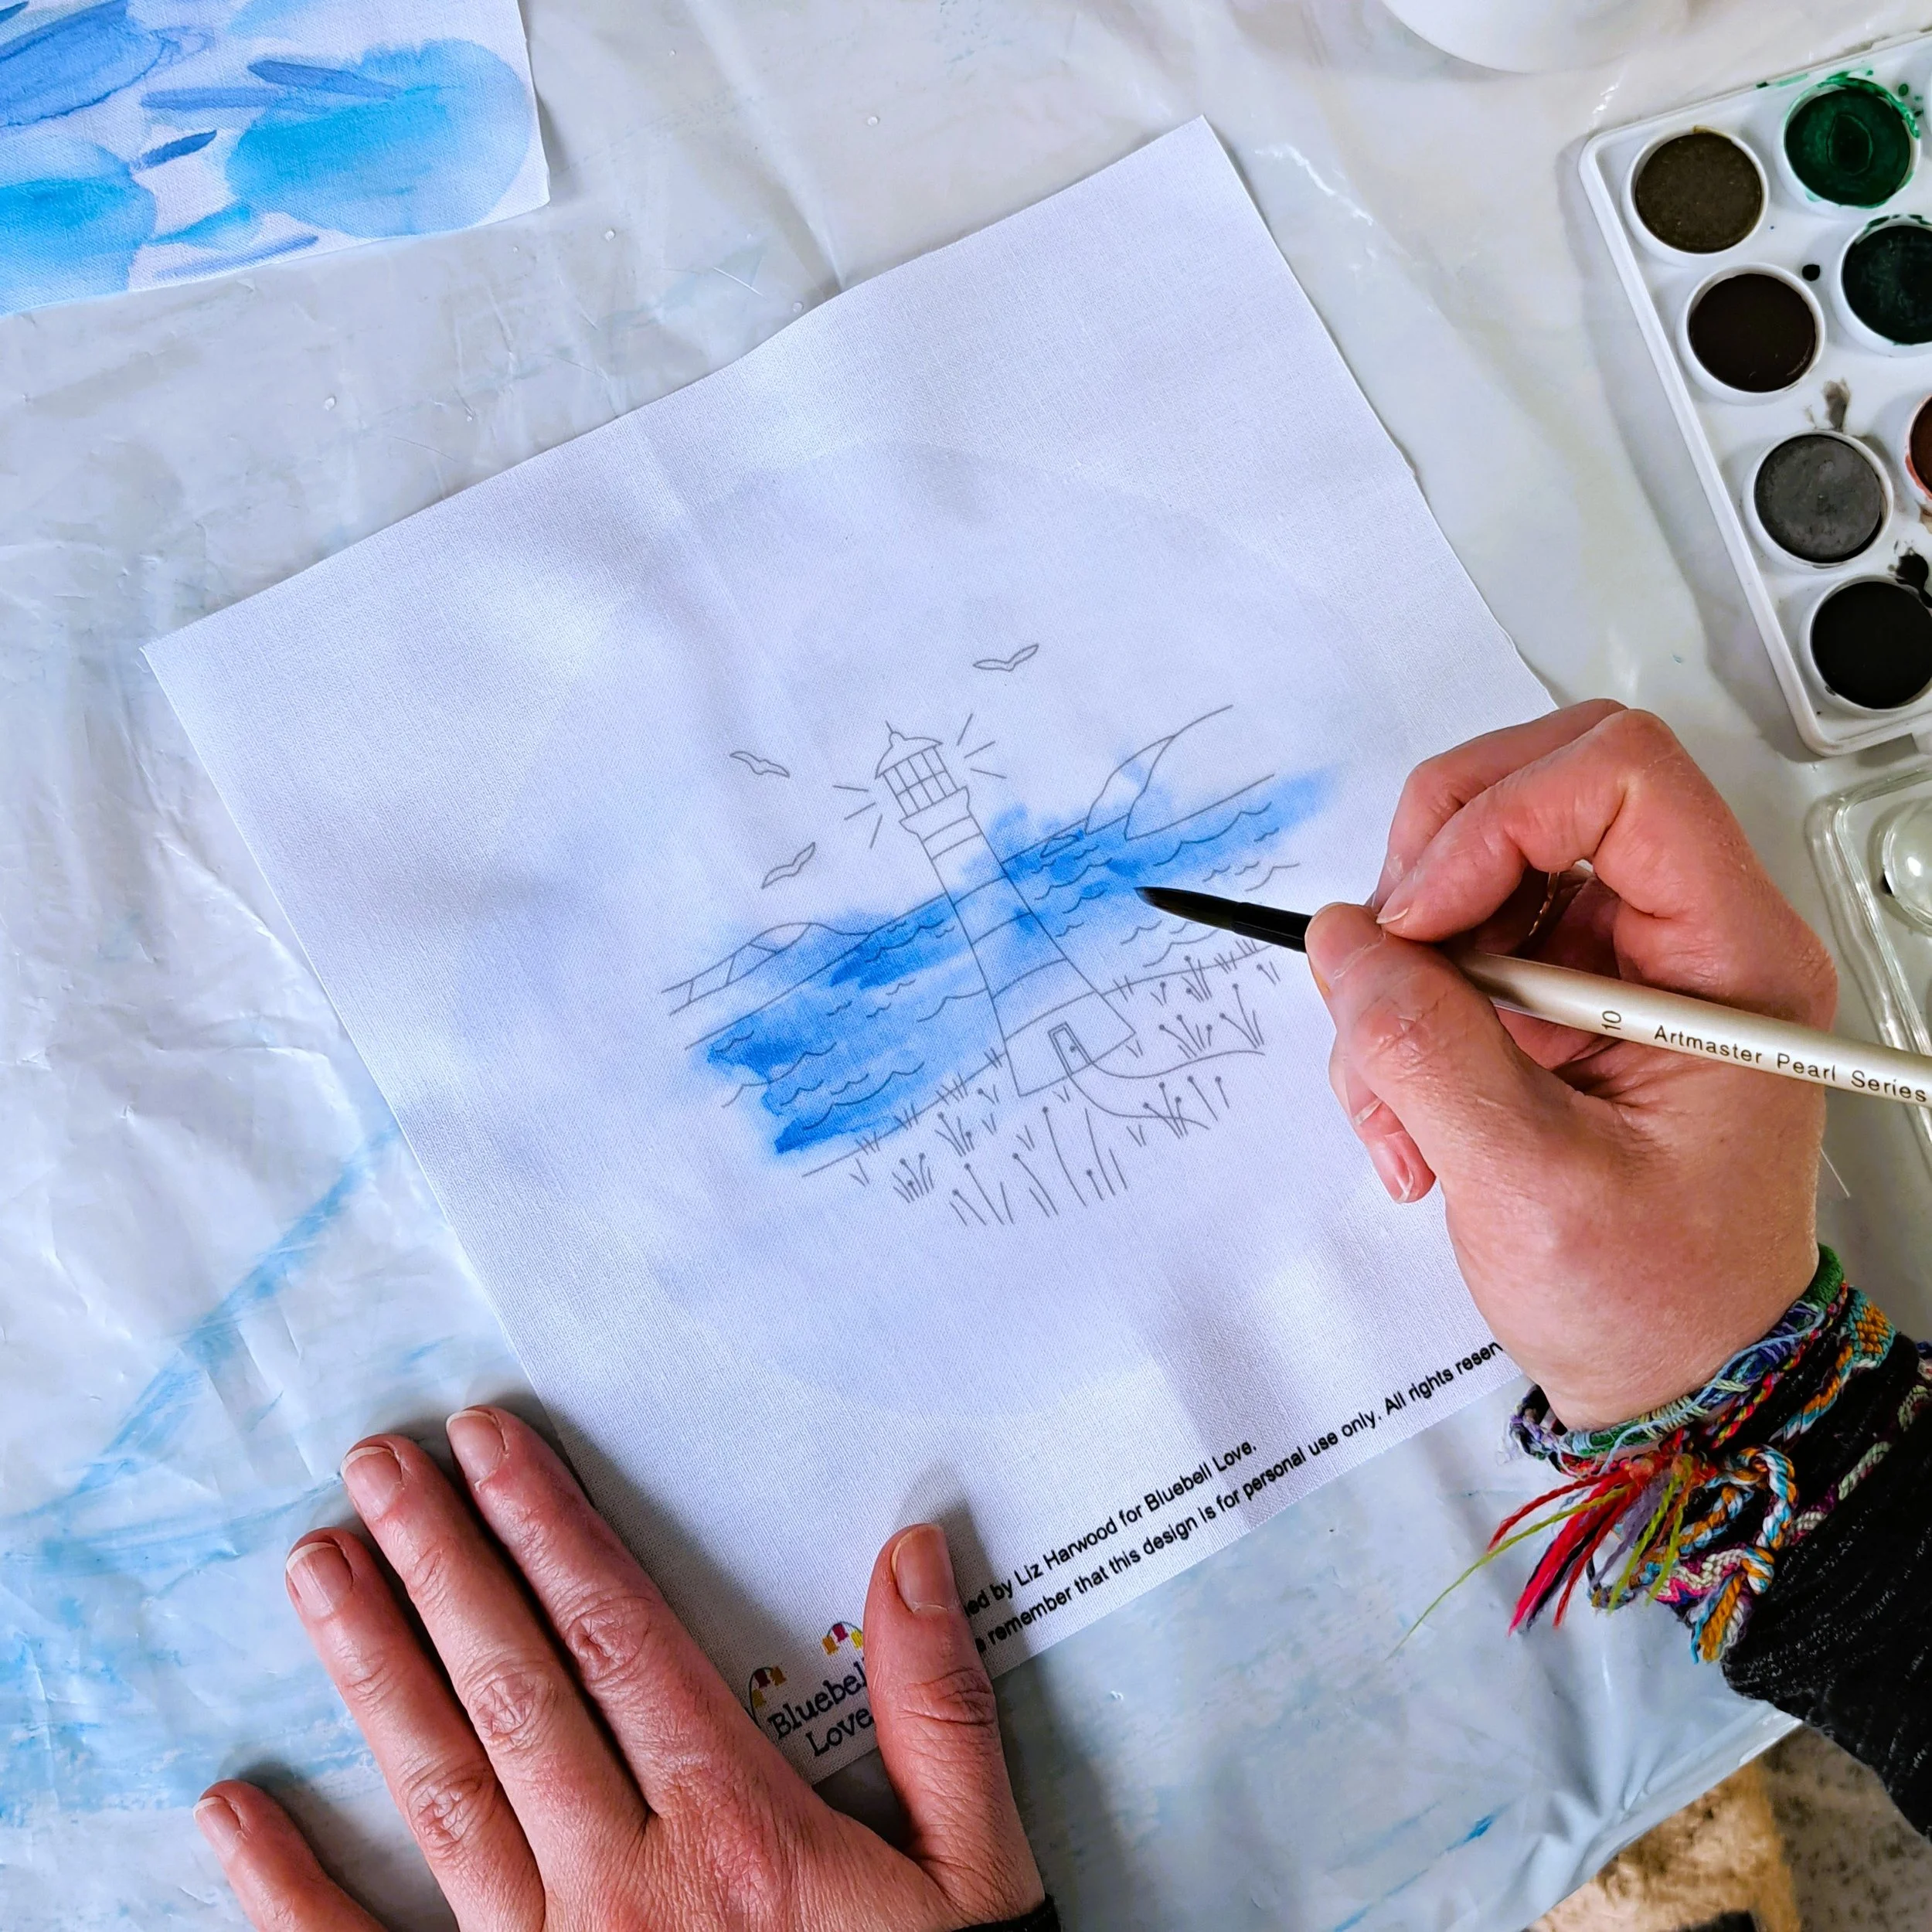
For the sea, I used a few of my darker blues, and for the sky some lighter shades. The water helped them blend beautifully together. If I wasn’t happy with an area, I either added more paint, or softened it with plain water. So forgiving!
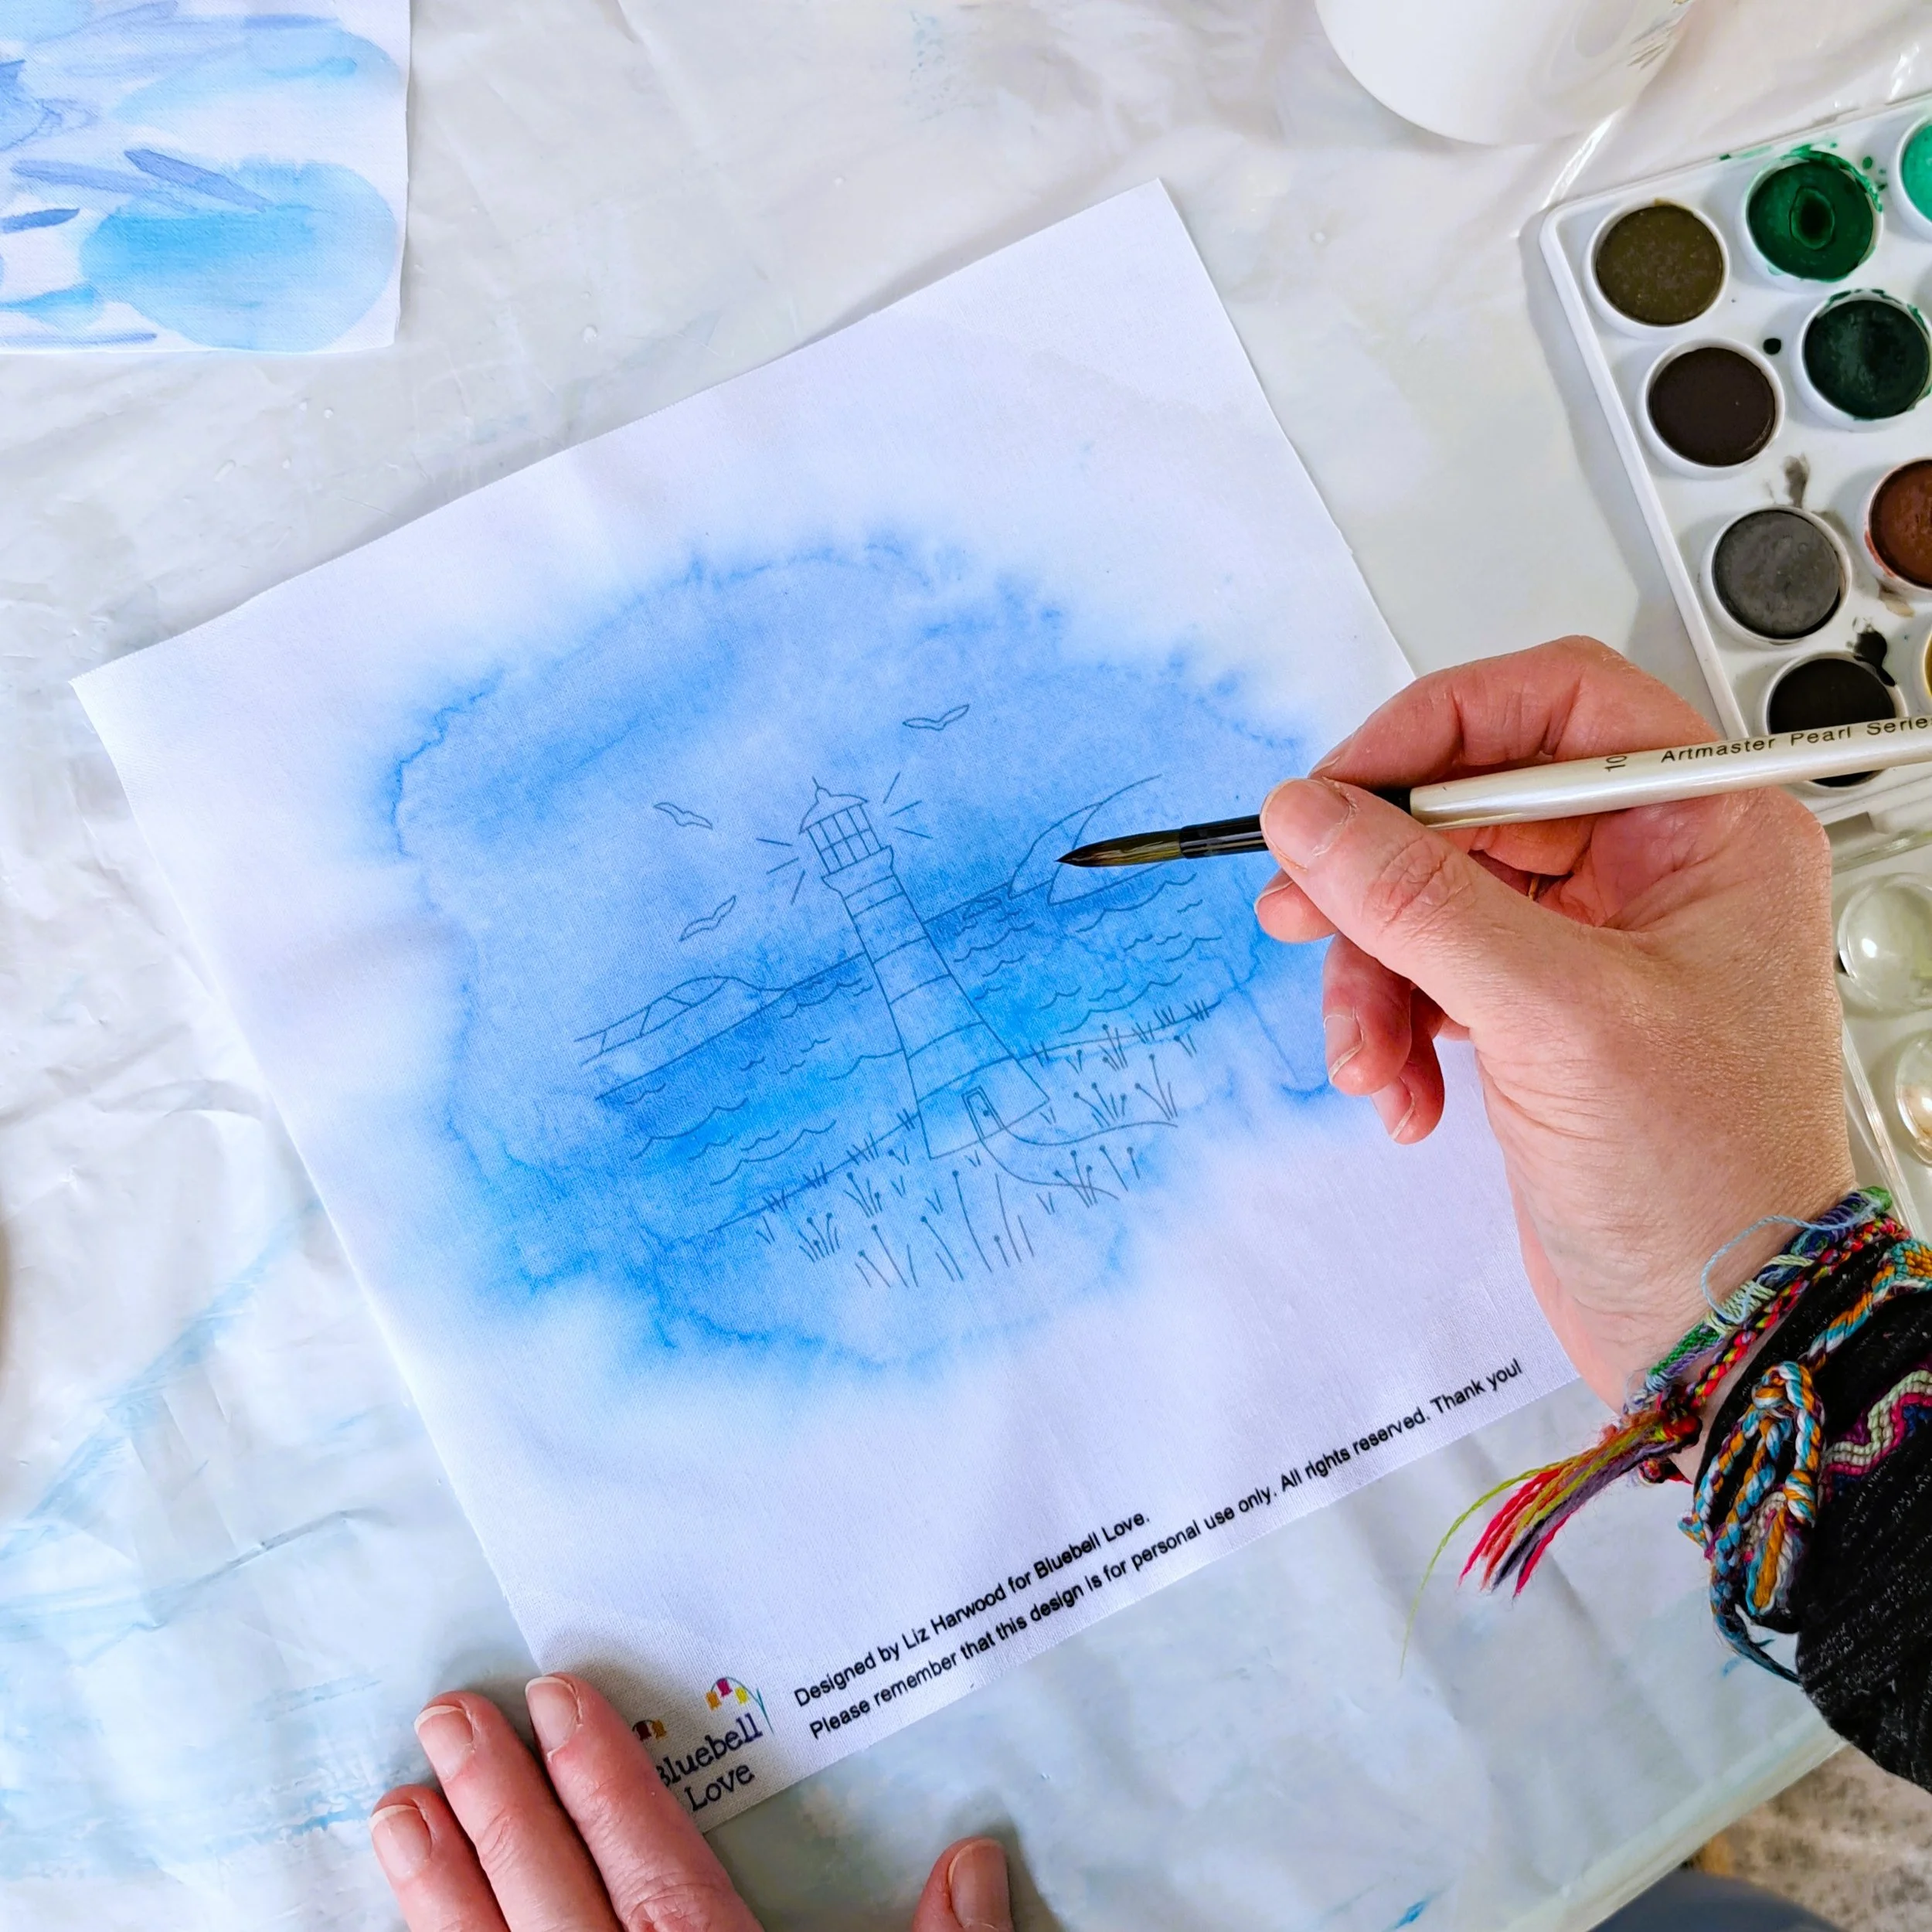
Now, my sea did bleed slightly into the grass section. I wasn’t too concerned, since I planned to cover that area with green paint, but I didn’t want to risk a harsh colour line where the paint stopped. So I brought the blue all the way down to the base of the grass - just to blend things more naturally.
I also tried adding a bit more paint around the headlands to create shadows, but once it dried you couldn’t really see the difference. Watercolours definitely lighten as they dry!
After that, I dried the fabric completely. I’m not patient, so I used a hairdryer 😅 Just make sure you keep the panel flat while it dries - if you hang it up while it’s still wet, the paint will run. Also, remember to give your plastic sheet a wipe at this point in case any paint puddles have formed underneath.
Painting the Grass
For the cliff edge and grass, I switched to the wet on dry technique to keep it more controlled. I didn’t want the green to mix with the sea and turn a murky shade!
I started by wetting my green paint with water and using a dry brush to carefully run it along the cliff edge. I’ll be honest here - I don’t think I’ve quite mastered this technique yet 😅 I know I told you to test it first… and I did… but in the end I just went for it with my “what’s the worst that could happen?” head on.

Luckily, it worked out! I managed to keep the green paint mostly on the right side of the cliff line - hurrah! I actually used a bluey-green shade in this area, thinking that if it did bleed, it would blend better with the blues from the sea.
Once I was happy with the edge, I continued painting onto the dry fabric to fill in the rest of the grass. At that point the fabric became wet again, so I added in a few other green shades - just like I did for the sky and sea.

✨A little tip:
Don’t overload your fabric. I definitely got a little carried away here and added too much paint (and therefore water). My grass bled slightly into the sea, which left a faint colour shift. It became less obvious once it had dried. If you look closely, you might see it - but I don’t think it’s obvious. I’ll disguise it with some clever stitching anyway!
I did consider painting the path too… but honestly, I thought I’d end up making a mess. So I decided to quit while I was ahead 😄 I gave the panel one final blast with the hairdryer to make sure I was happy with the results before I packed up all the painting bits away.
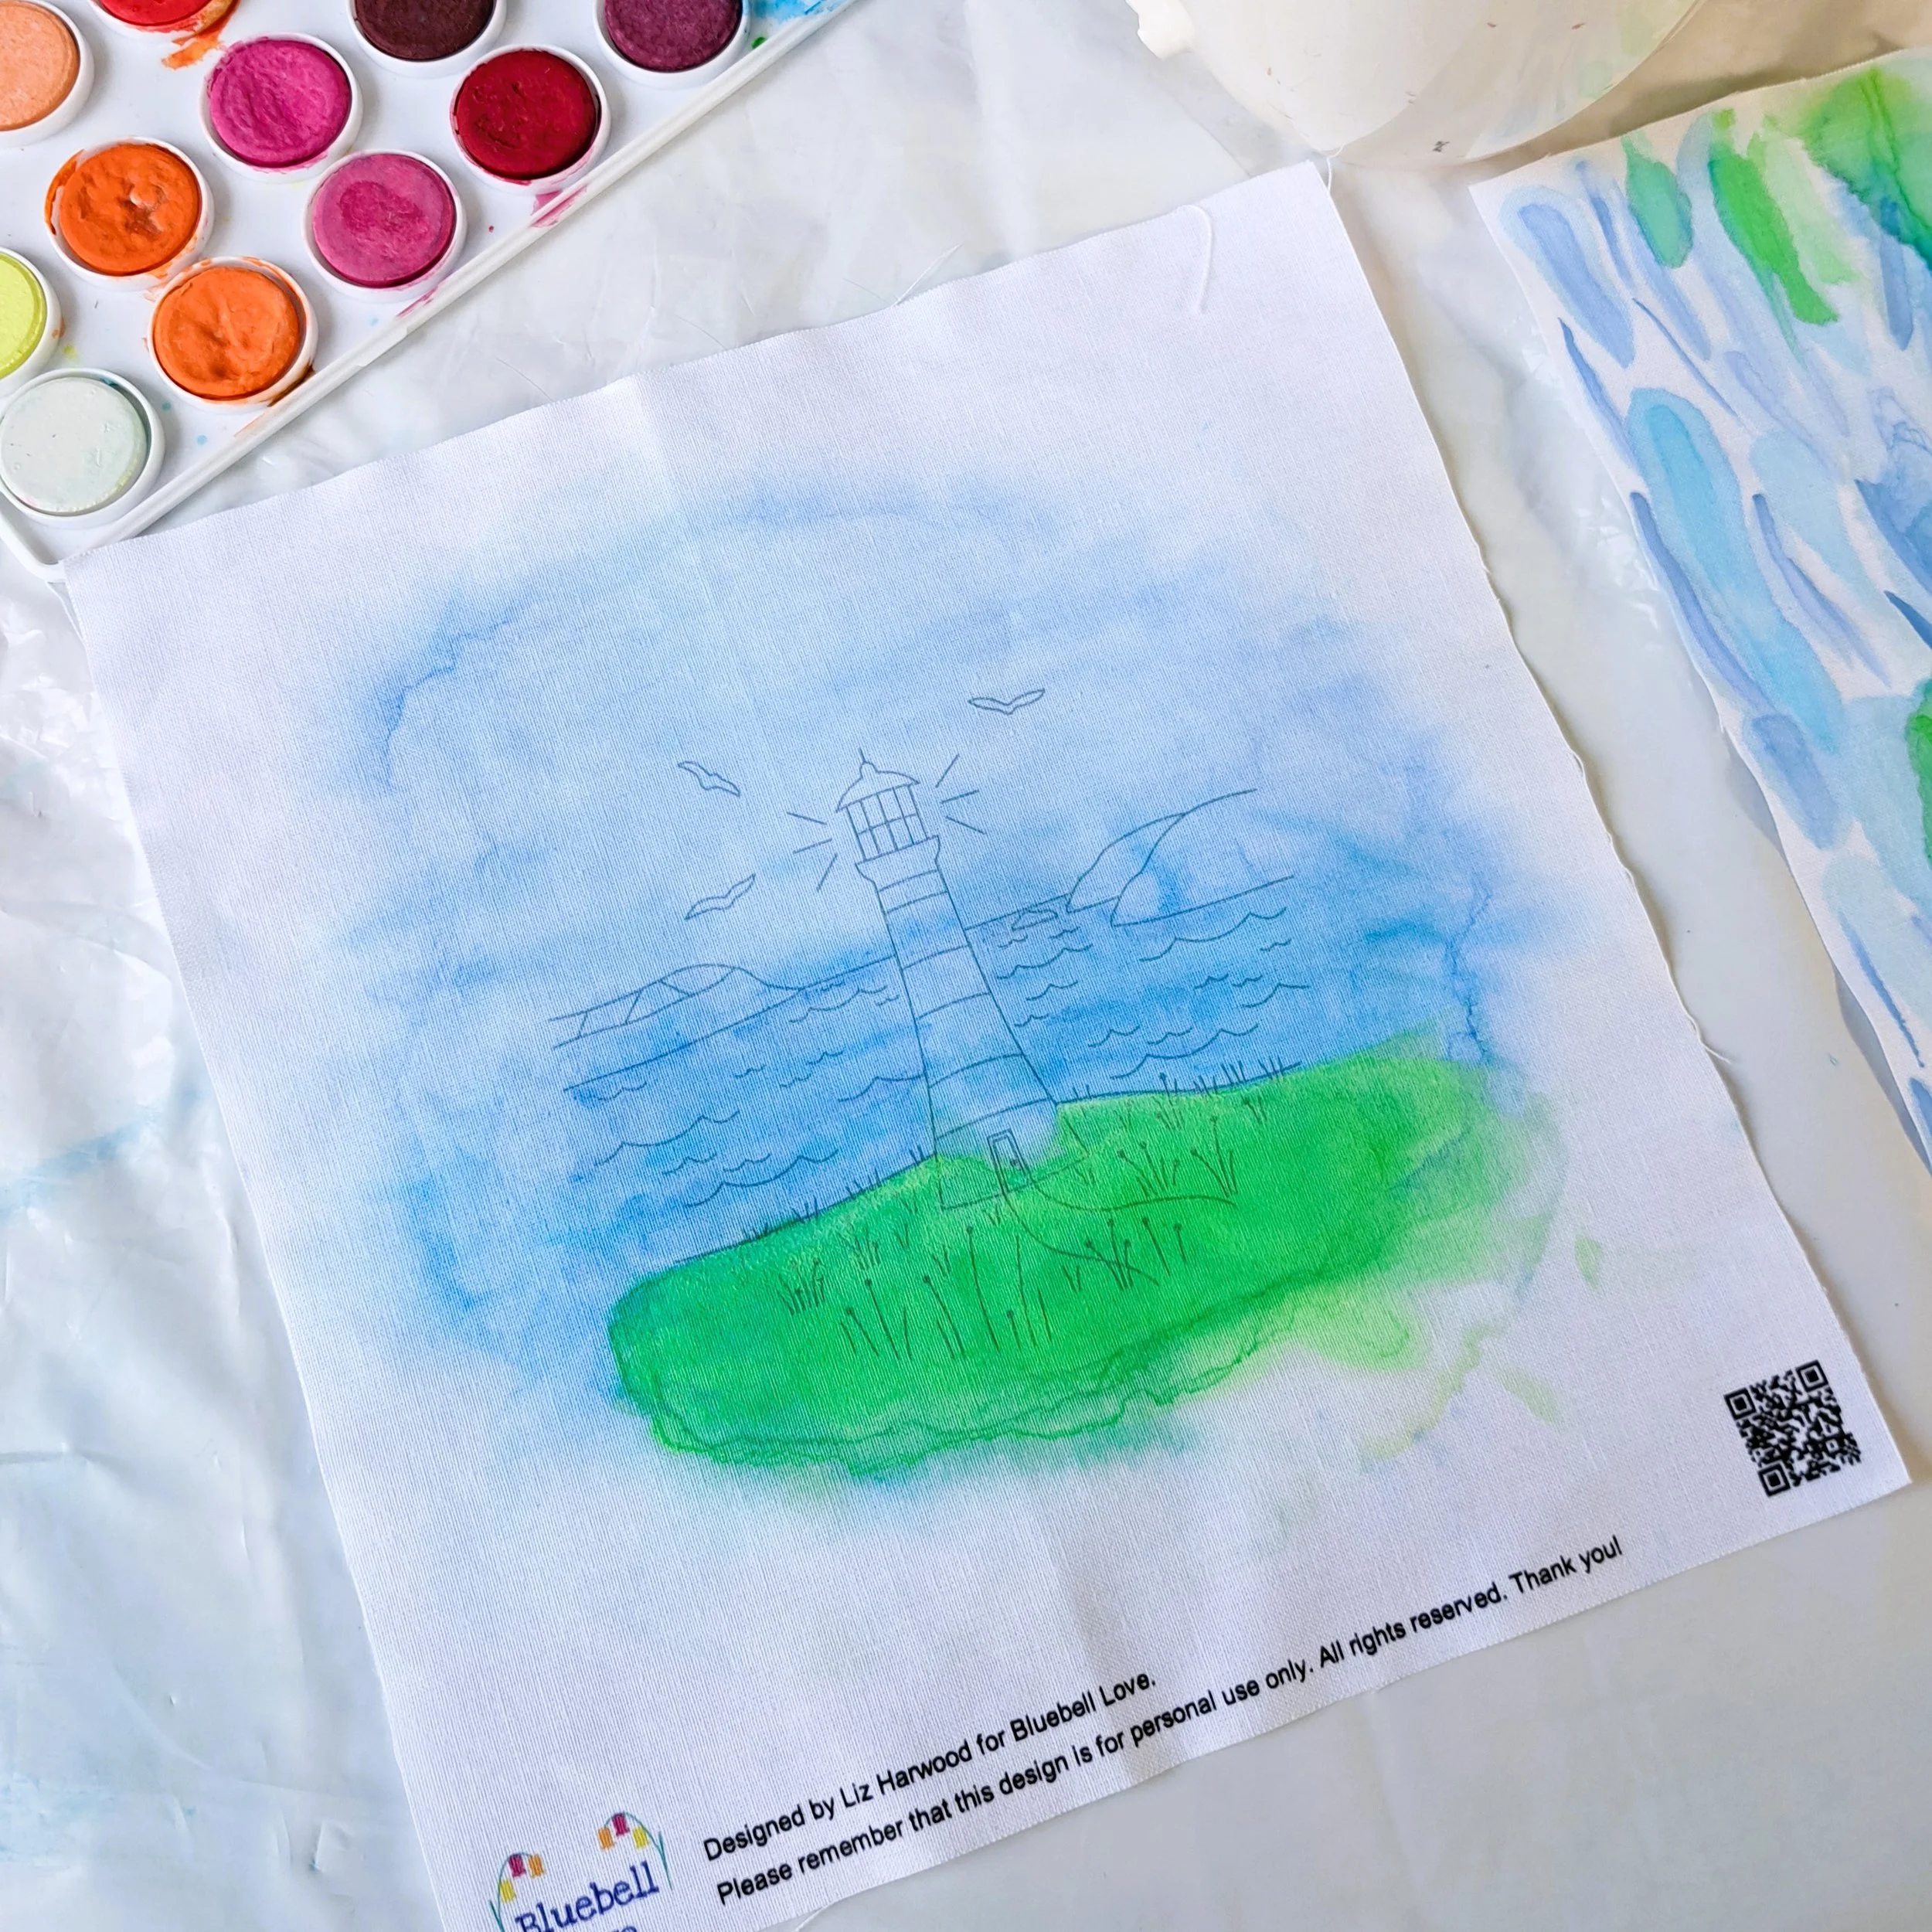
This is how my panel looked once it had fully dried.
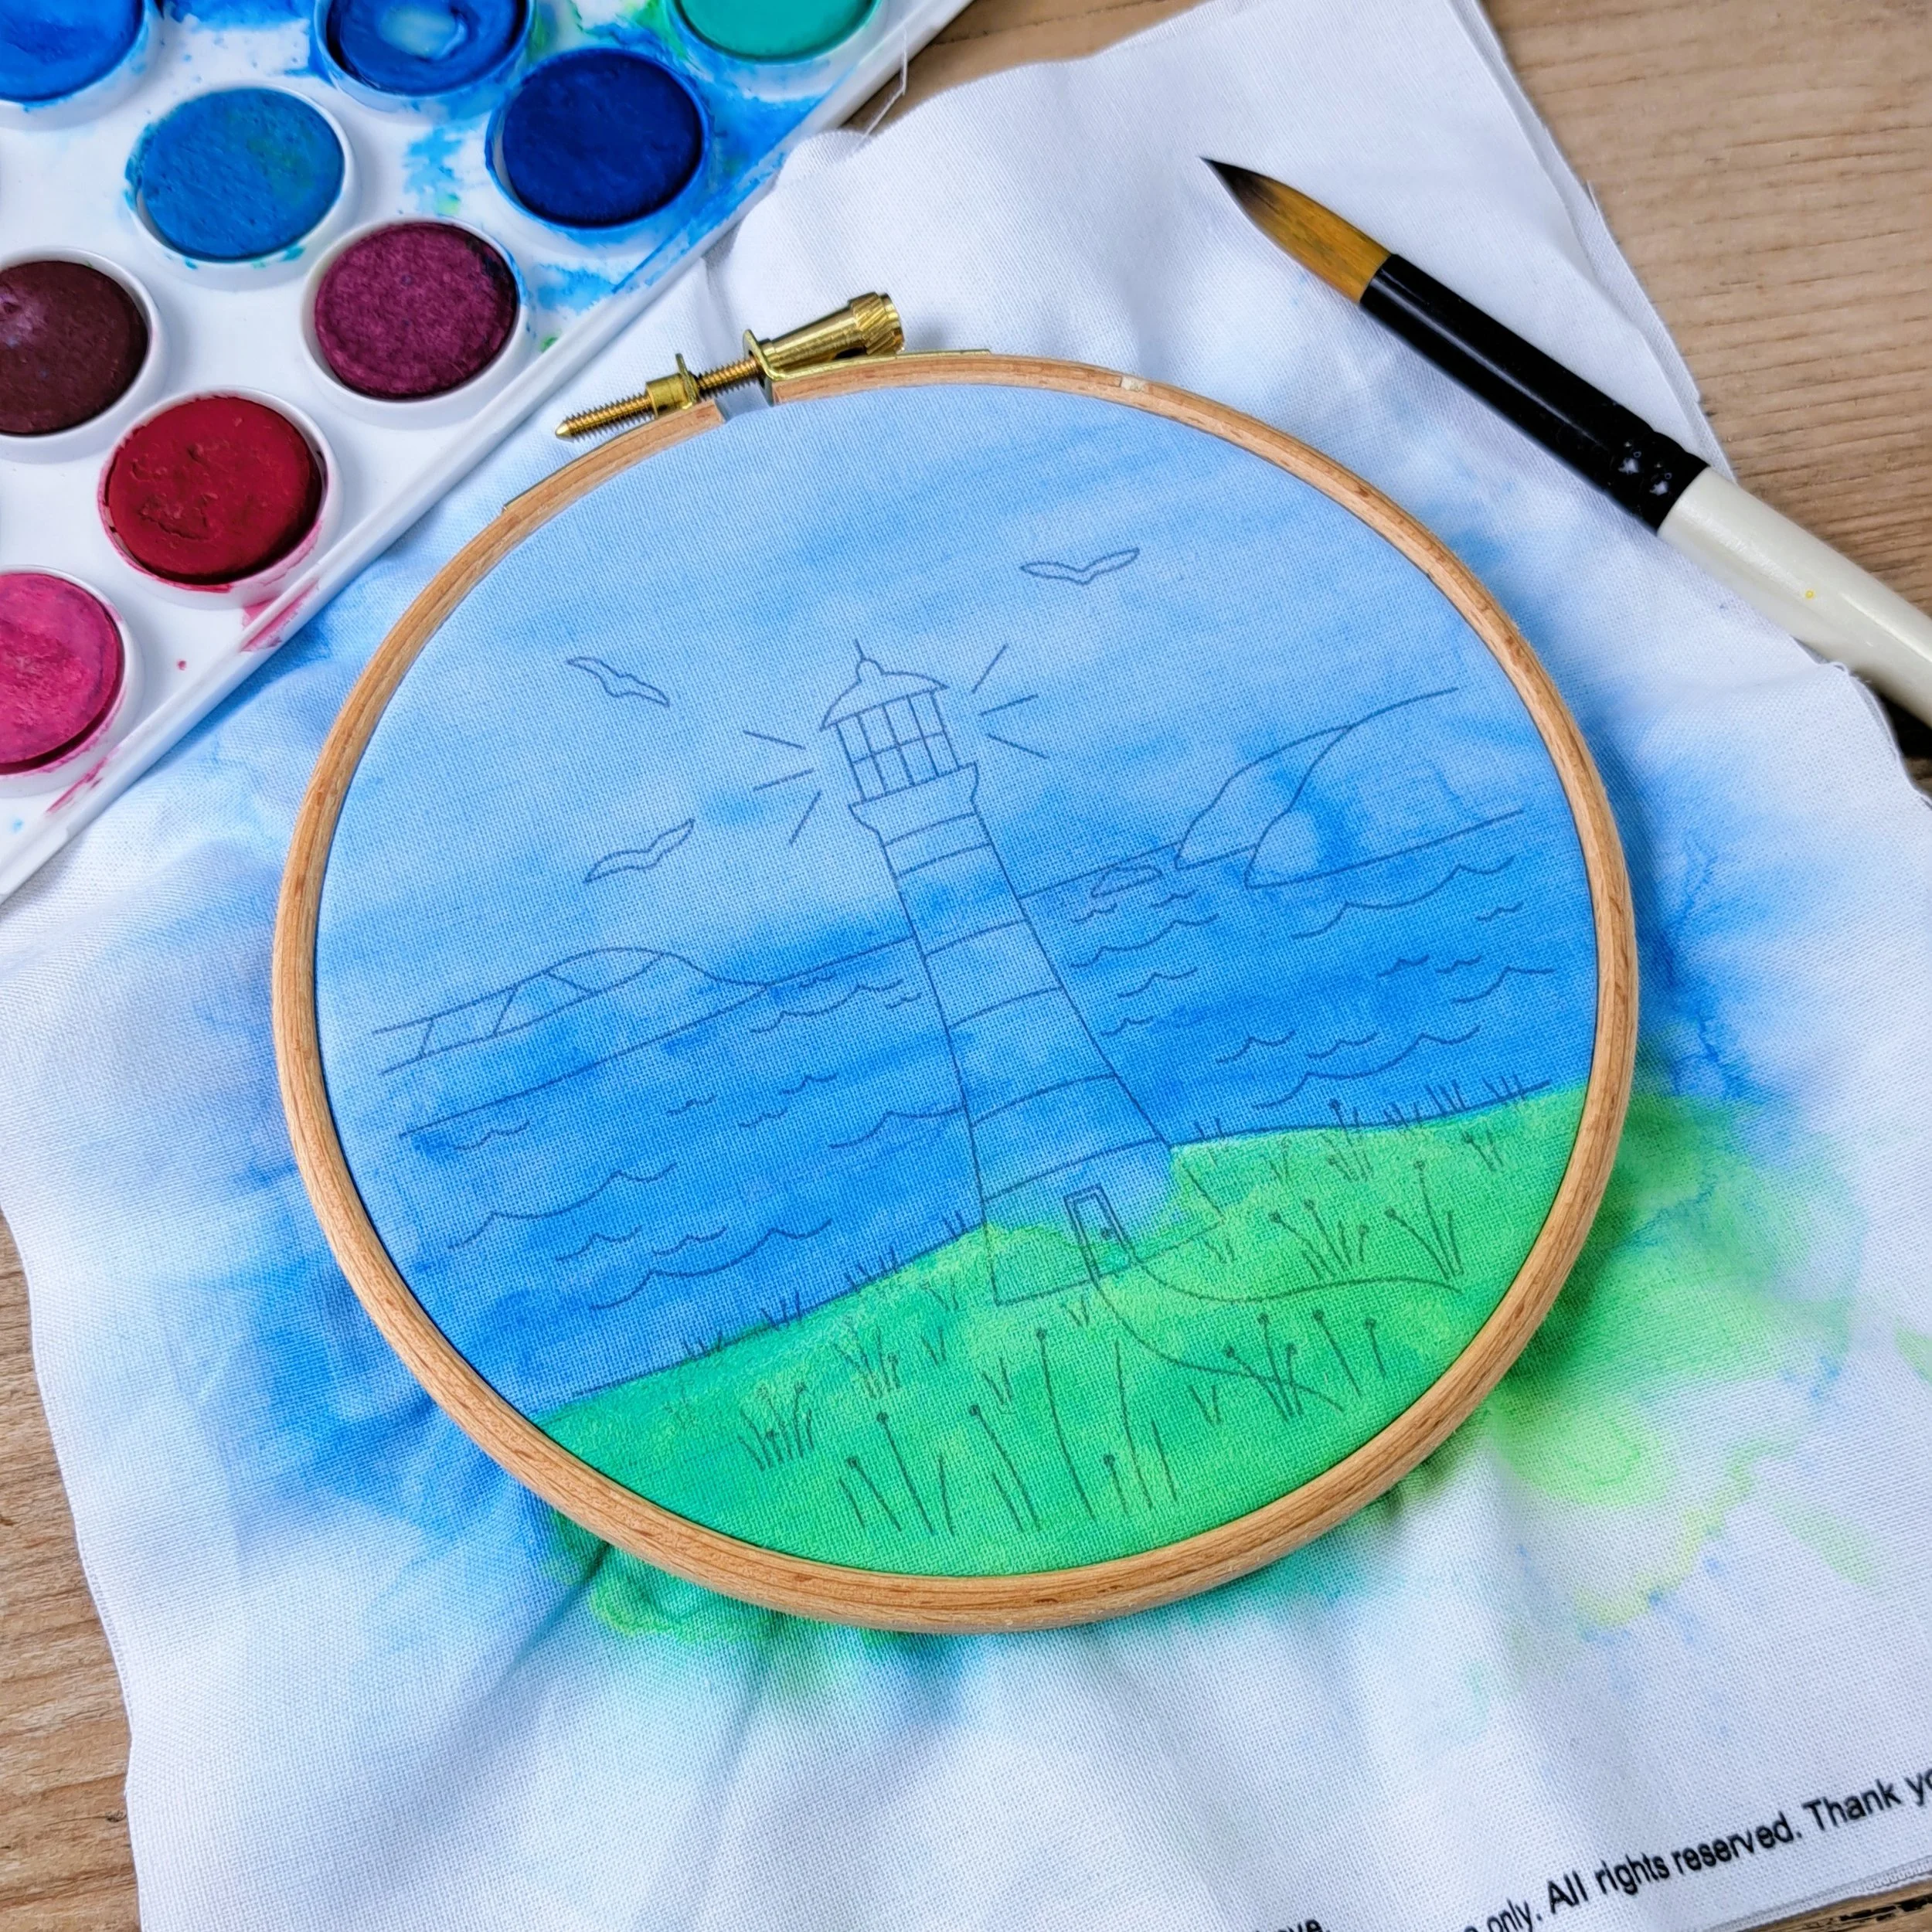
Give it a Little Iron
Once everything was dry, I gave the panel a quick press with the iron (no steam!). I find it softens the paint slightly and just makes stitching that little bit easier. Just remember: water will wash the paint out - so definitely no steam here.
3. The Stitches
Here are the stitches I used for this one:
Stem Stitch
Straight Stitch
Split Stitch
Seed Stitch
French Knots
Brick Stitch
Satin Stitch
Couch Stitch
Whipped Backstitch
Lazy Daisies
That said, you absolutely don’t need to use all of these! I really love using different stitches to bring out all the textures in a piece, but if there’s a stitch you don’t enjoy... life’s too short to be stitching things we don’t love! ✨
So feel free to swap in stitches you do love instead. Or, if you're feeling adventurous, you could even add in a few extra ones!
Most importantly – have fun with it 😊
If you’d like a little extra help with any of these stitches, check out my ‘Stitch of the Week’ page – it’s a growing library of tutorial videos to guide you through each one. Not all of them may be up just yet, but I’m adding to it regularly!
4. Let’s Start Stitching
First things first - pop your embroidery panel and that extra layer of fabric into your hoop, making sure everything is nice and taut. I always aim for that satisfying drum-like tension - it helps keep your stitches neat and stops the fabric from puckering as you go.
How to Get That Drum Tension:
Lay the fabric over the inner hoop, then press the outer hoop down on top.
Gently pull the edges of the fabric outside the hoop to smooth out any wrinkles or bumps.
Tighten the screw mechanism until the hoop feels secure.
Give the fabric around the edges one final little tug to tighten it up even more.
Your fabric should now feel tight like a drum - just the way we want it - and ready for stitching!
✨ A little Tip:
Keep an eye on the tension as you stitch. It can loosen a bit with stitching. If that happens, just pause and tighten it back up before you carry on.
4. Step-by-Step Stitching Guide
You can really start stitching wherever you like. If there’s a particular bit you’re excited about, don’t feel like you have to wait - just dive in! That said, I do usually recommend working from the back of the design forward. That way, your front elements can sit neatly on top of the background, making the whole embroidery look more seamless. That’s not a hard rule though - you can always tuck stitches behind other areas if needed.
There are quite a few elements in this design, but don’t worry - I’ll walk you through how I stitched each one, step by step.
Okay, onto the stitching!
The Waves
This felt like a nice place to begin and warm up. I followed the wave lines using single rows of Stem Stitch. I took my needle down at each wave hump and restarted the stitch at the next curve, rather than making one continuous row - this helped keep the wave shape neat and prevented the corners from getting cut off.
I love this technique of stitching with two colours at once - if you want, you could pick two blues with higher contrast to make the effect stand out more.
Stitch - Stem Stitch
Thread colours - Anchor 145 (Light Blue) and Anchor 146 (Mid Blue)
Number of strands - 2 (1 strand of each blue, combined and stitched together)
Needle size - Small
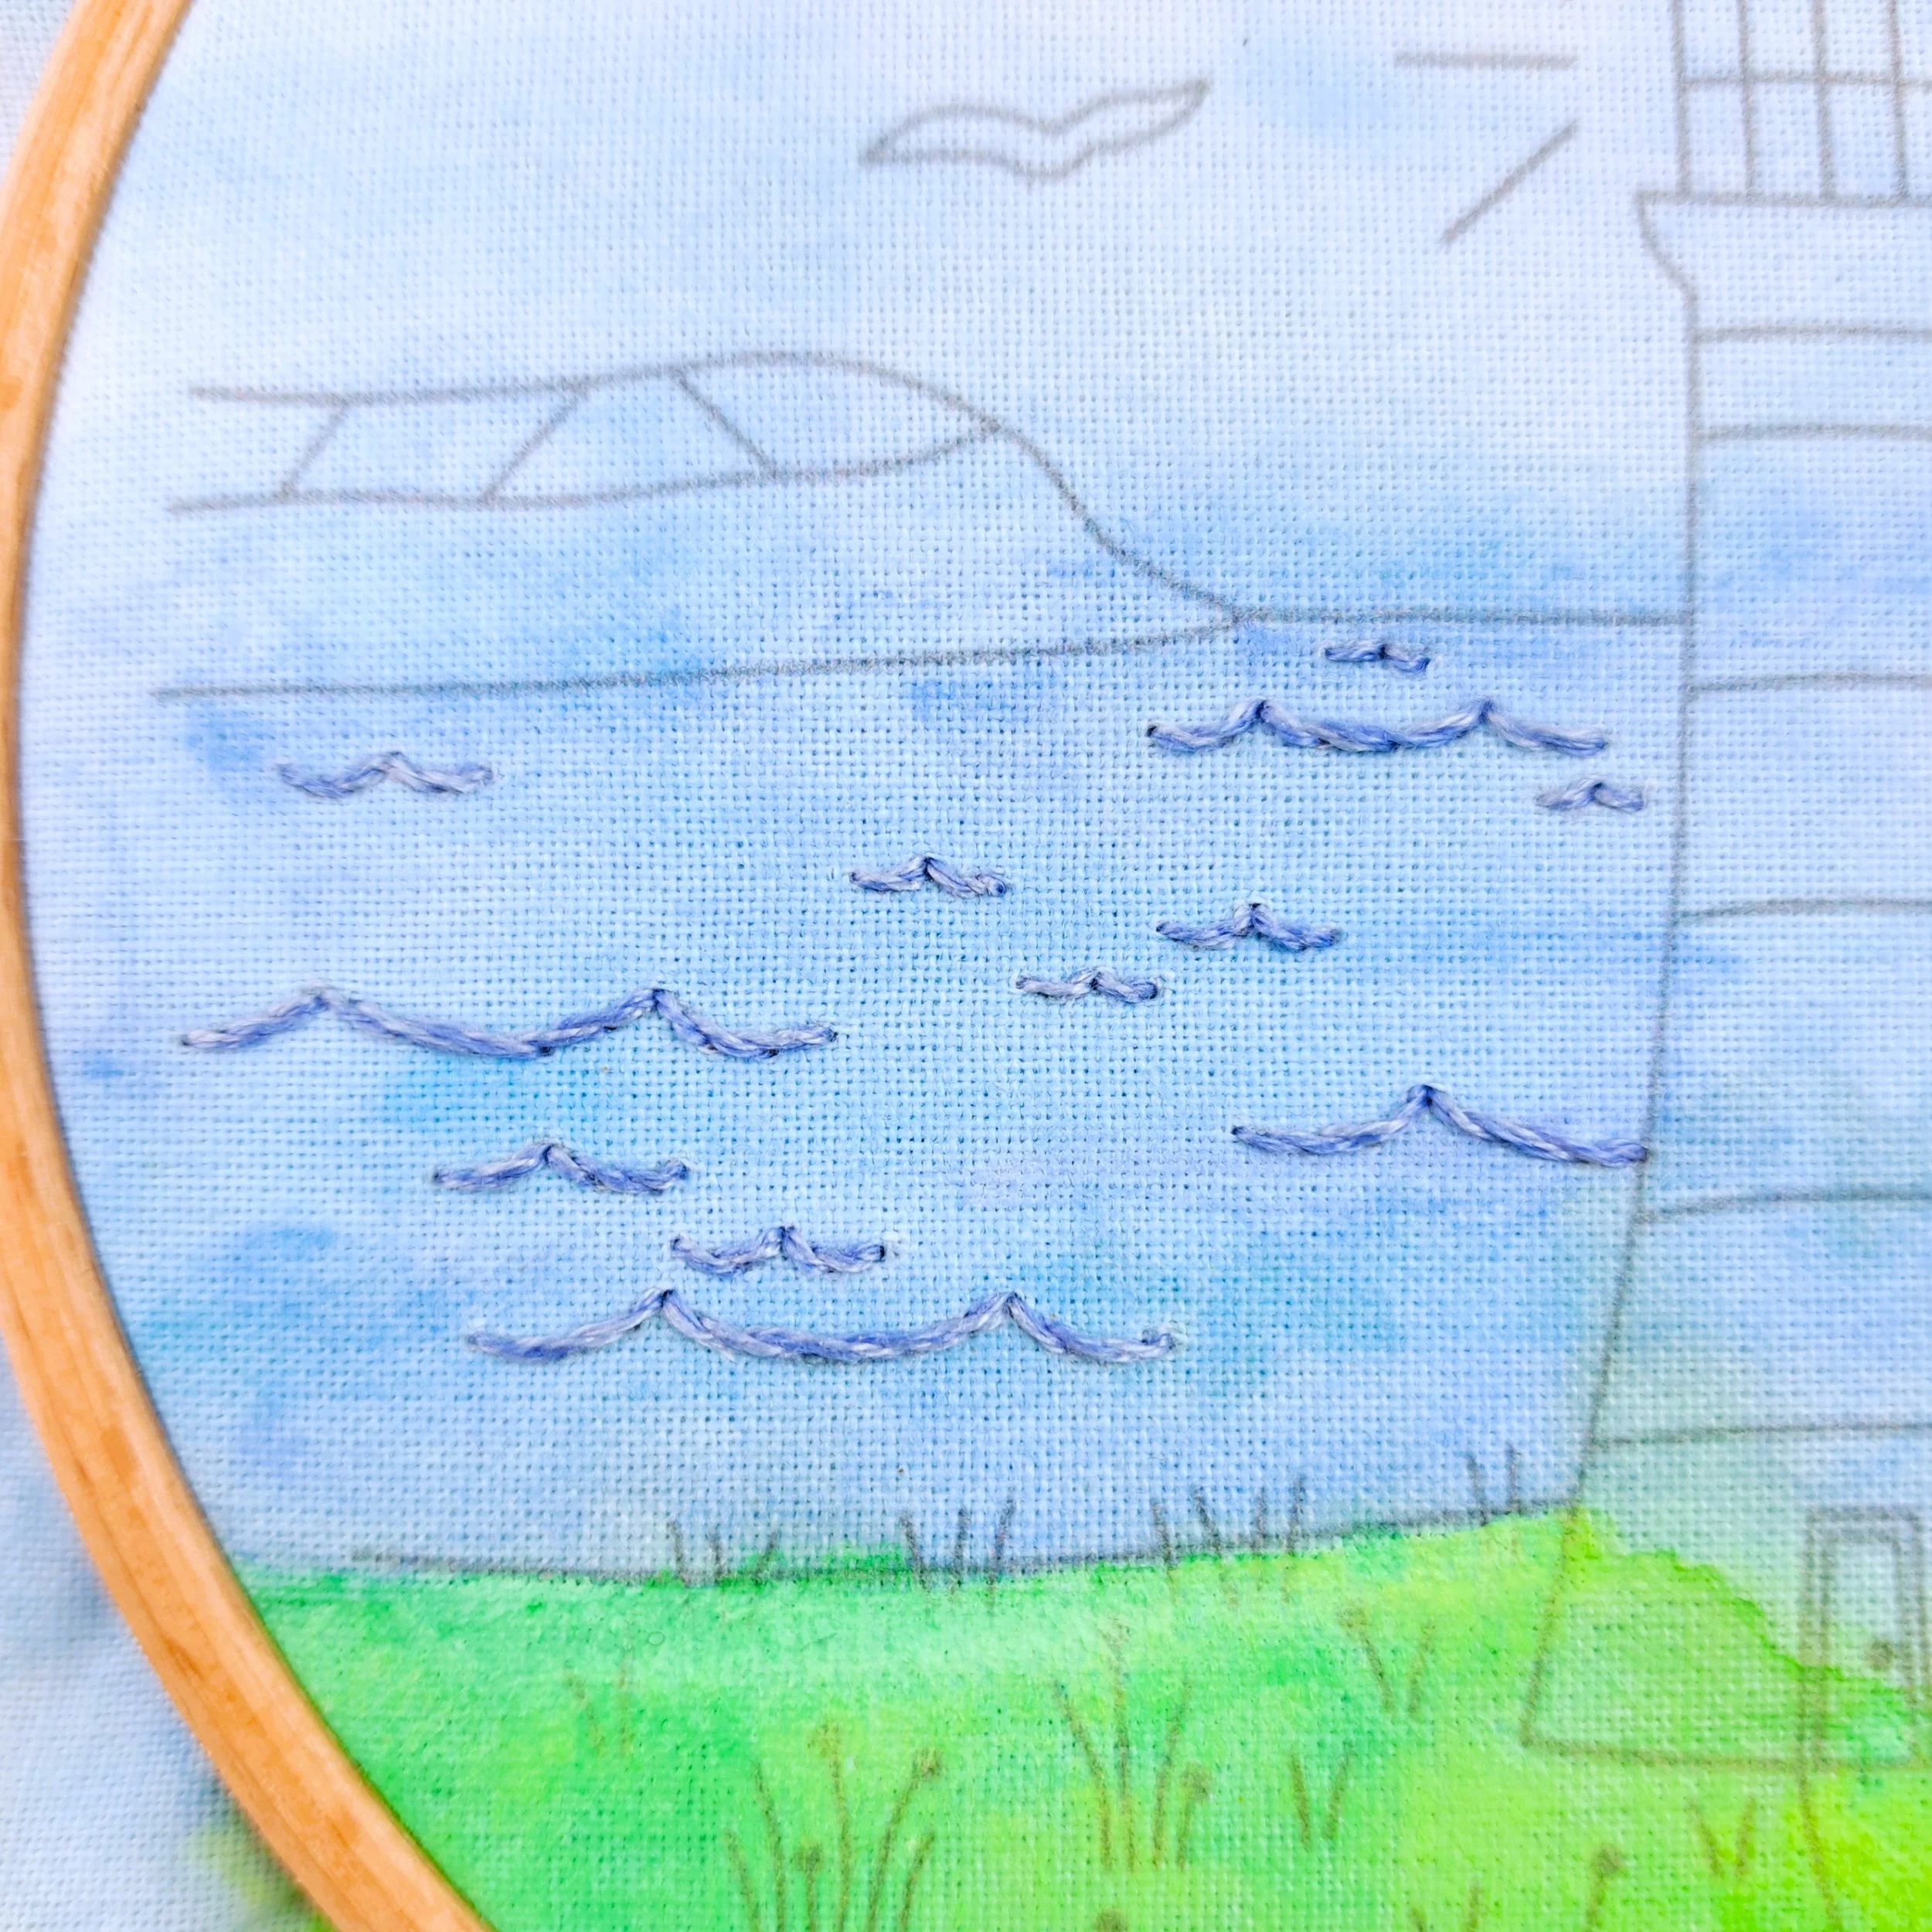
The Horizon
I stitched two long Straight Stitches for the horizon. Now, just something to bear in mind here: a bit later on, I stitched that little island just under the horizon on the right side of the lighthouse. Because the straight stitch is only anchored down at each end, combined with stitching my island too close to the horizon and the stitches I used, my island stitching actually pushes the horizon line up a bit.
So, you might want to use a different stitch here - a whipped backstitch would work well.
Stitch - Straight Stitch
Thread colour - Anchor 146 (Mid Blue)
Number of strands - 1
Needle size - Small
The Left Cliff
I used that fun two-colour stitching technique again here. It’s so effective with Split Stitch as a filling stitch. I stitched vertical rows of split stitches and angled them at the head of the cliff to follow the curve.
Stitch - Split Stitch
Thread colours - Anchor 375 (Golden Brown) and Anchor 355 (Reddish Brown)
Number of strands - 2 (1 strand of each brown, combined and stitched together)
Needle size - Small
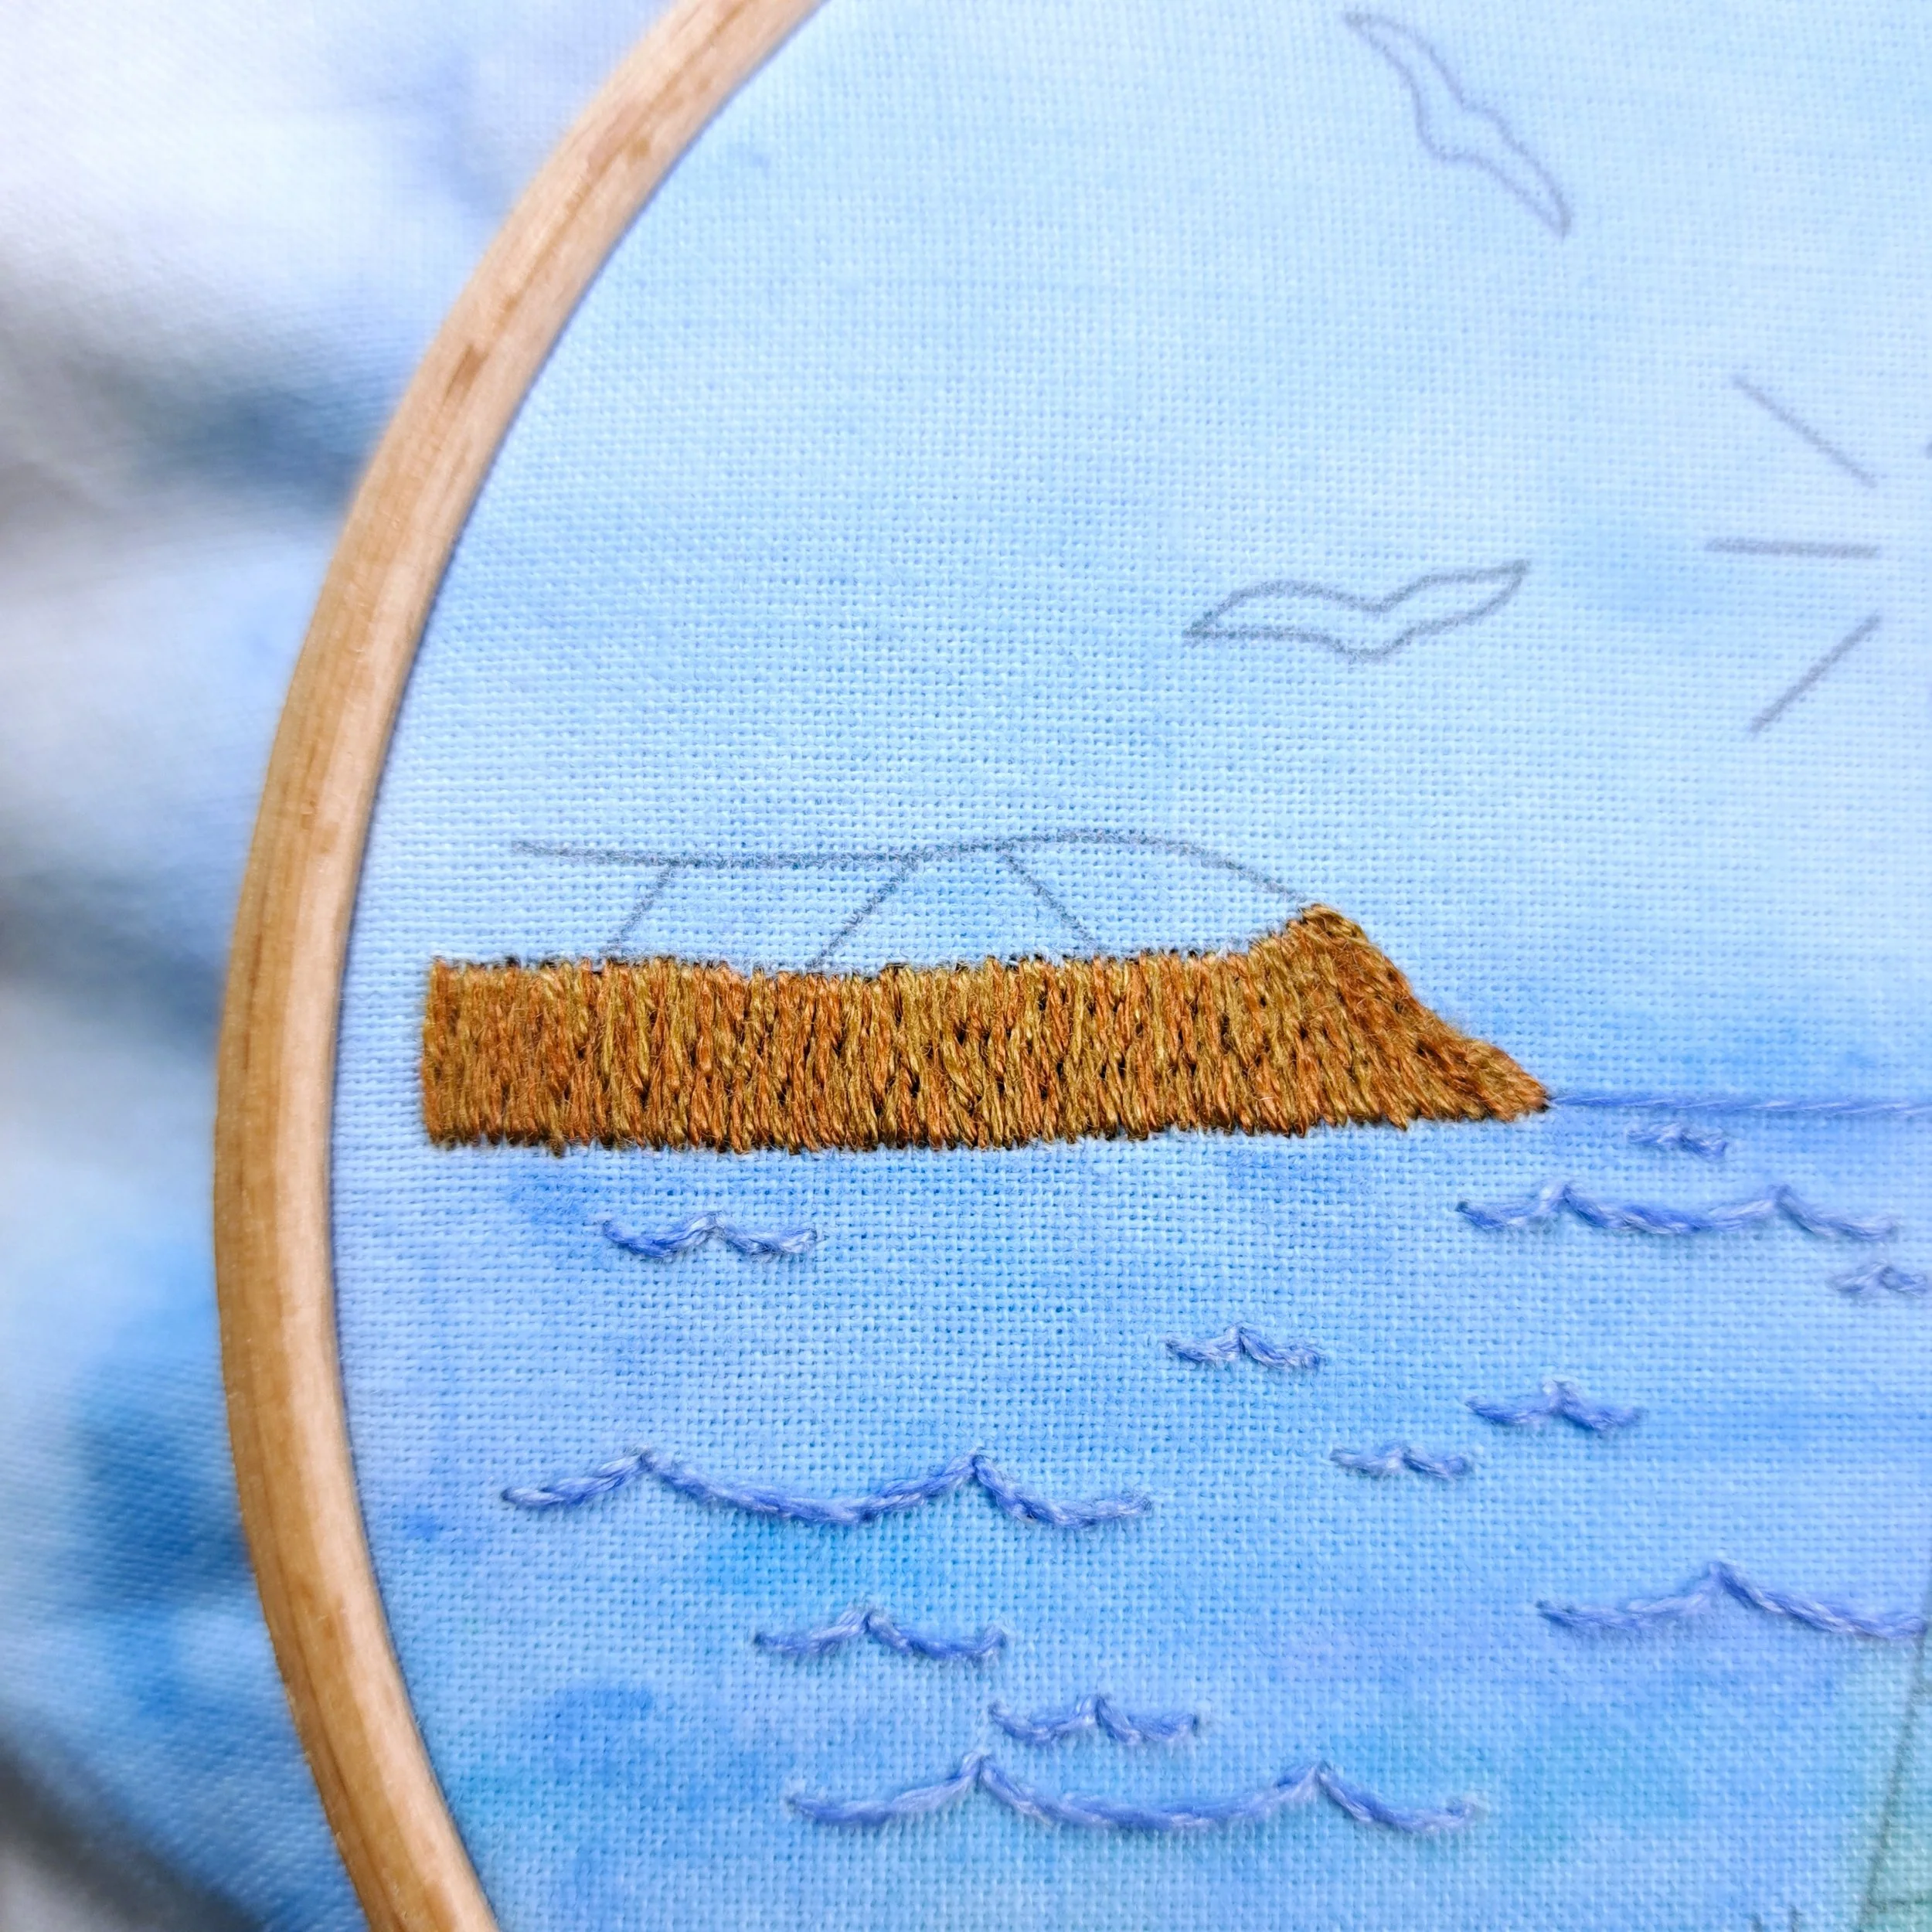
The Fields
I chose to stitch each of my fields differently – it’s super fun to get creative and imagine what’s growing in each one. You could add some really cute little details in here! When I was stitching, I was obsessed with all the sunny rapeseed oil yellow fields around - they’re so bright and pretty! So, I just had to stitch one.
I’ve numbered the fields (1 to 4) here, so you know which one I’m talking about.
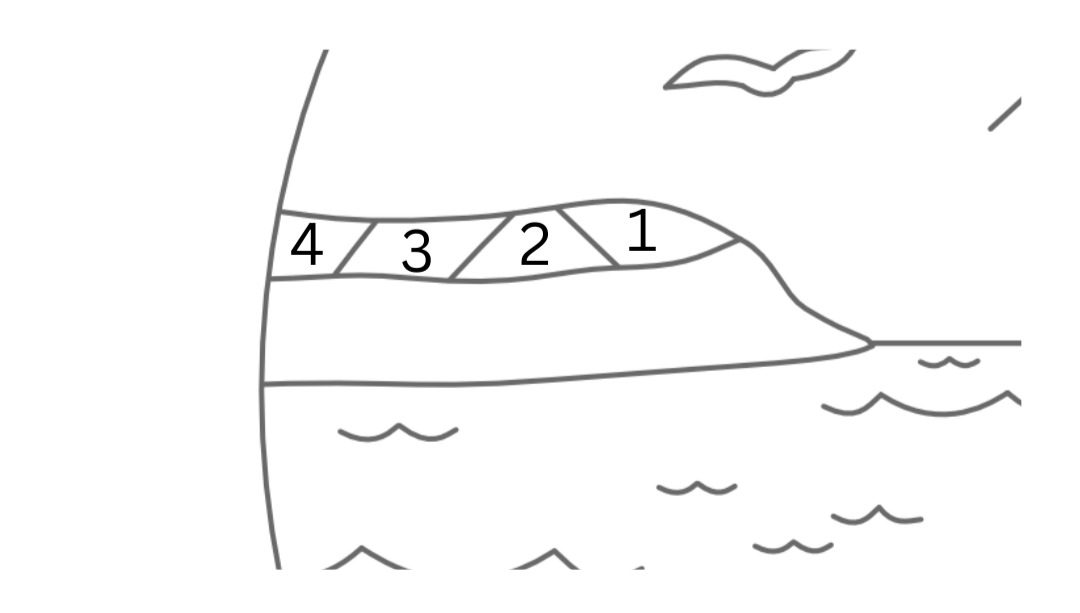
Fields 1, 3, and 4
I filled three of the fields using Seed Stitch. It’s a tricky stitch not to create patterns when filling like this, so I layered my stitches up a bit to completely cover the fabric underneath. This gives a lovely texture.
I left a small unstitched gap around the edges of each field to make adding the hedge easier later.
Stitch - Seed Stitch
Thread colours - Field 1 with Anchor 243 (Mid Green), Field 3 with Anchor 240 (Light Green), Field 4 with Anchor 211 (Dark Green)
Number of strands - 2
Needle size - Small
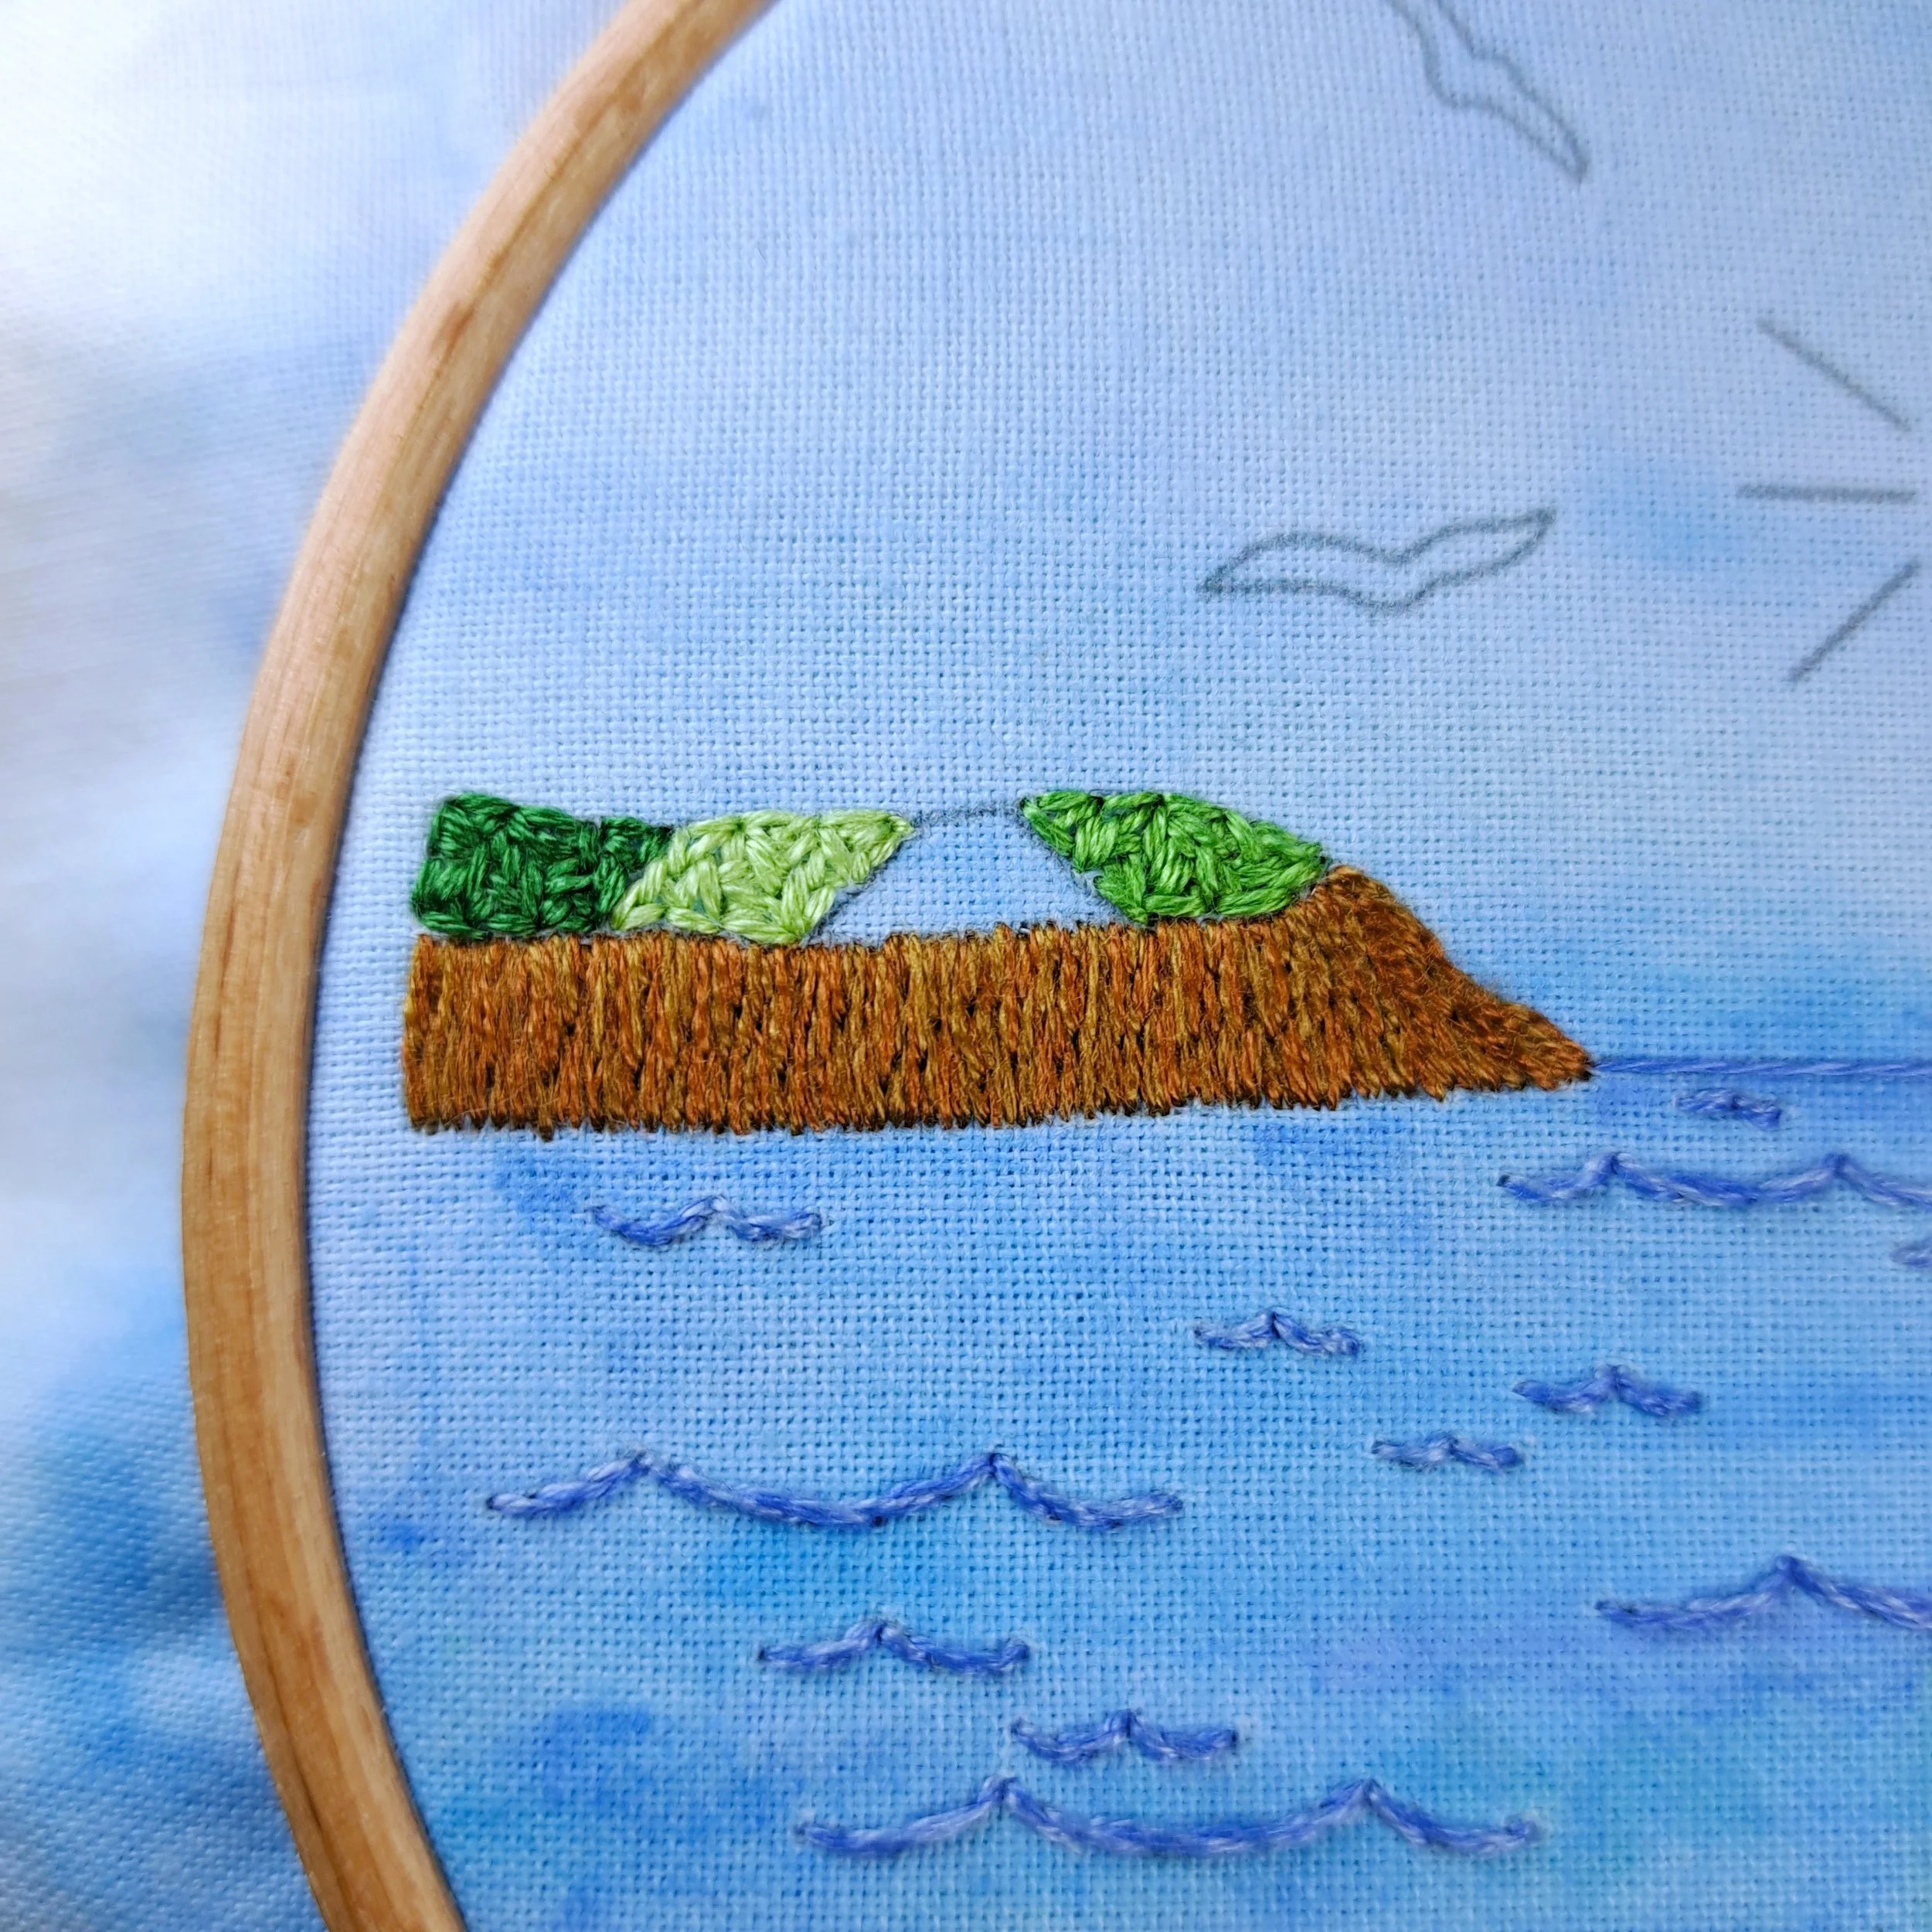
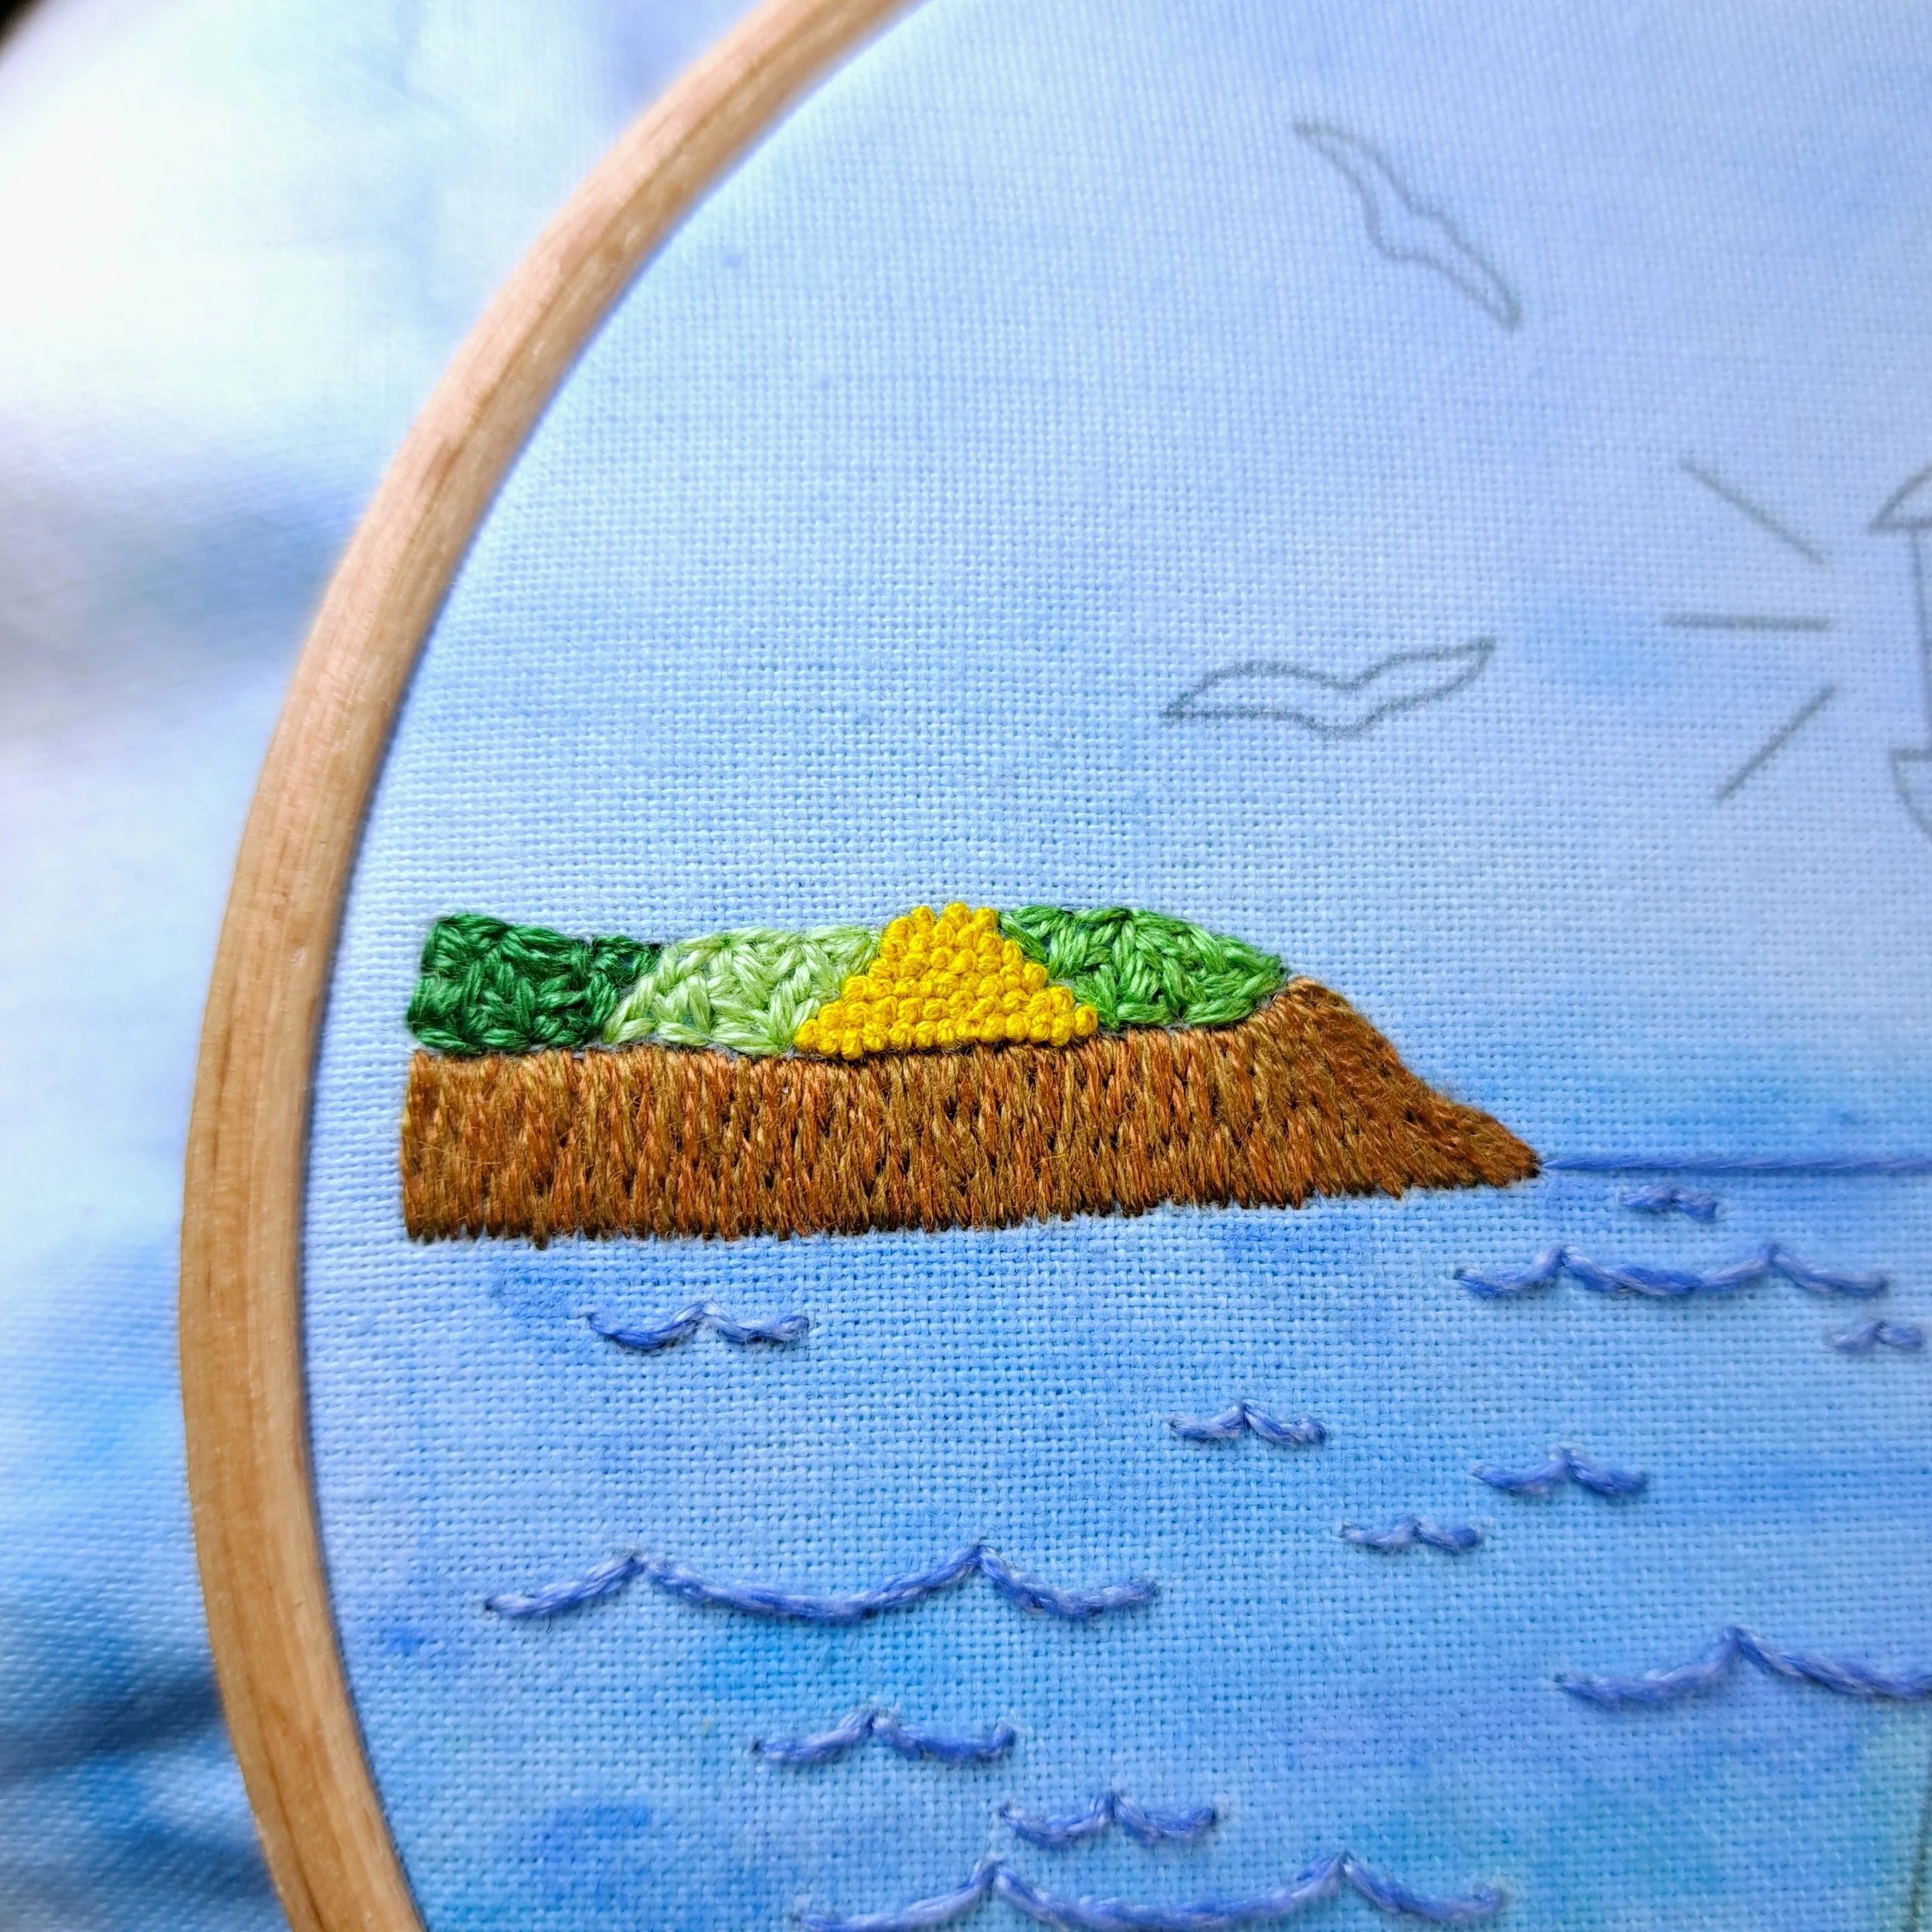
Field 2 – The Rapeseed Oil Field
For this one, I stitched lots of little French Knots really close together, working in rows. Like the other fields, I left a small gap around the edges for the hedge.
Stitch - French Knots with 2 wraps
Thread colour - Anchor 298 (Bright Yellow)
Number of strands - 2
Needle size - Small
The Hedges
And to finish off this headland, I stitched single rows of French Knots along the hedge lines. I wanted mine to look a bit uneven, so I mixed it up - some knots with 2 wraps, some with just 1 wrap - and I tried to avoid making any pattern when switching between them.
Stitch – French Knots (some with 2 wraps, some with 1 wrap)
Thread colour – Anchor 211 (Dark Green)
Number of strands – 3
Needle size – Medium

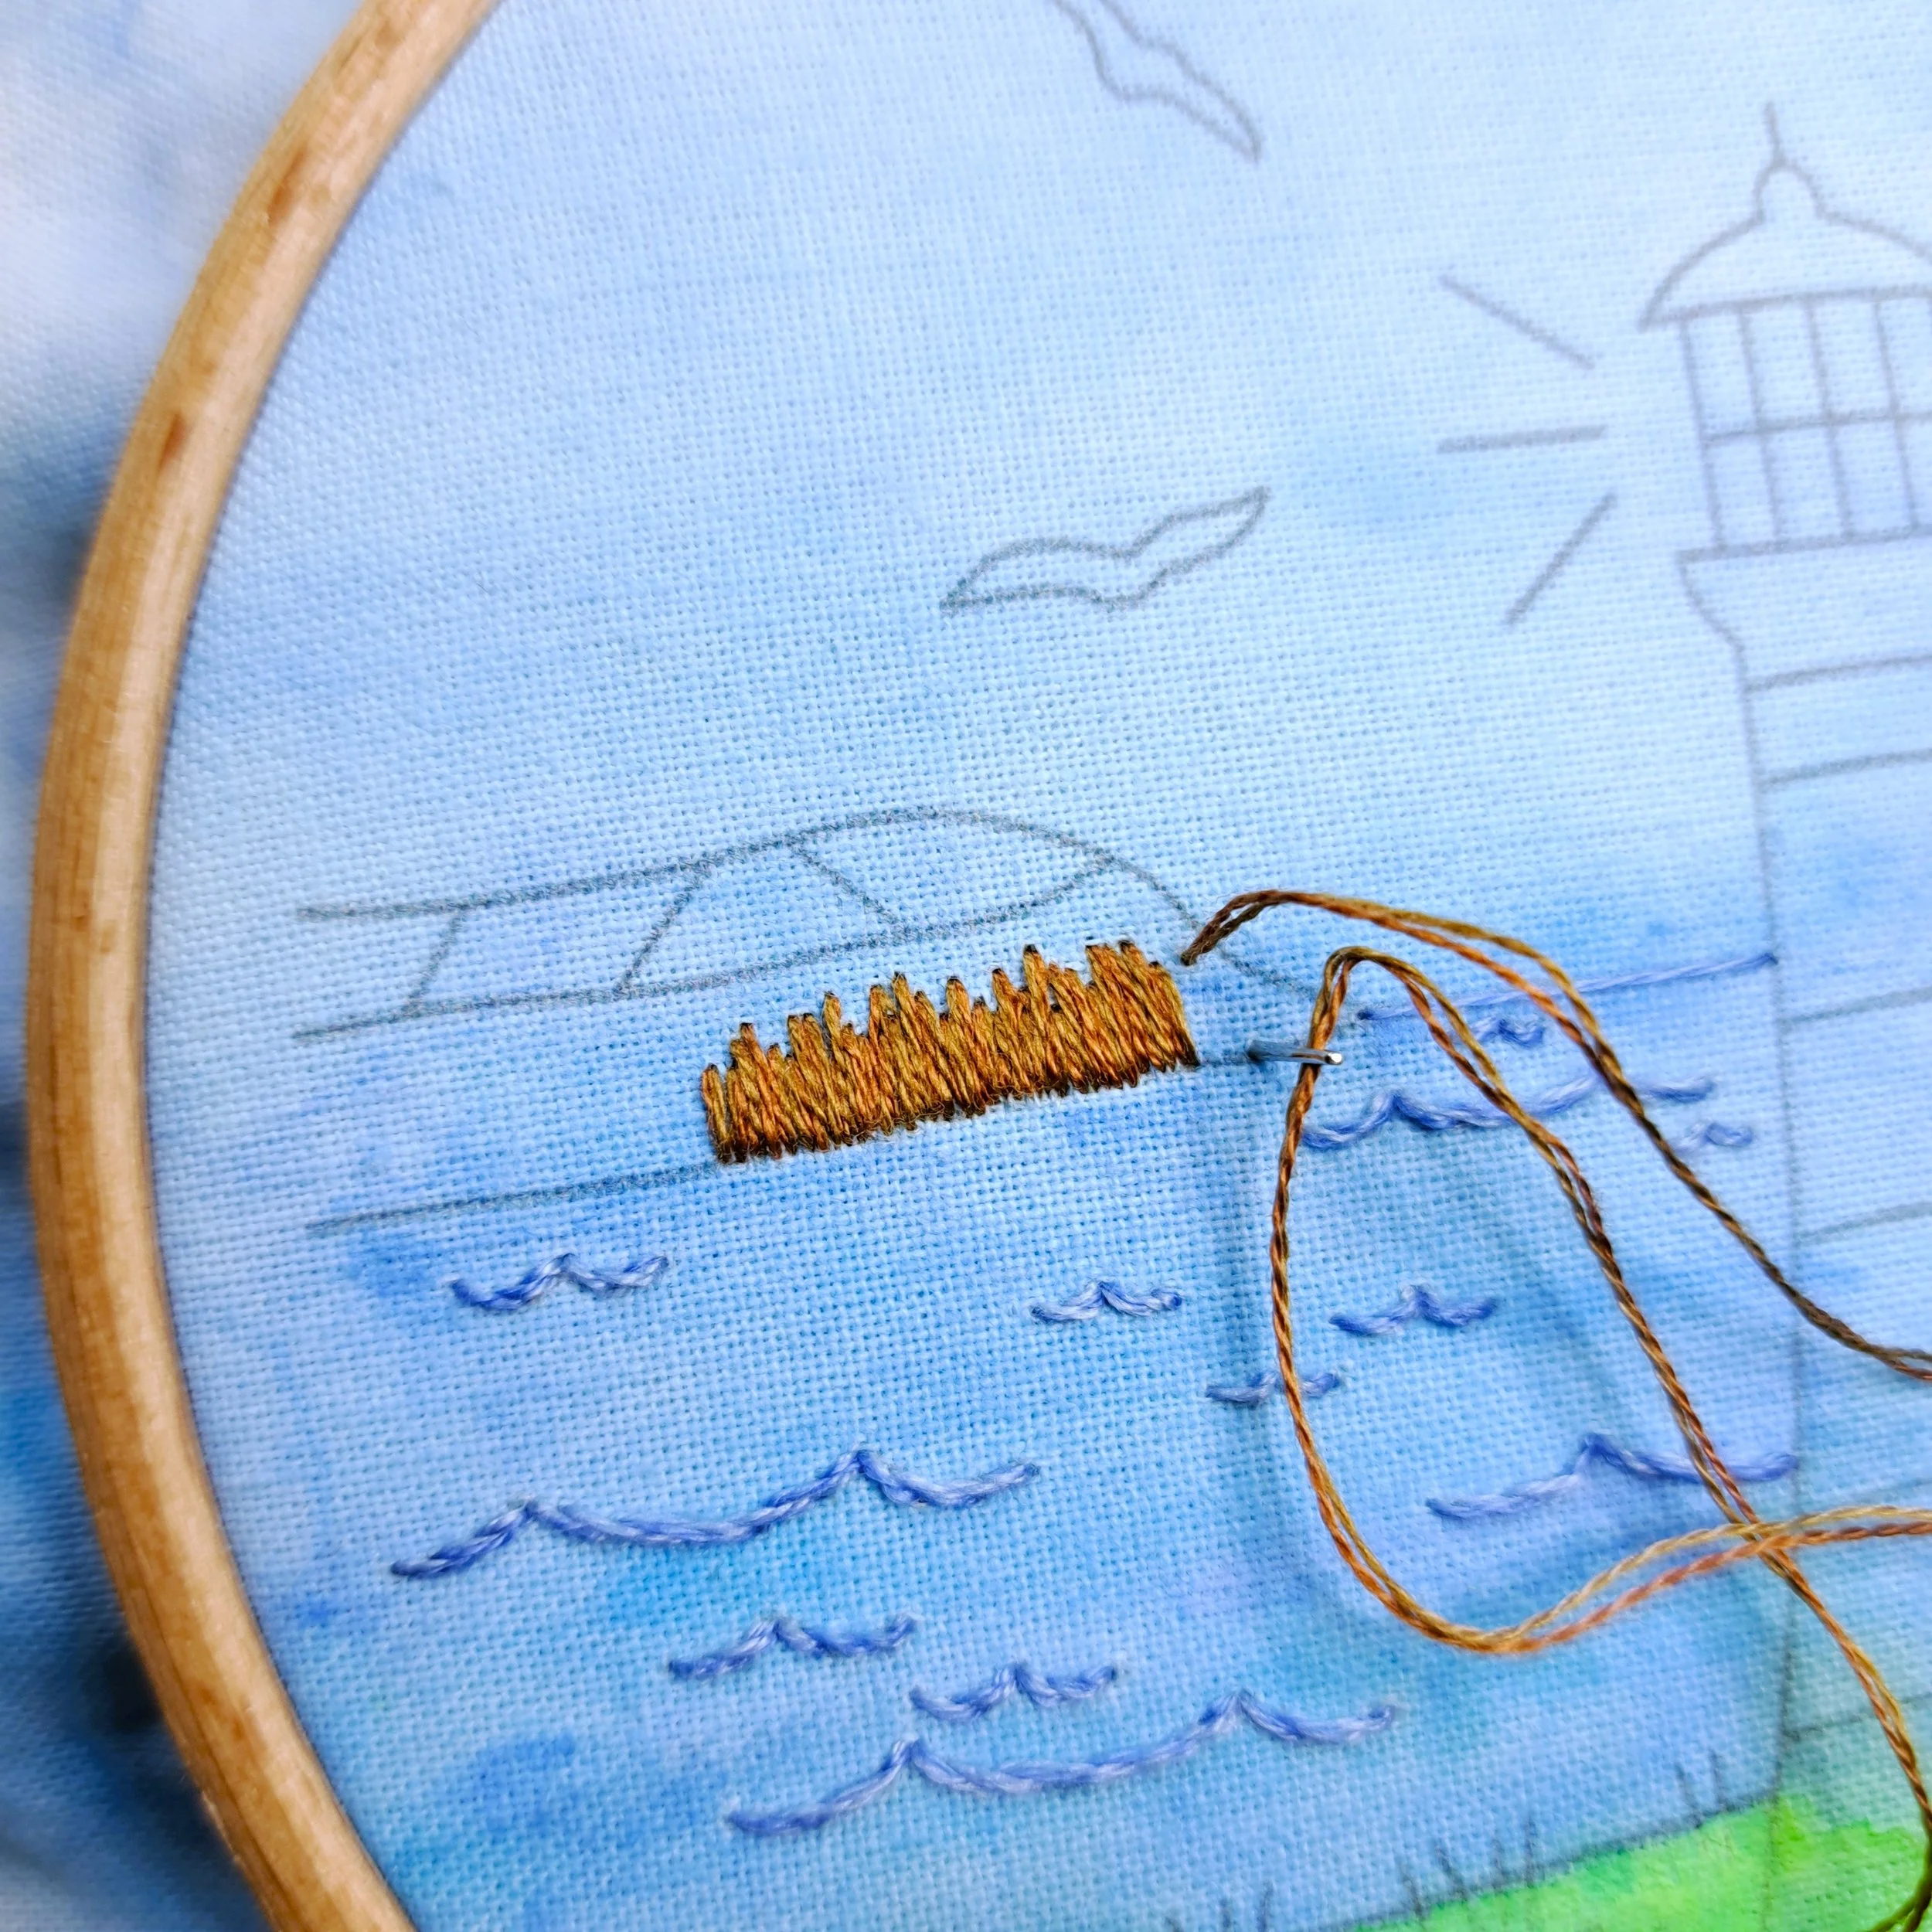
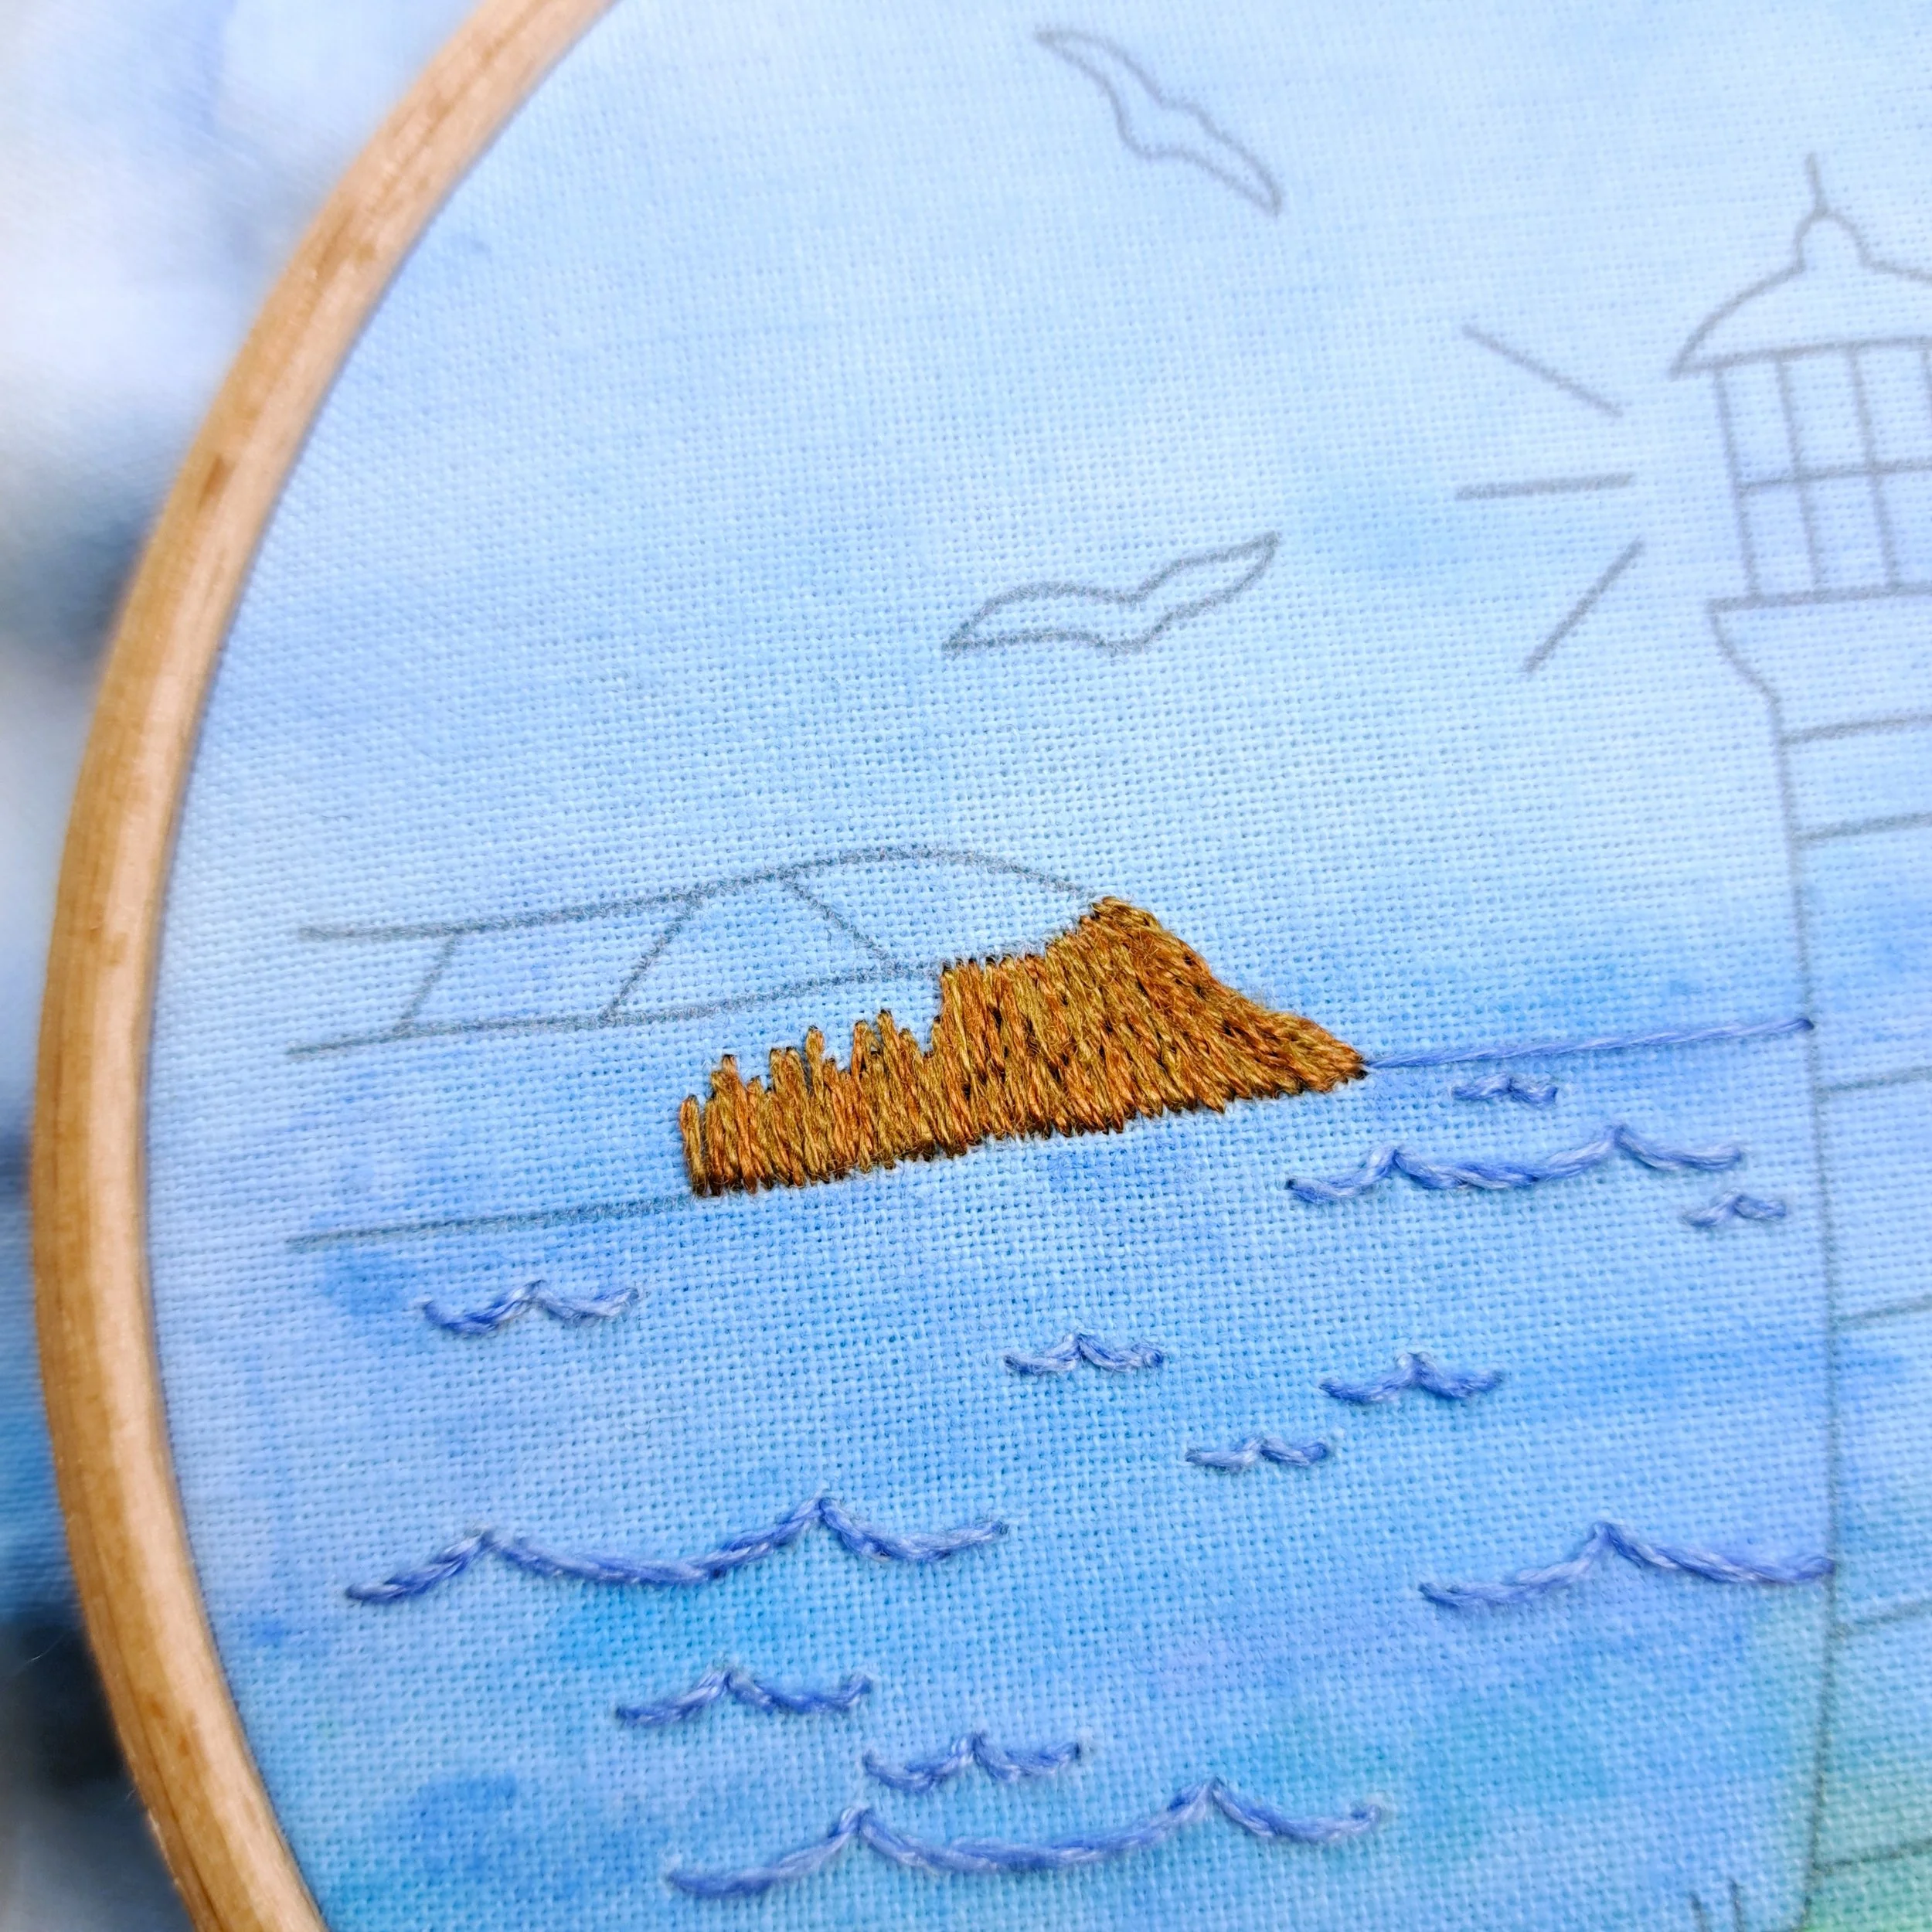
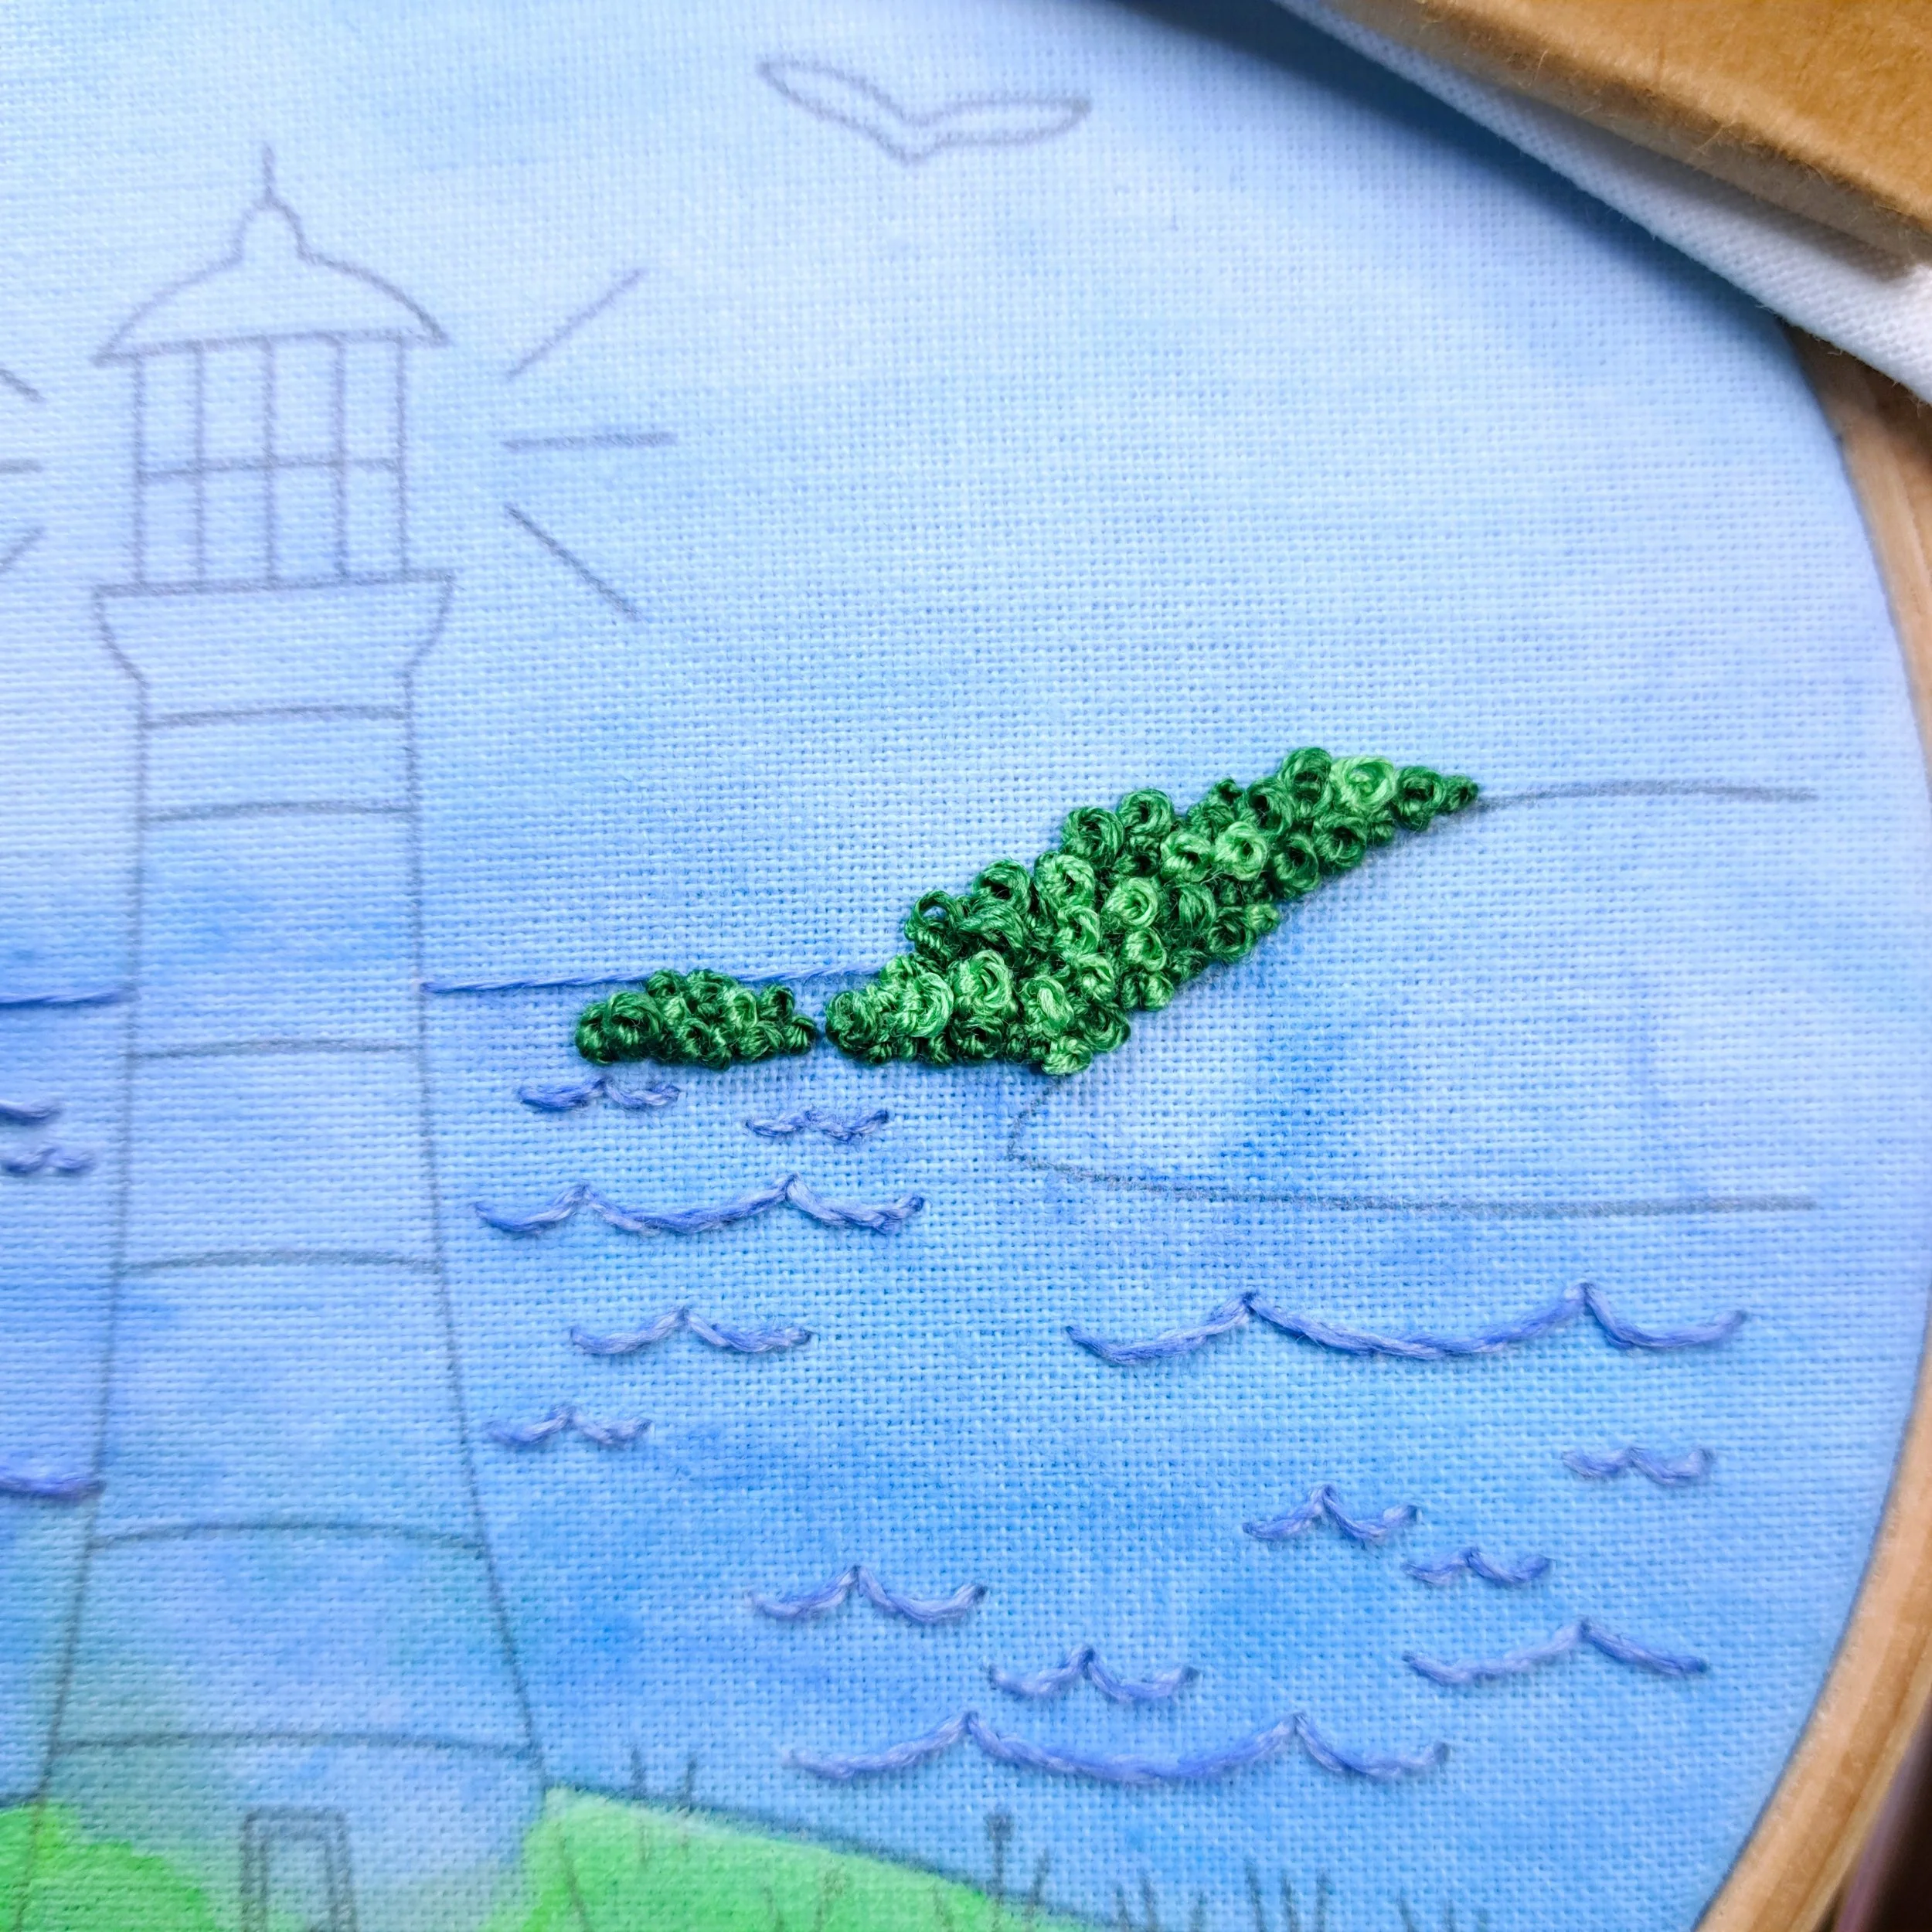
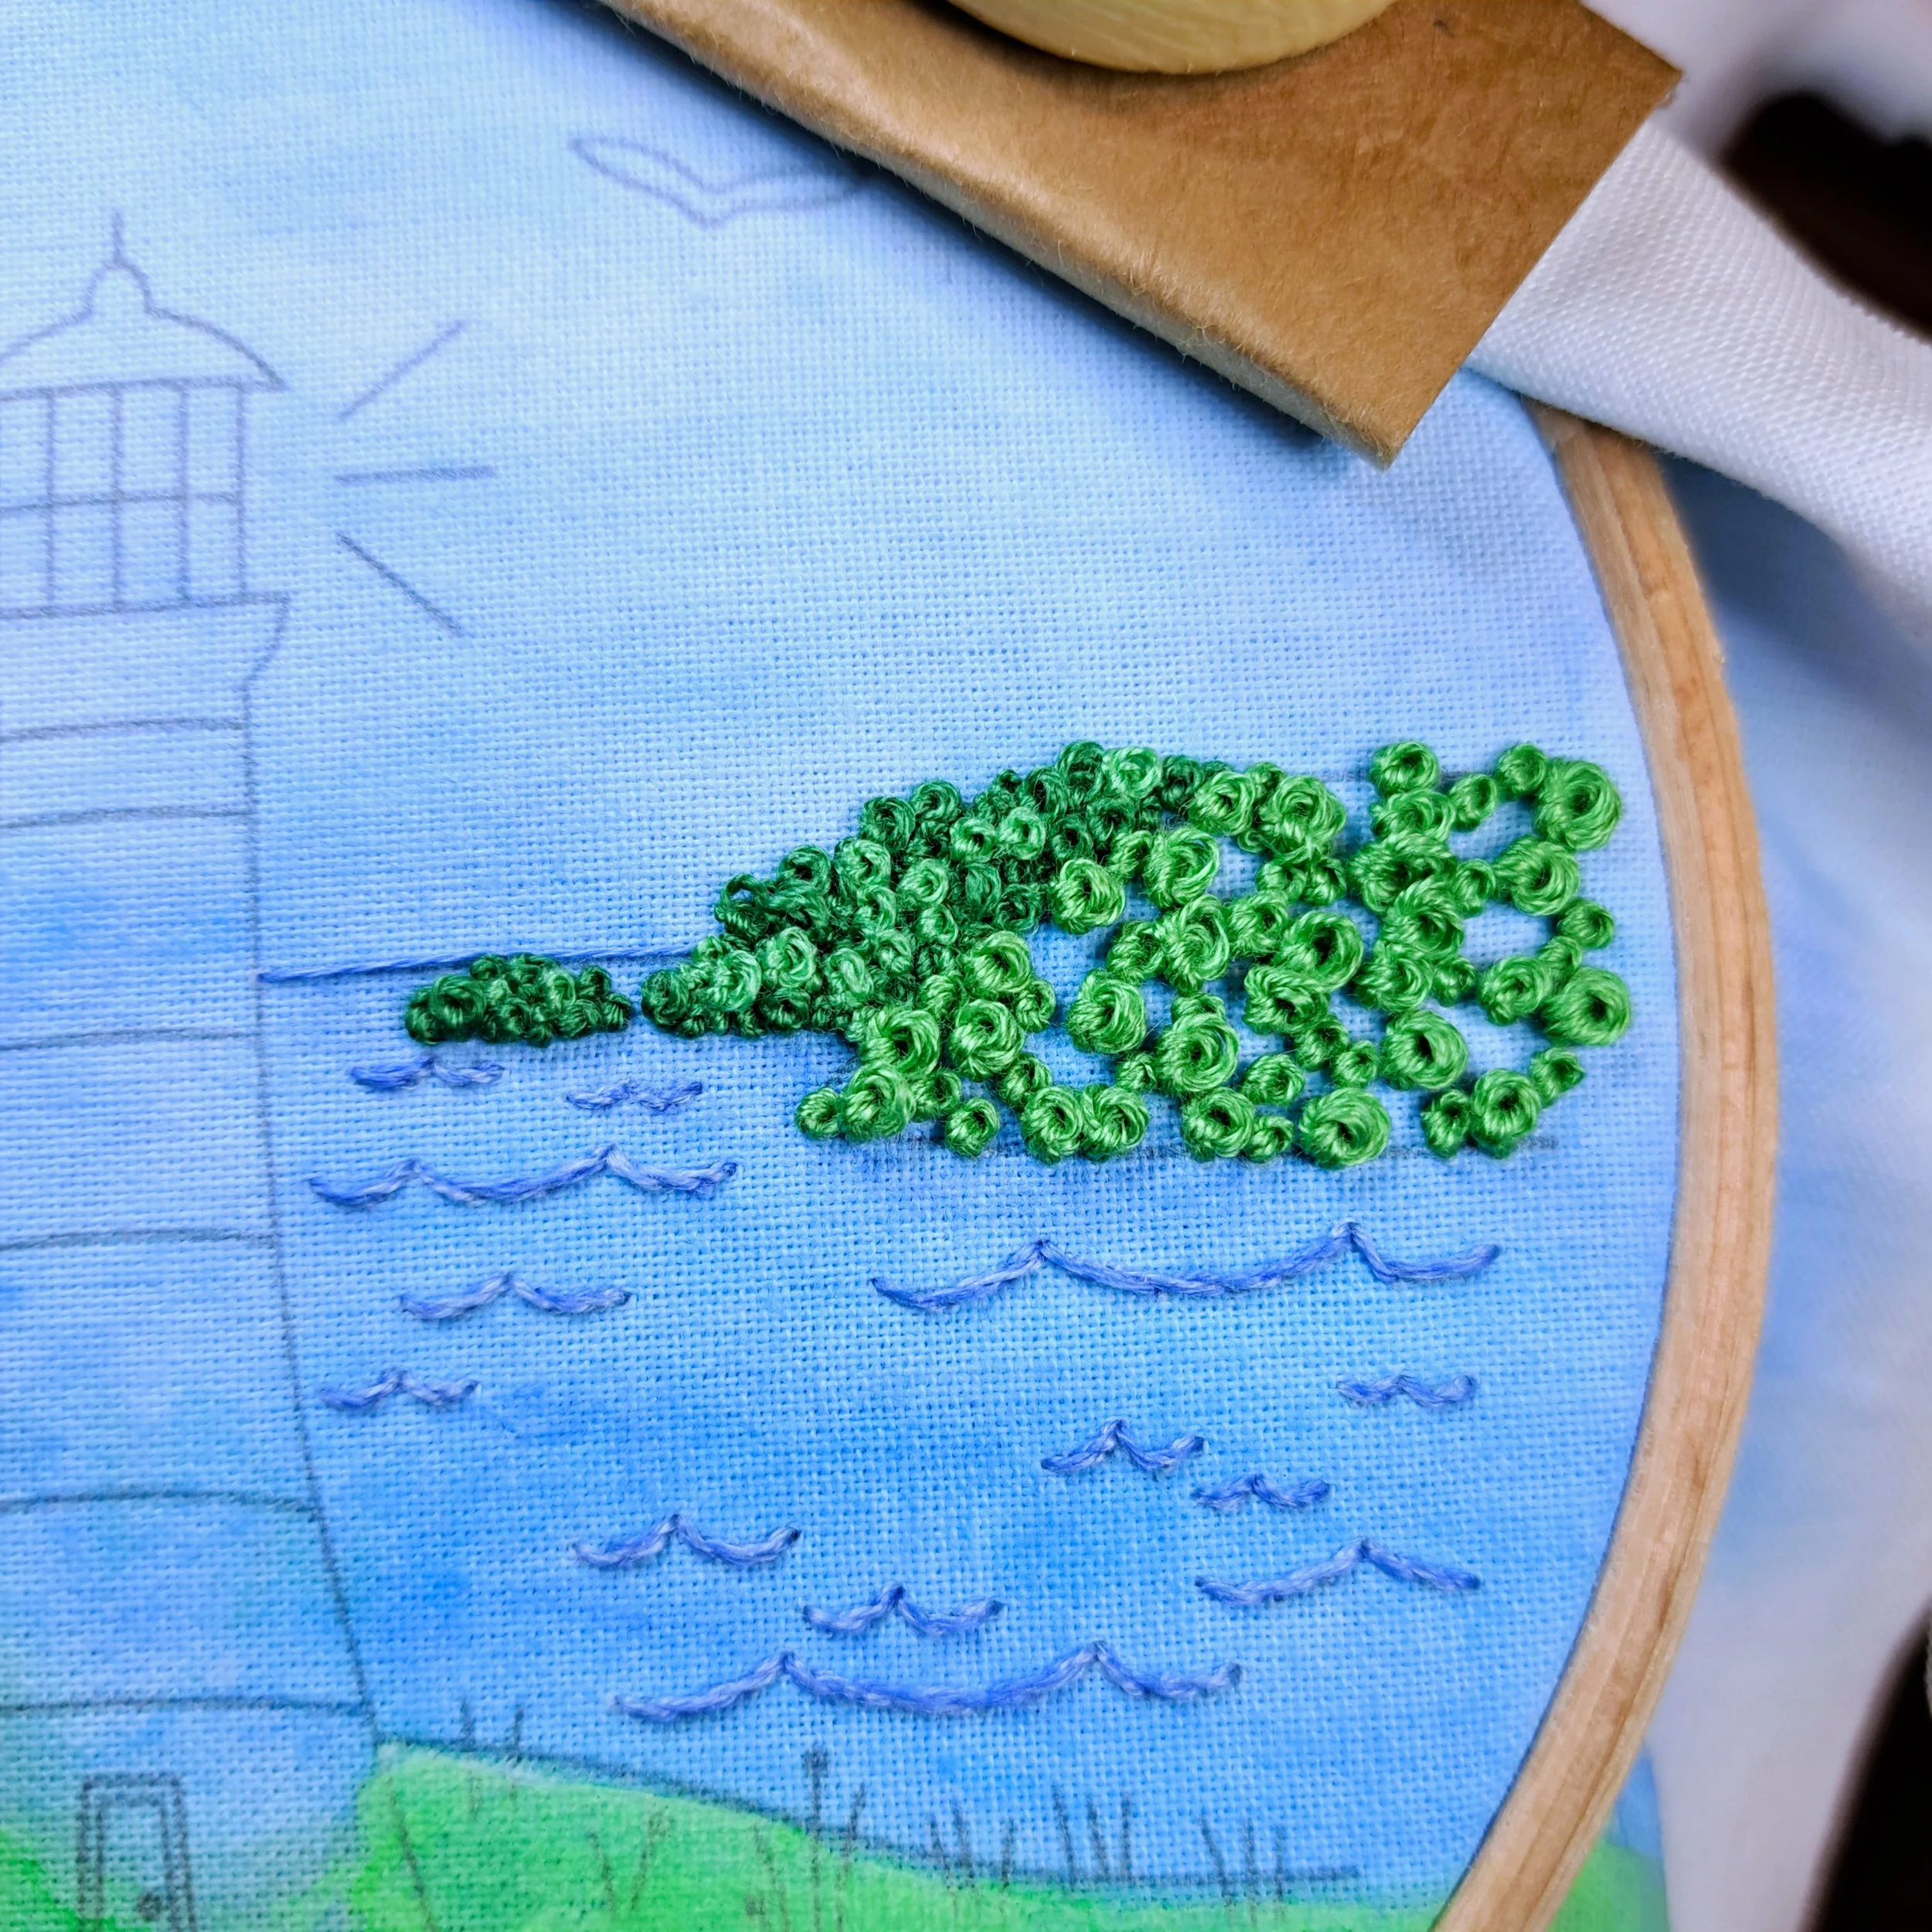
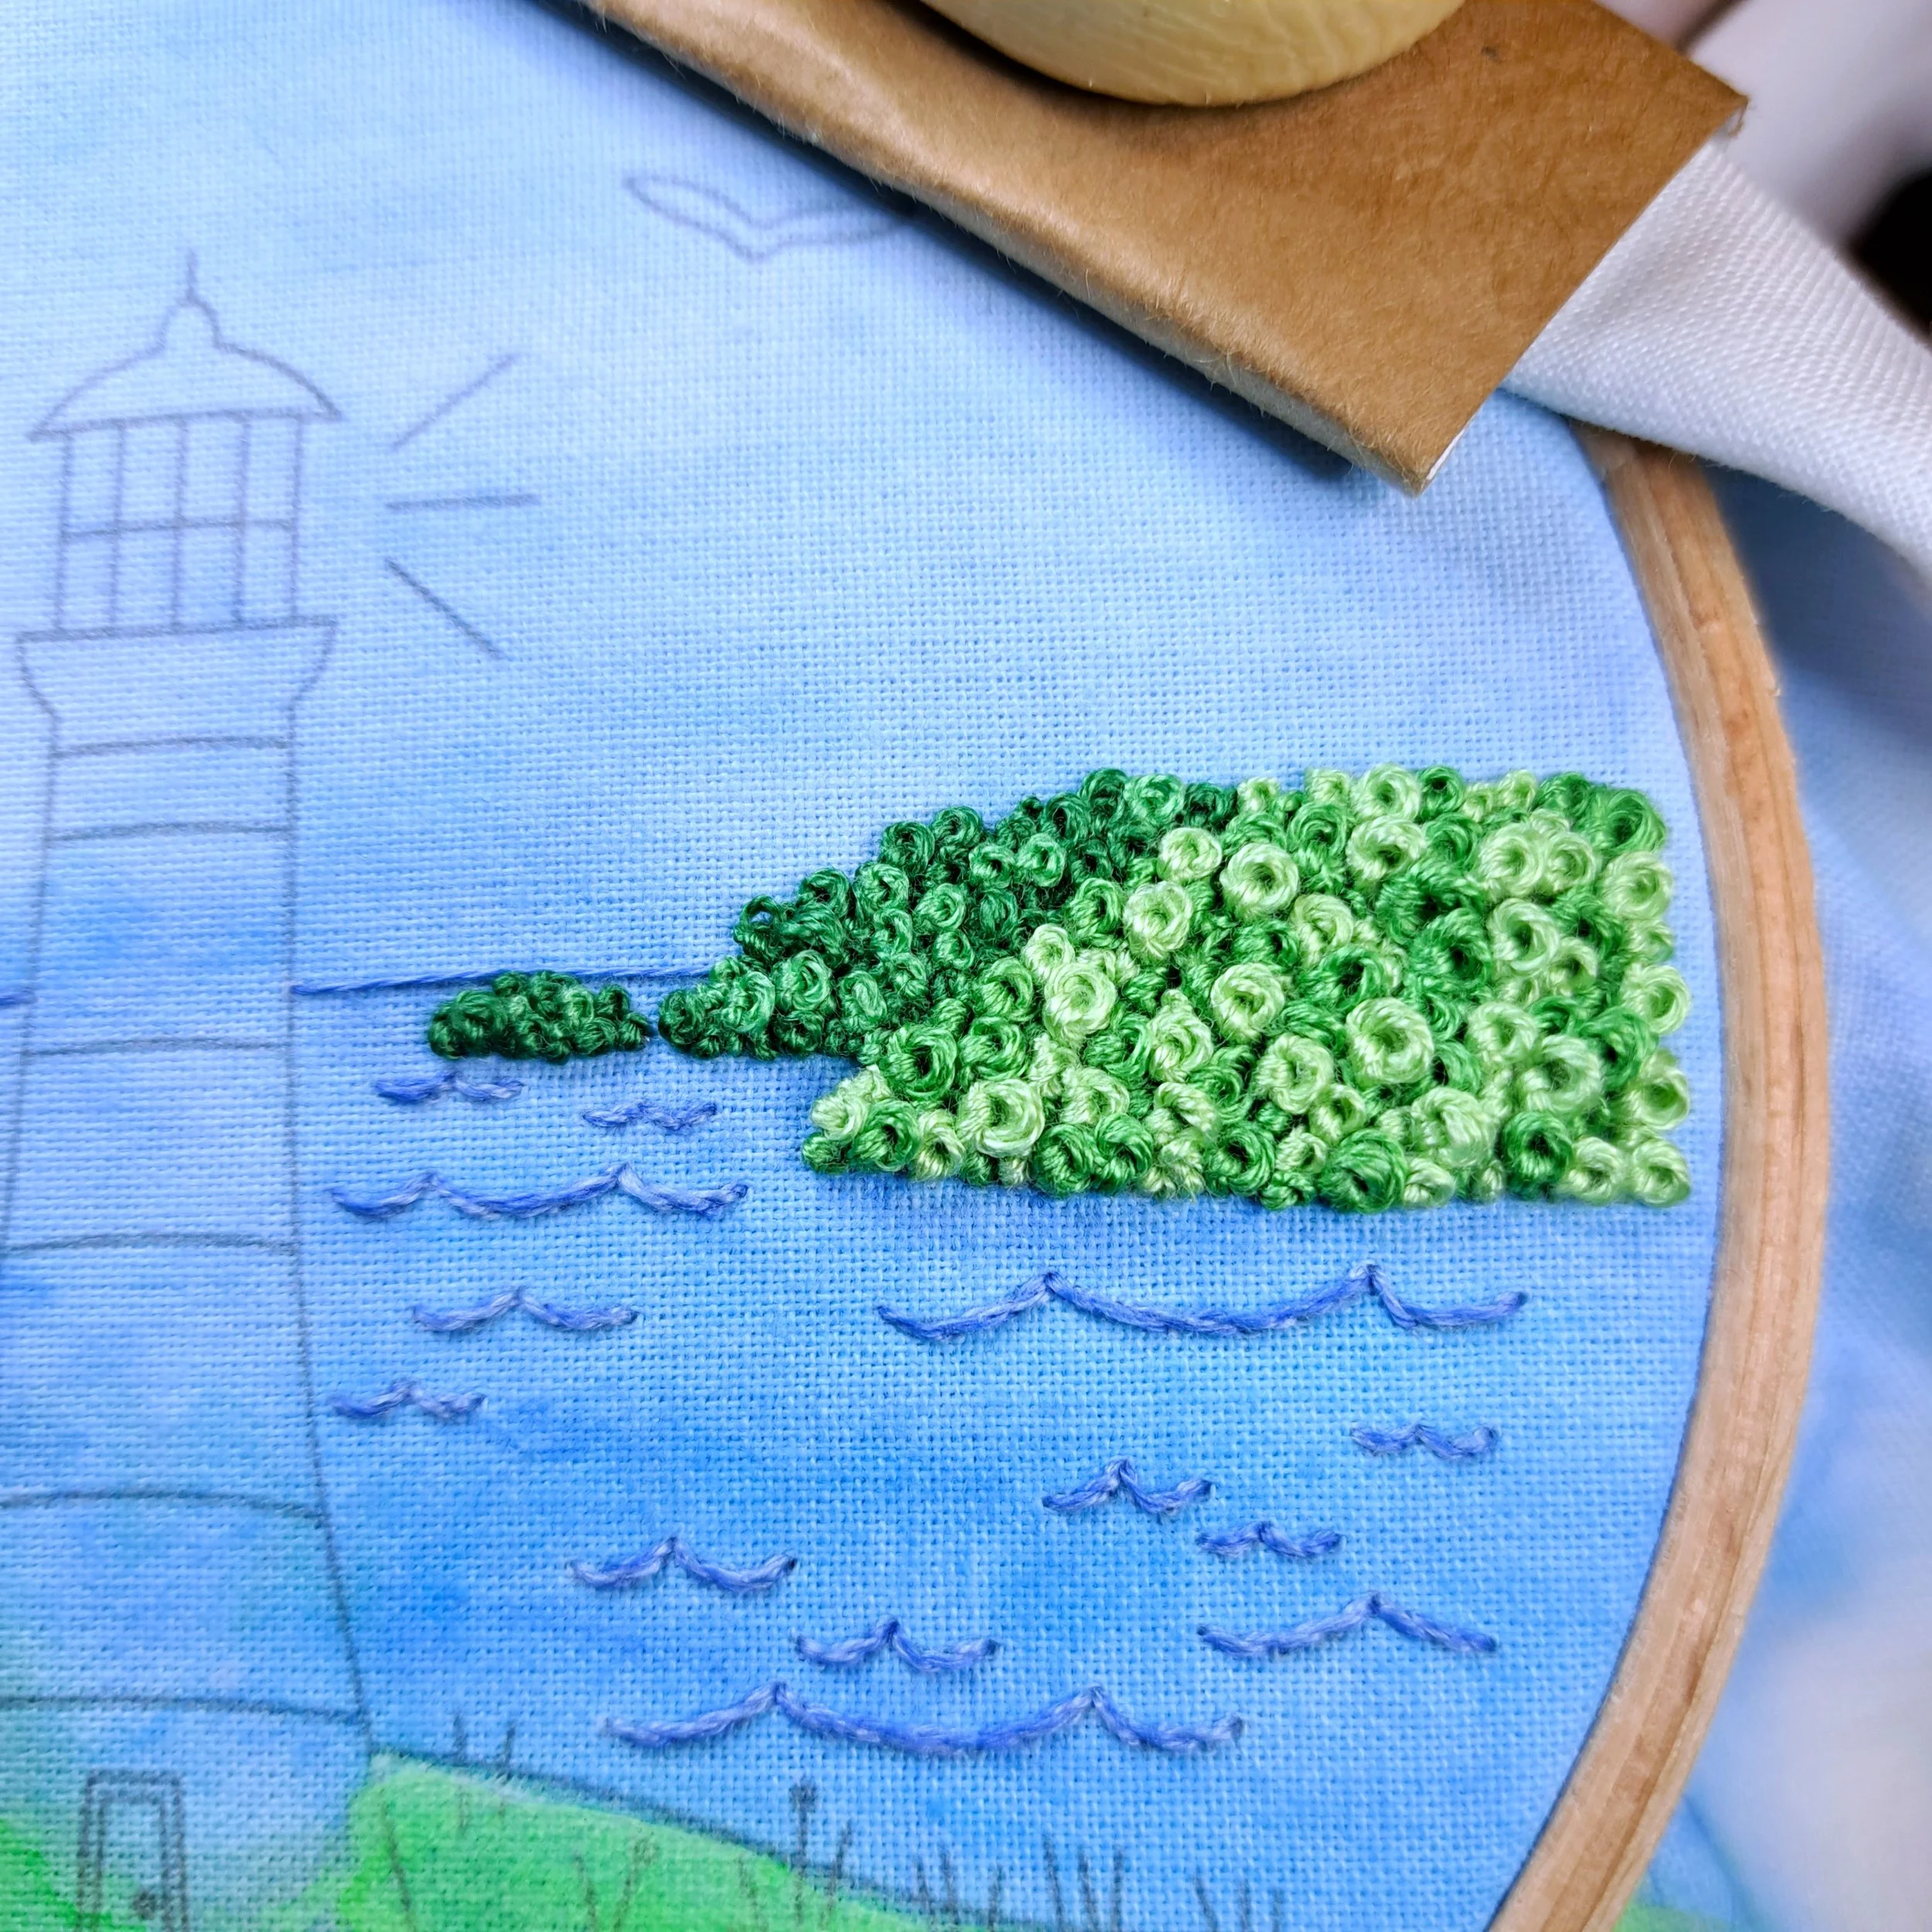
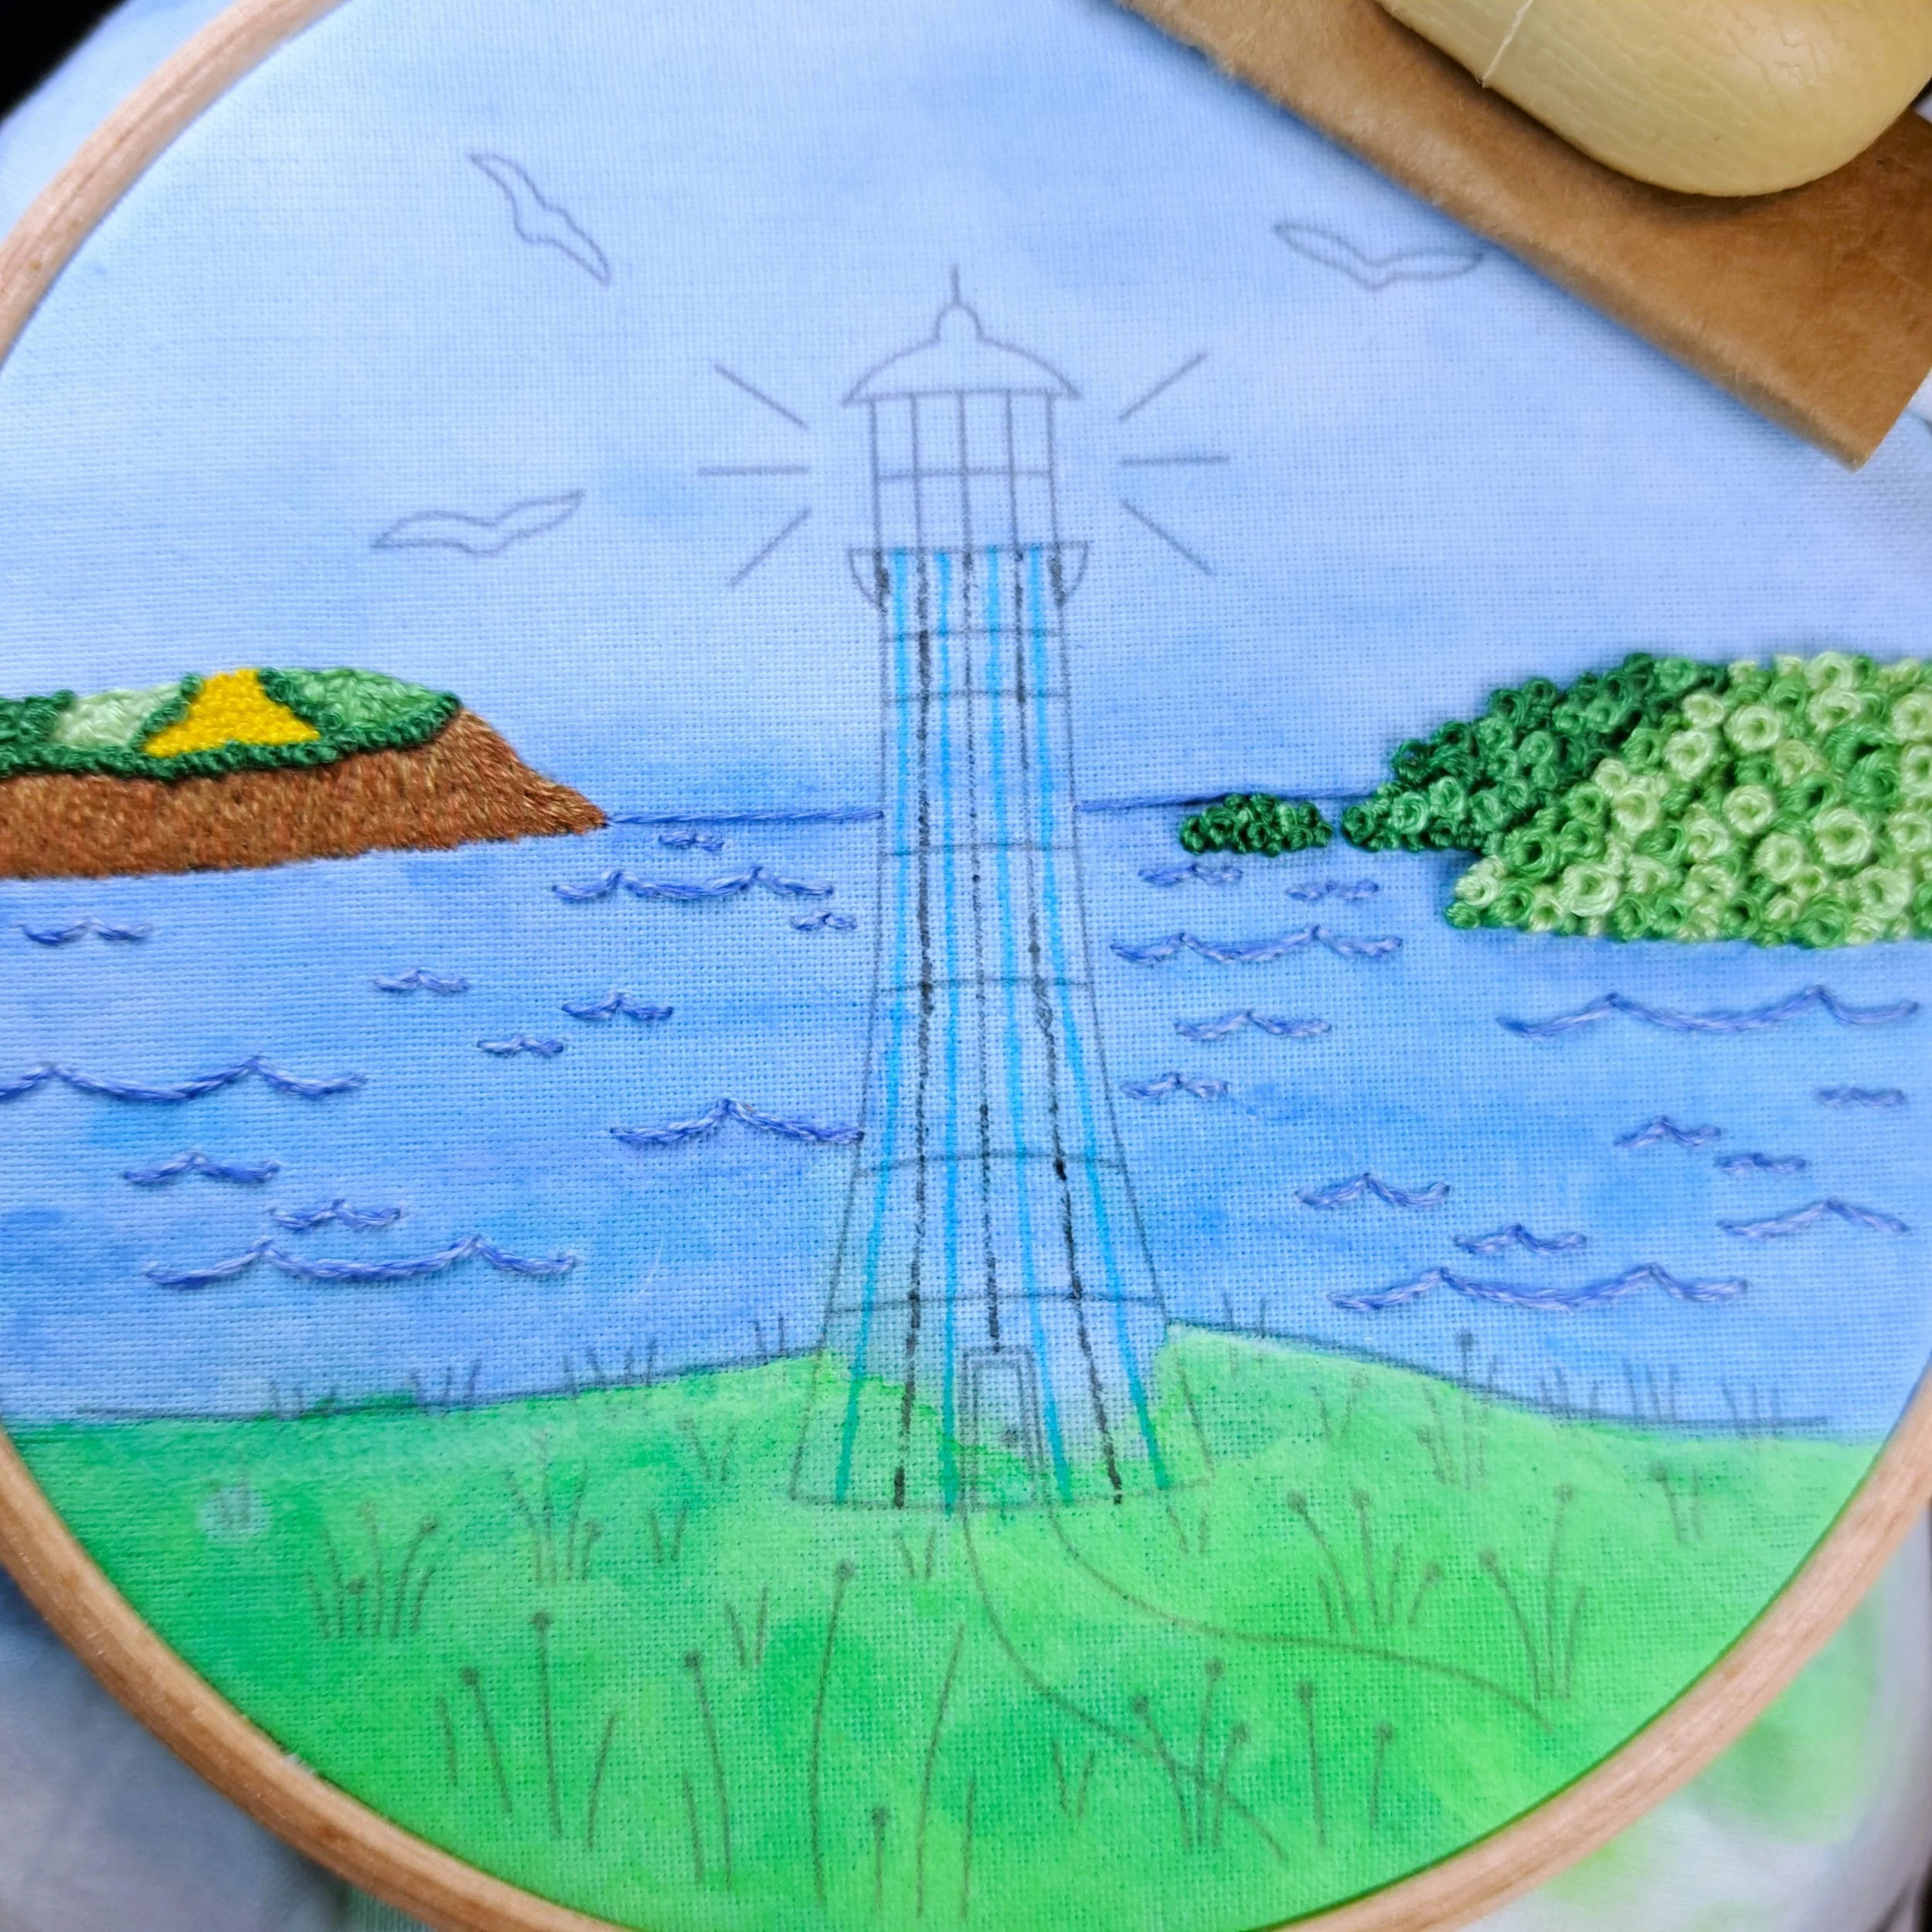
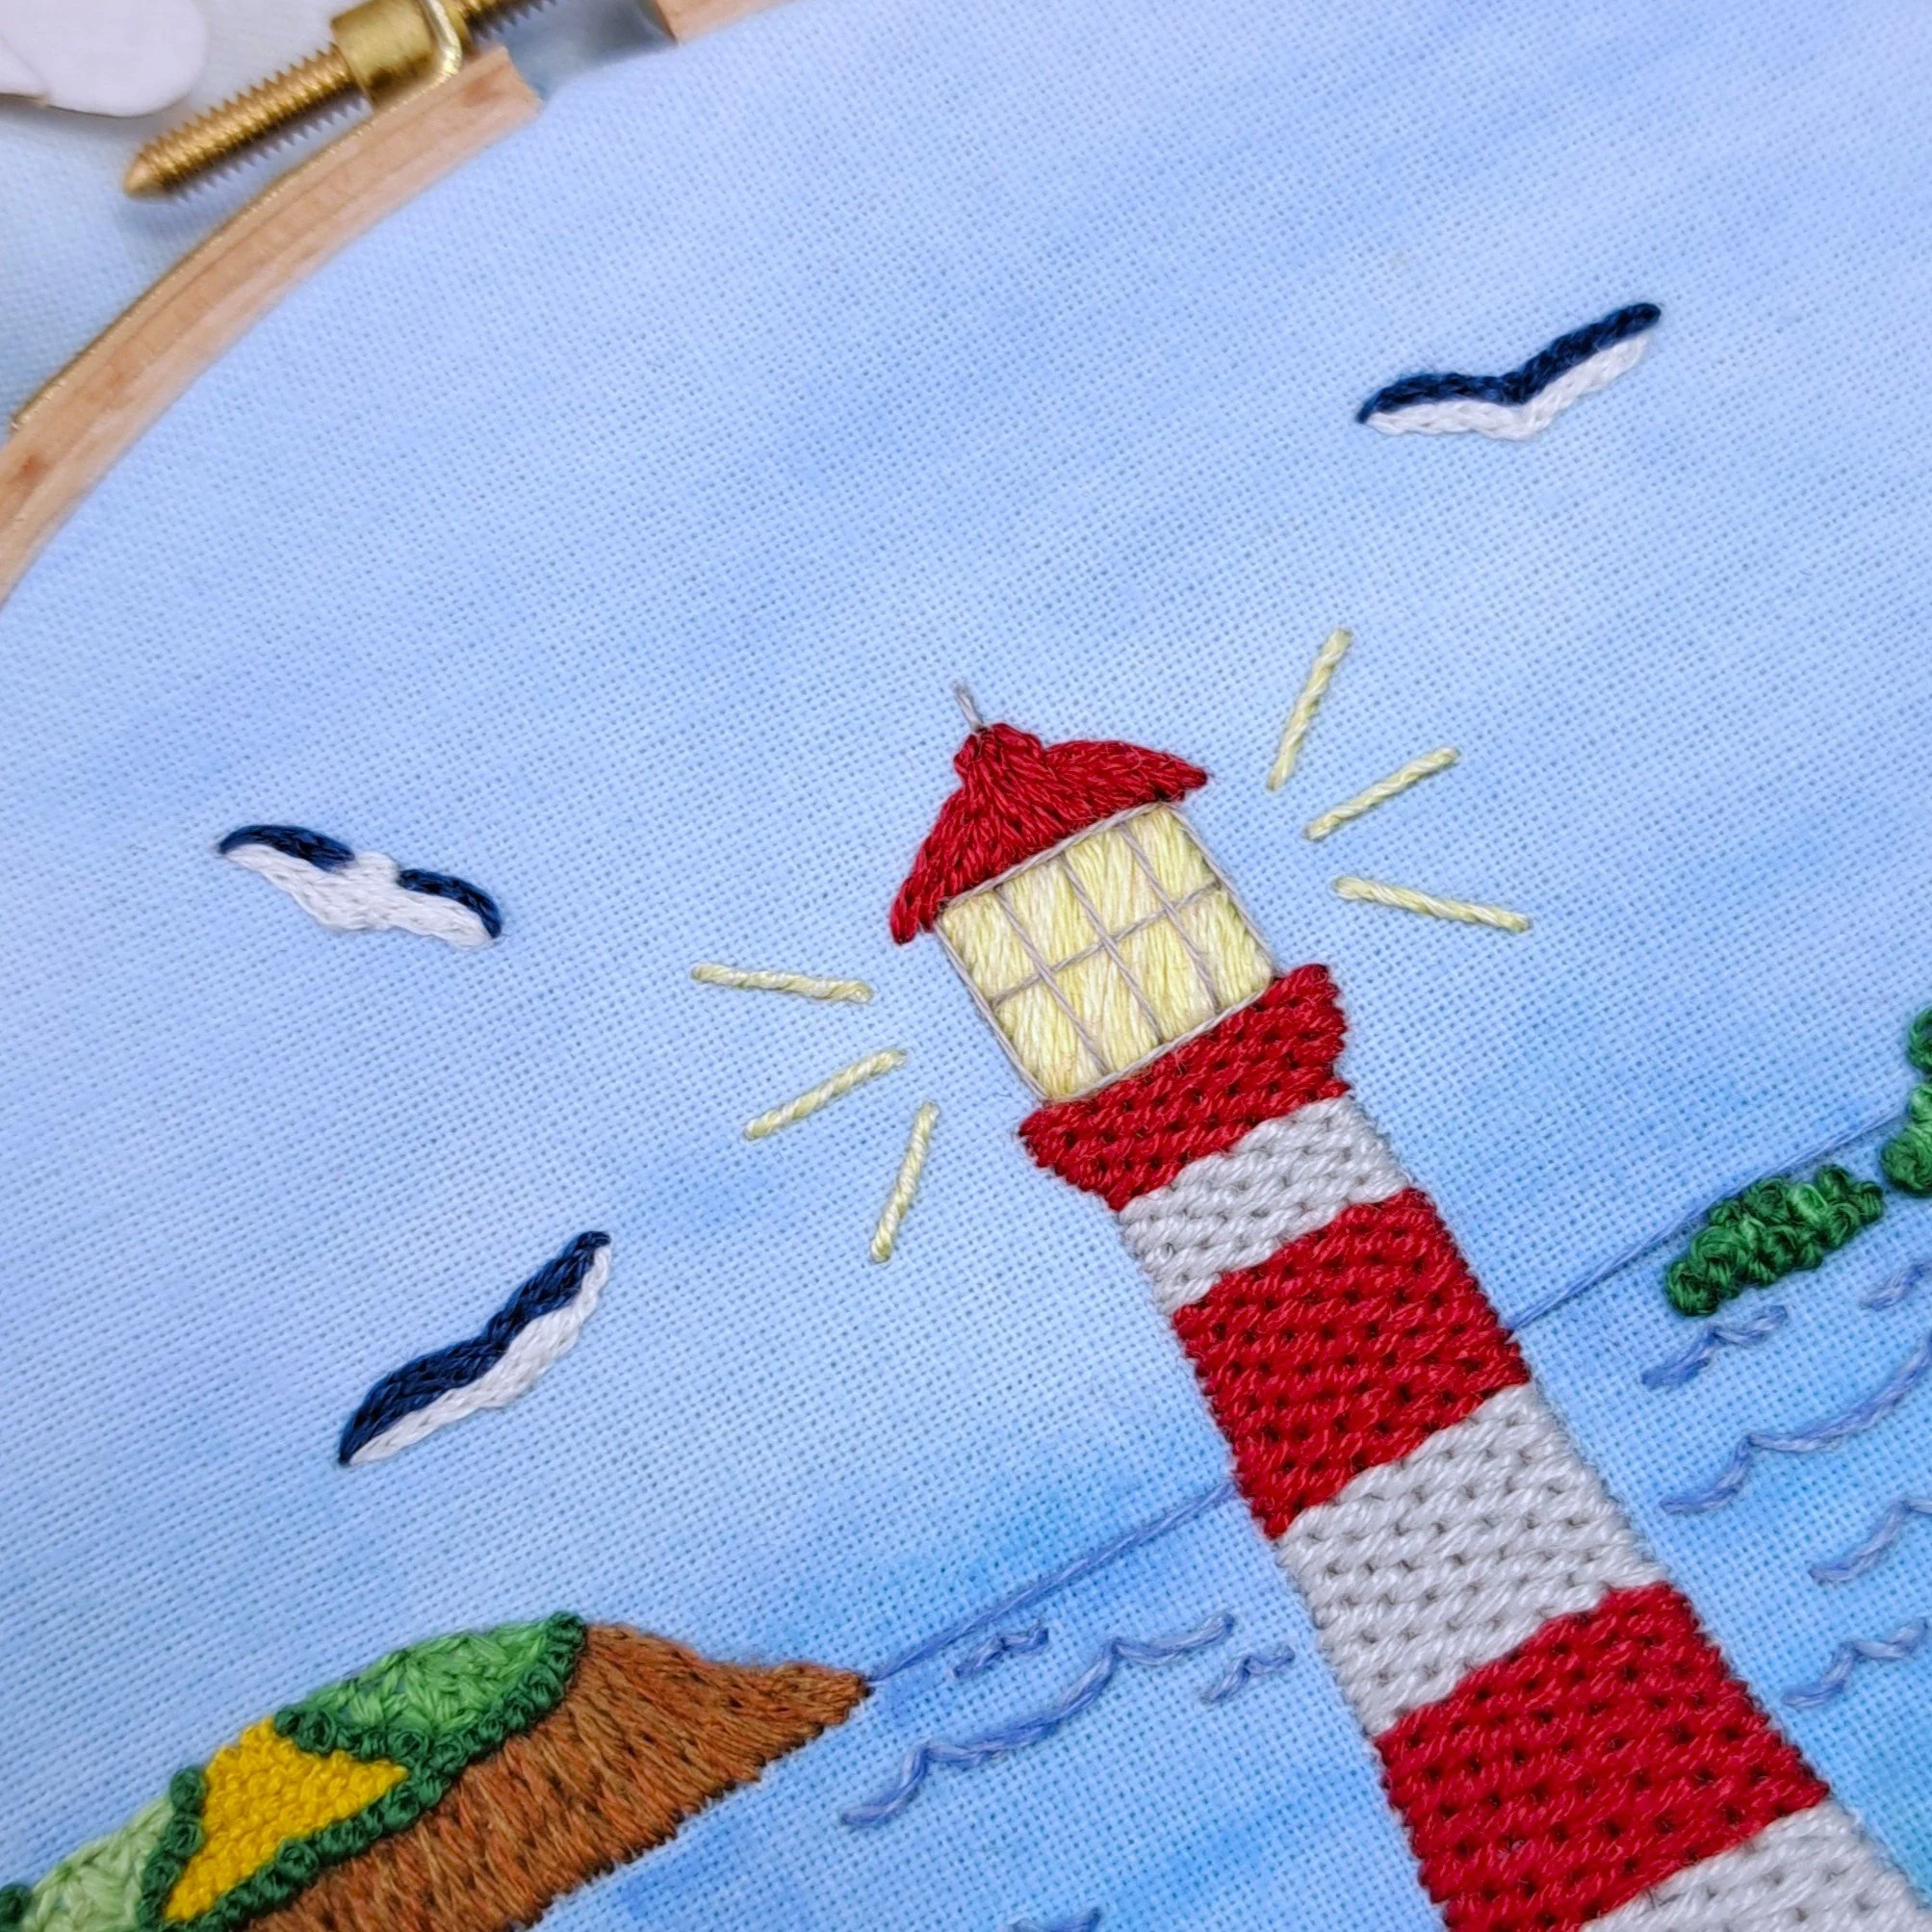
The Headland on the Right at the Back & the Little Island
I completely filled this headland island with French Knots, and had lots of fun creating different sized knots to give the effect of a dense cluster of trees. Some knots I made with 3 wraps, some with 2 wraps, and some just with 1 wrap. For extra texture, I even left some of the knots loose - I broke the usual French Knot rules by not keeping tension on the wraps before pulling my needle through. These were really fun to play with!
I filled most of this headland and the little island using Anchor 211 (Dark Green), then filled in the gaps with Anchor 209 (Green).
Stitch – French Knots, with a mixture of 3, 2, and 1 wraps
Thread colours – Anchor 211 (Dark Green) and Anchor 209 (Green)
Number of strands – 3
Needle size – Medium

This is how the headland looked after being stitched with Anchor 211 (Dark Green)
Then I filled in all the gaps with Anchor 209 (Green).
The Front Headland
I stitched this headland in almost the same way as the other one, but I used more strands and aimed to make the majority of the knots larger to help it feel closer and more defined from the other headland. I also used two lighter shades of green here - about 50% filled with Anchor 243 (Mid Green), then filled in the gaps with Anchor 240 (Light Green).
Stitch – French Knots, with a mixture of 3, 2, and 1 wraps
Thread colours – Anchor 243 (Mid Green) and Anchor 240 (Light Green)
Number of strands – 5
Needle size – Large
This is how the front headland looked after being stitched with Anchor 243 (Mid Green).
Then I filled in all the gaps with Anchor 240 (Light Green).
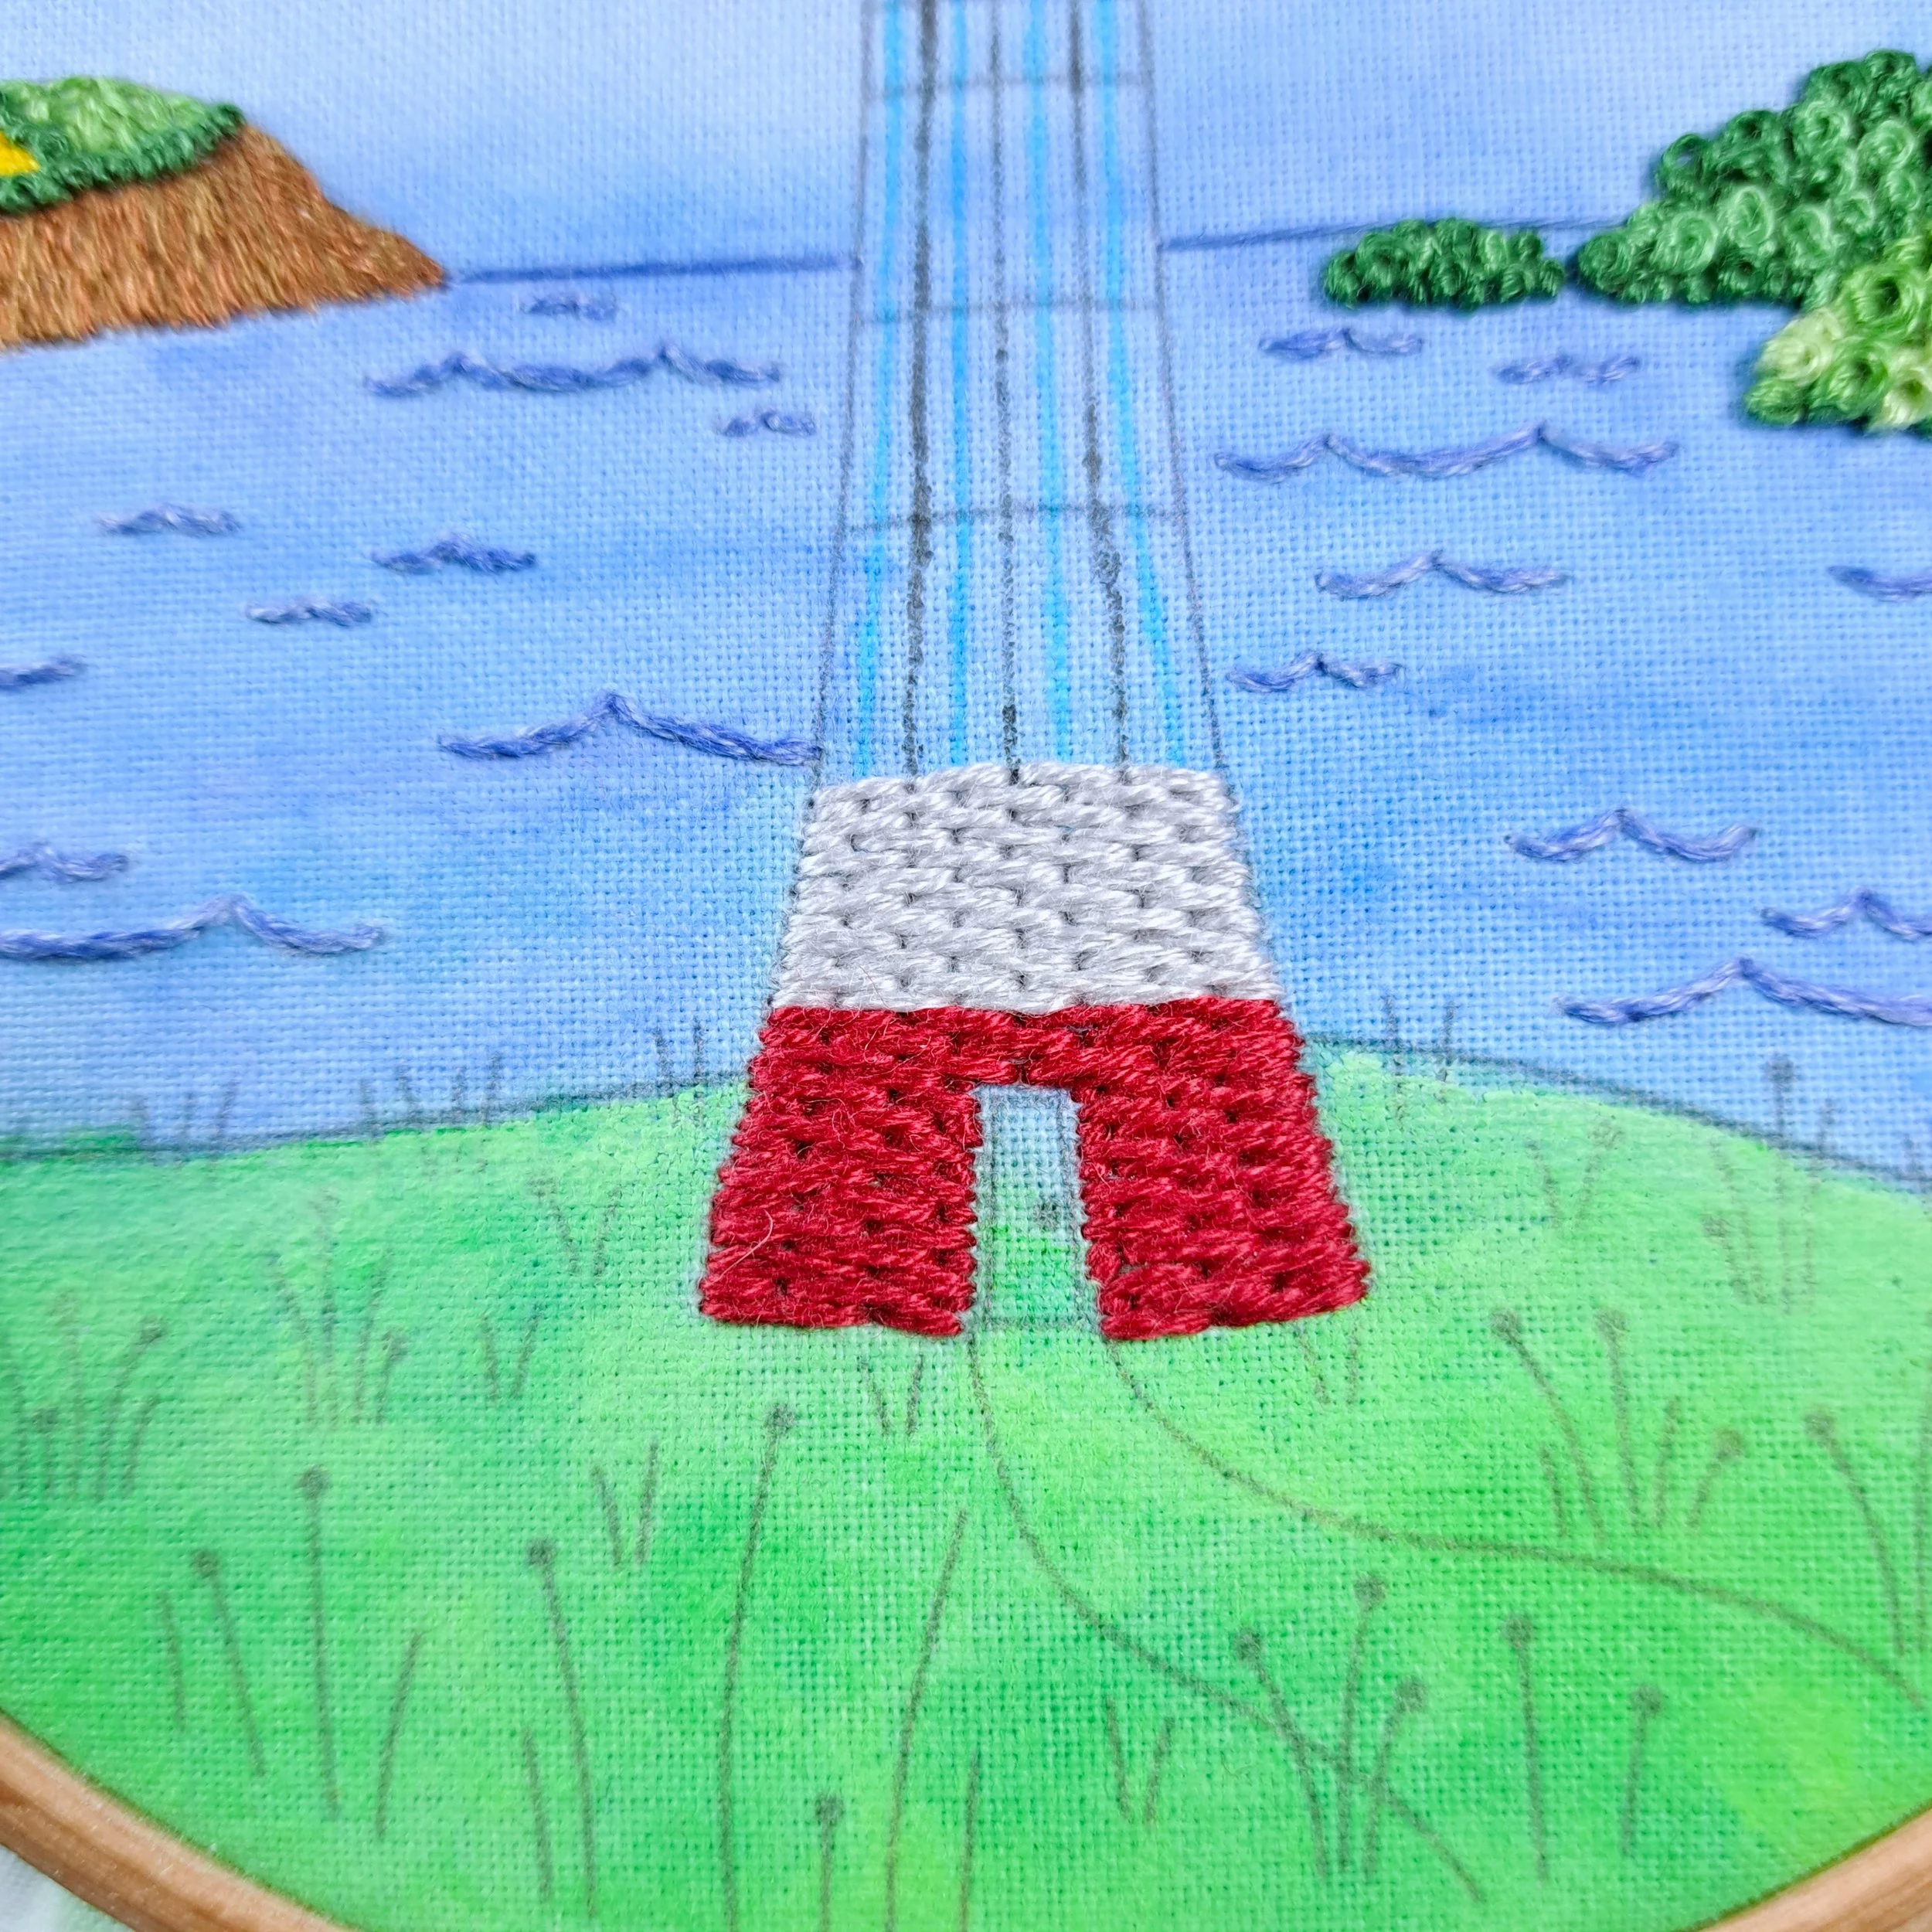
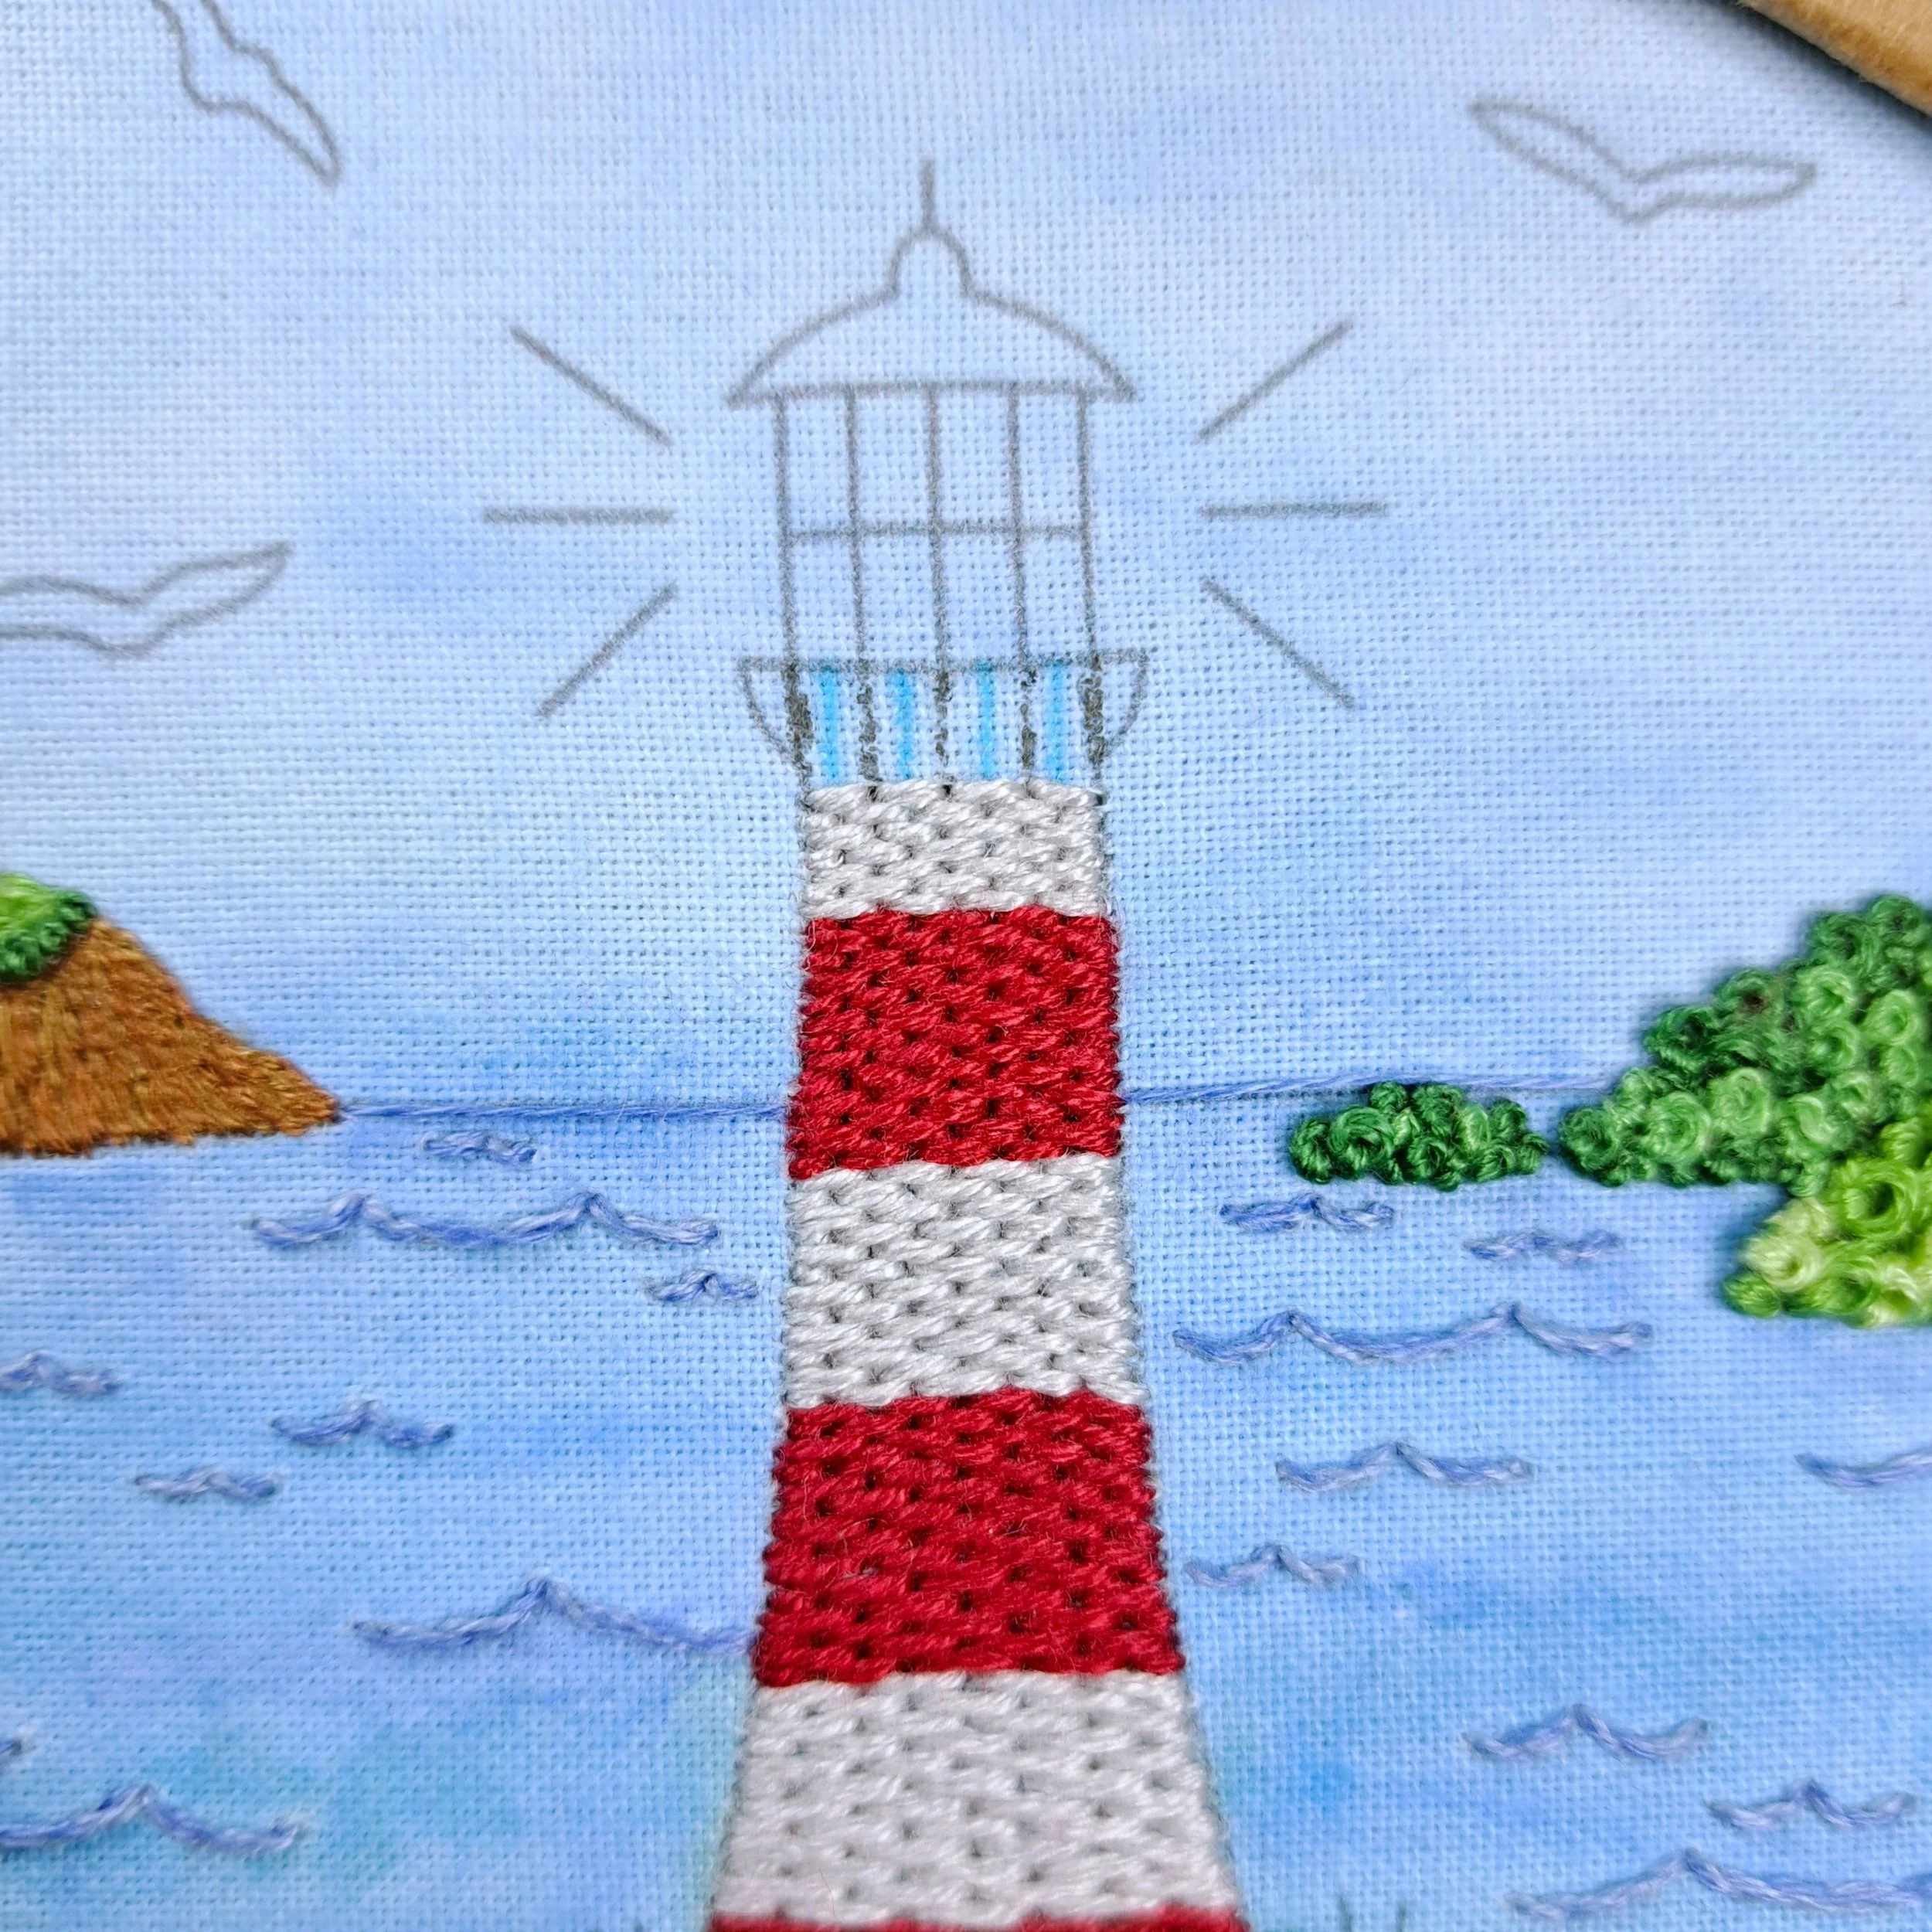
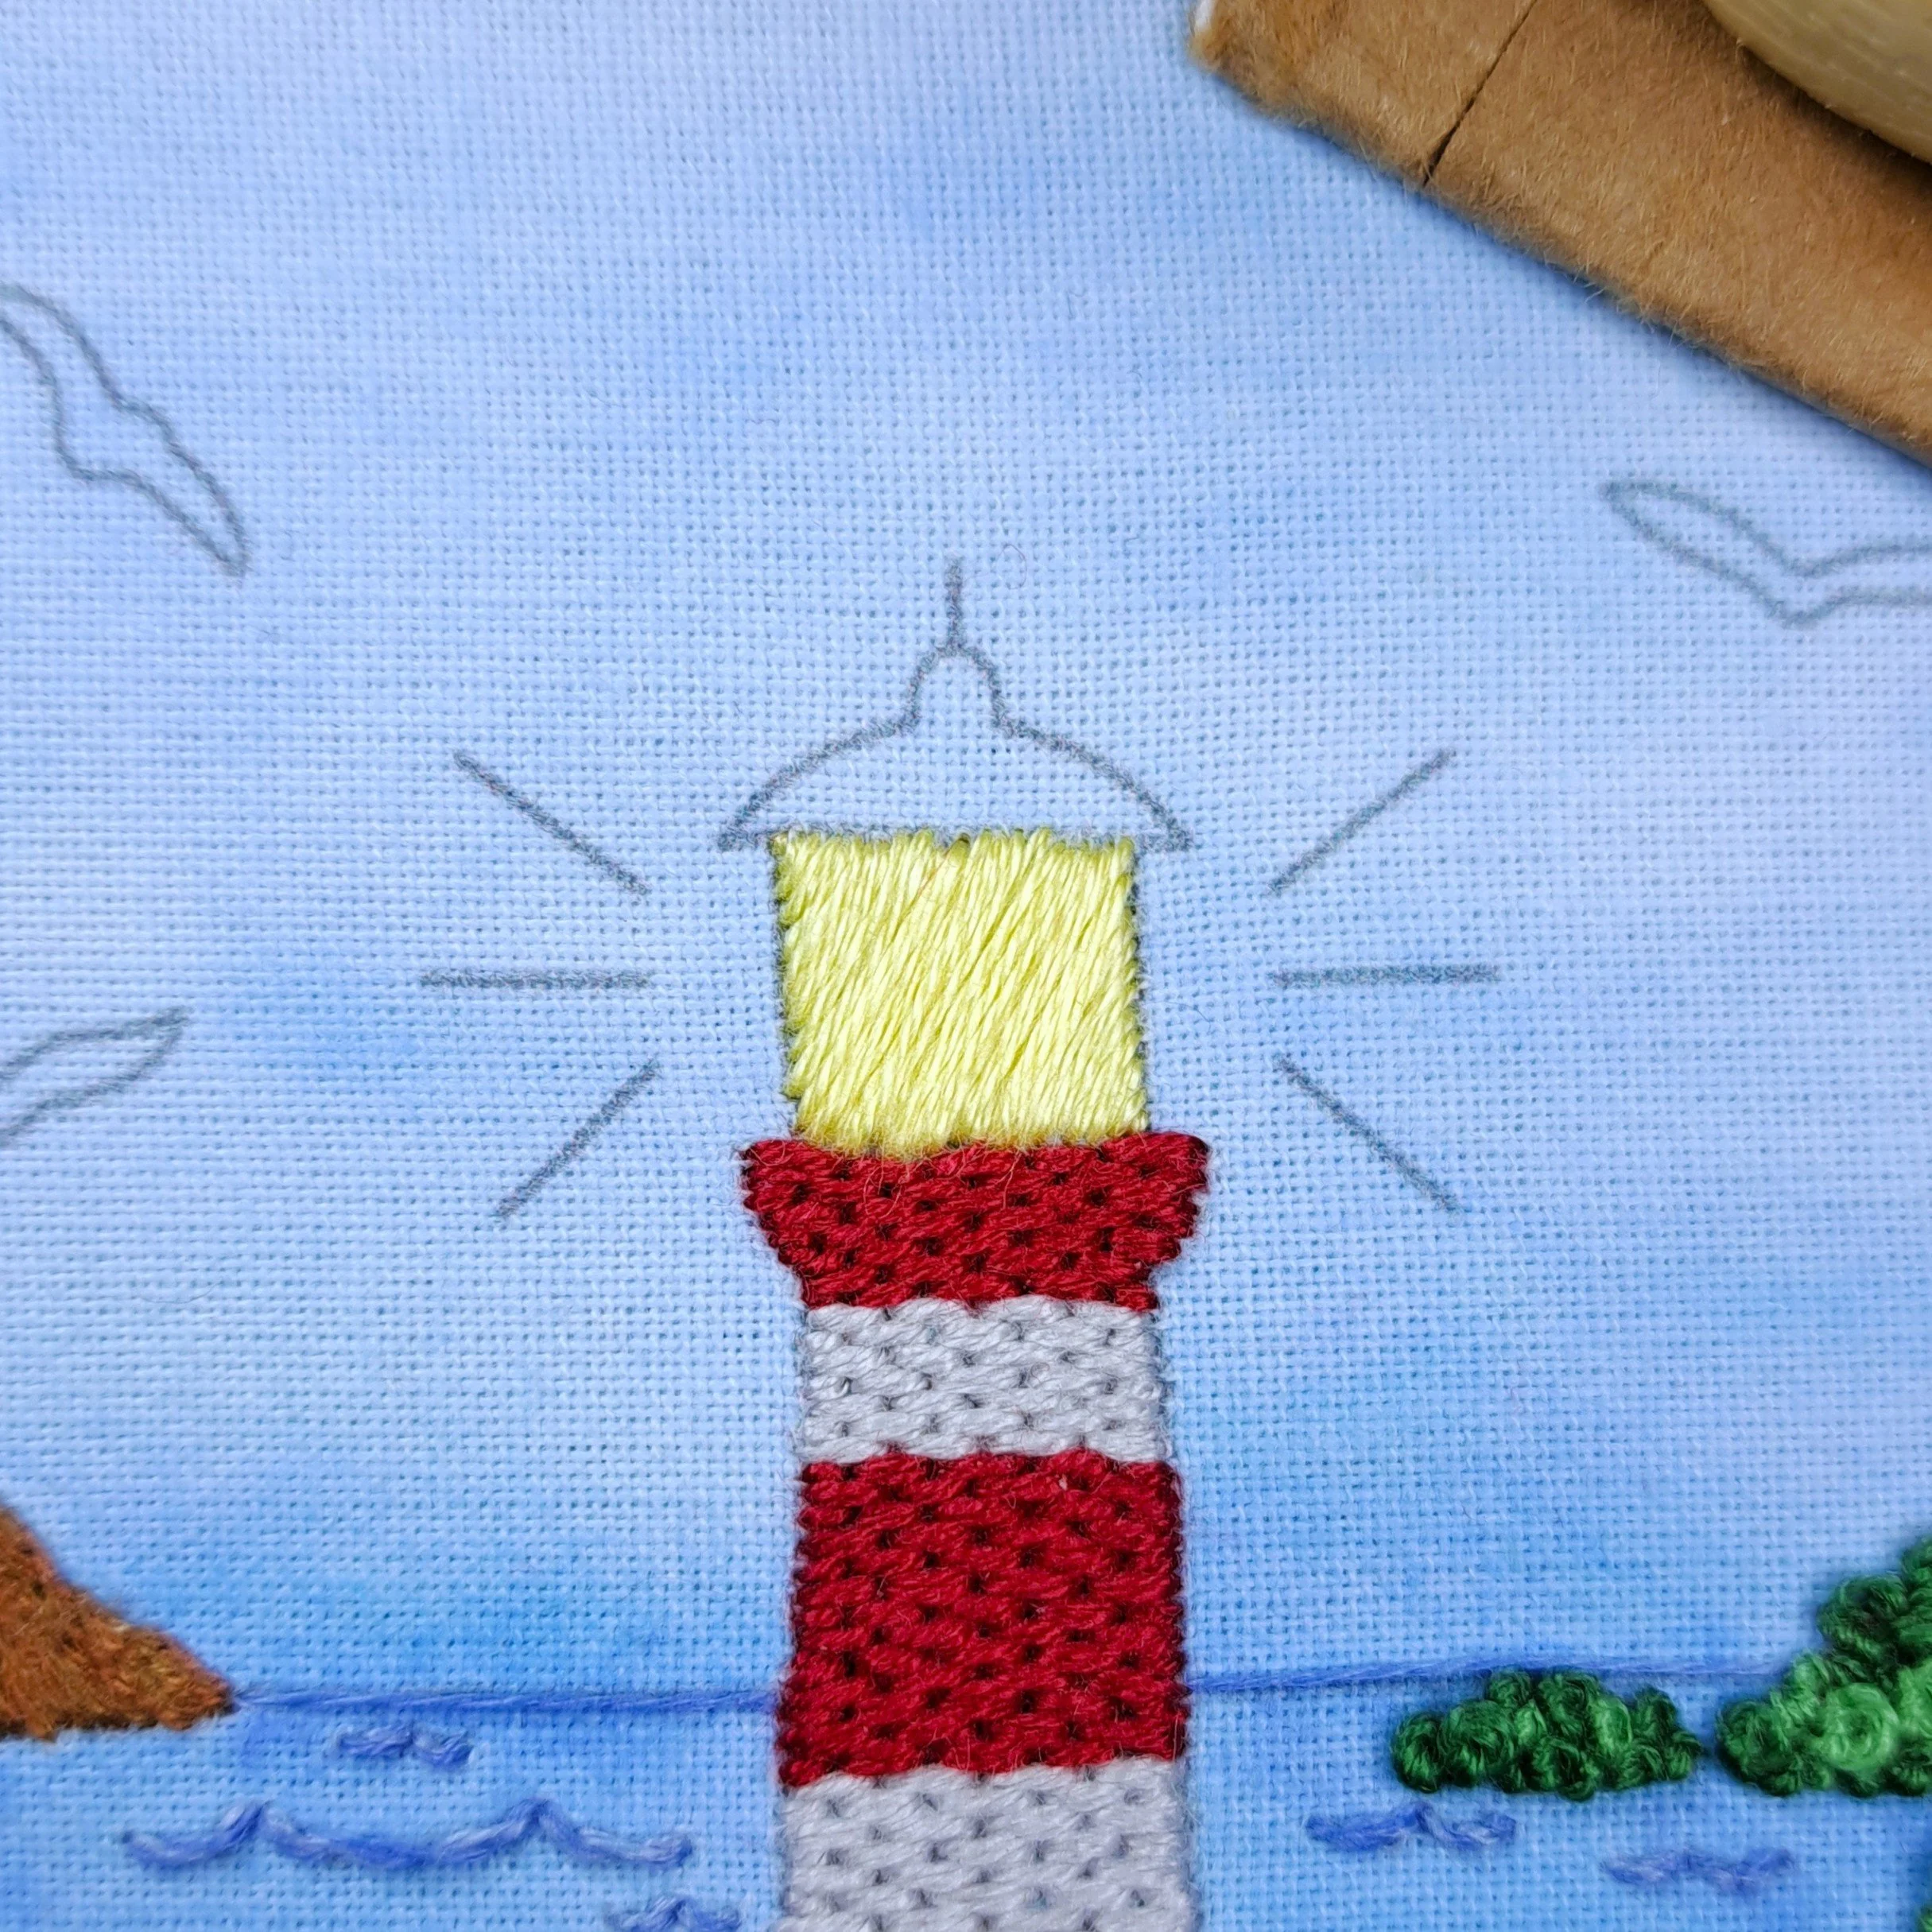
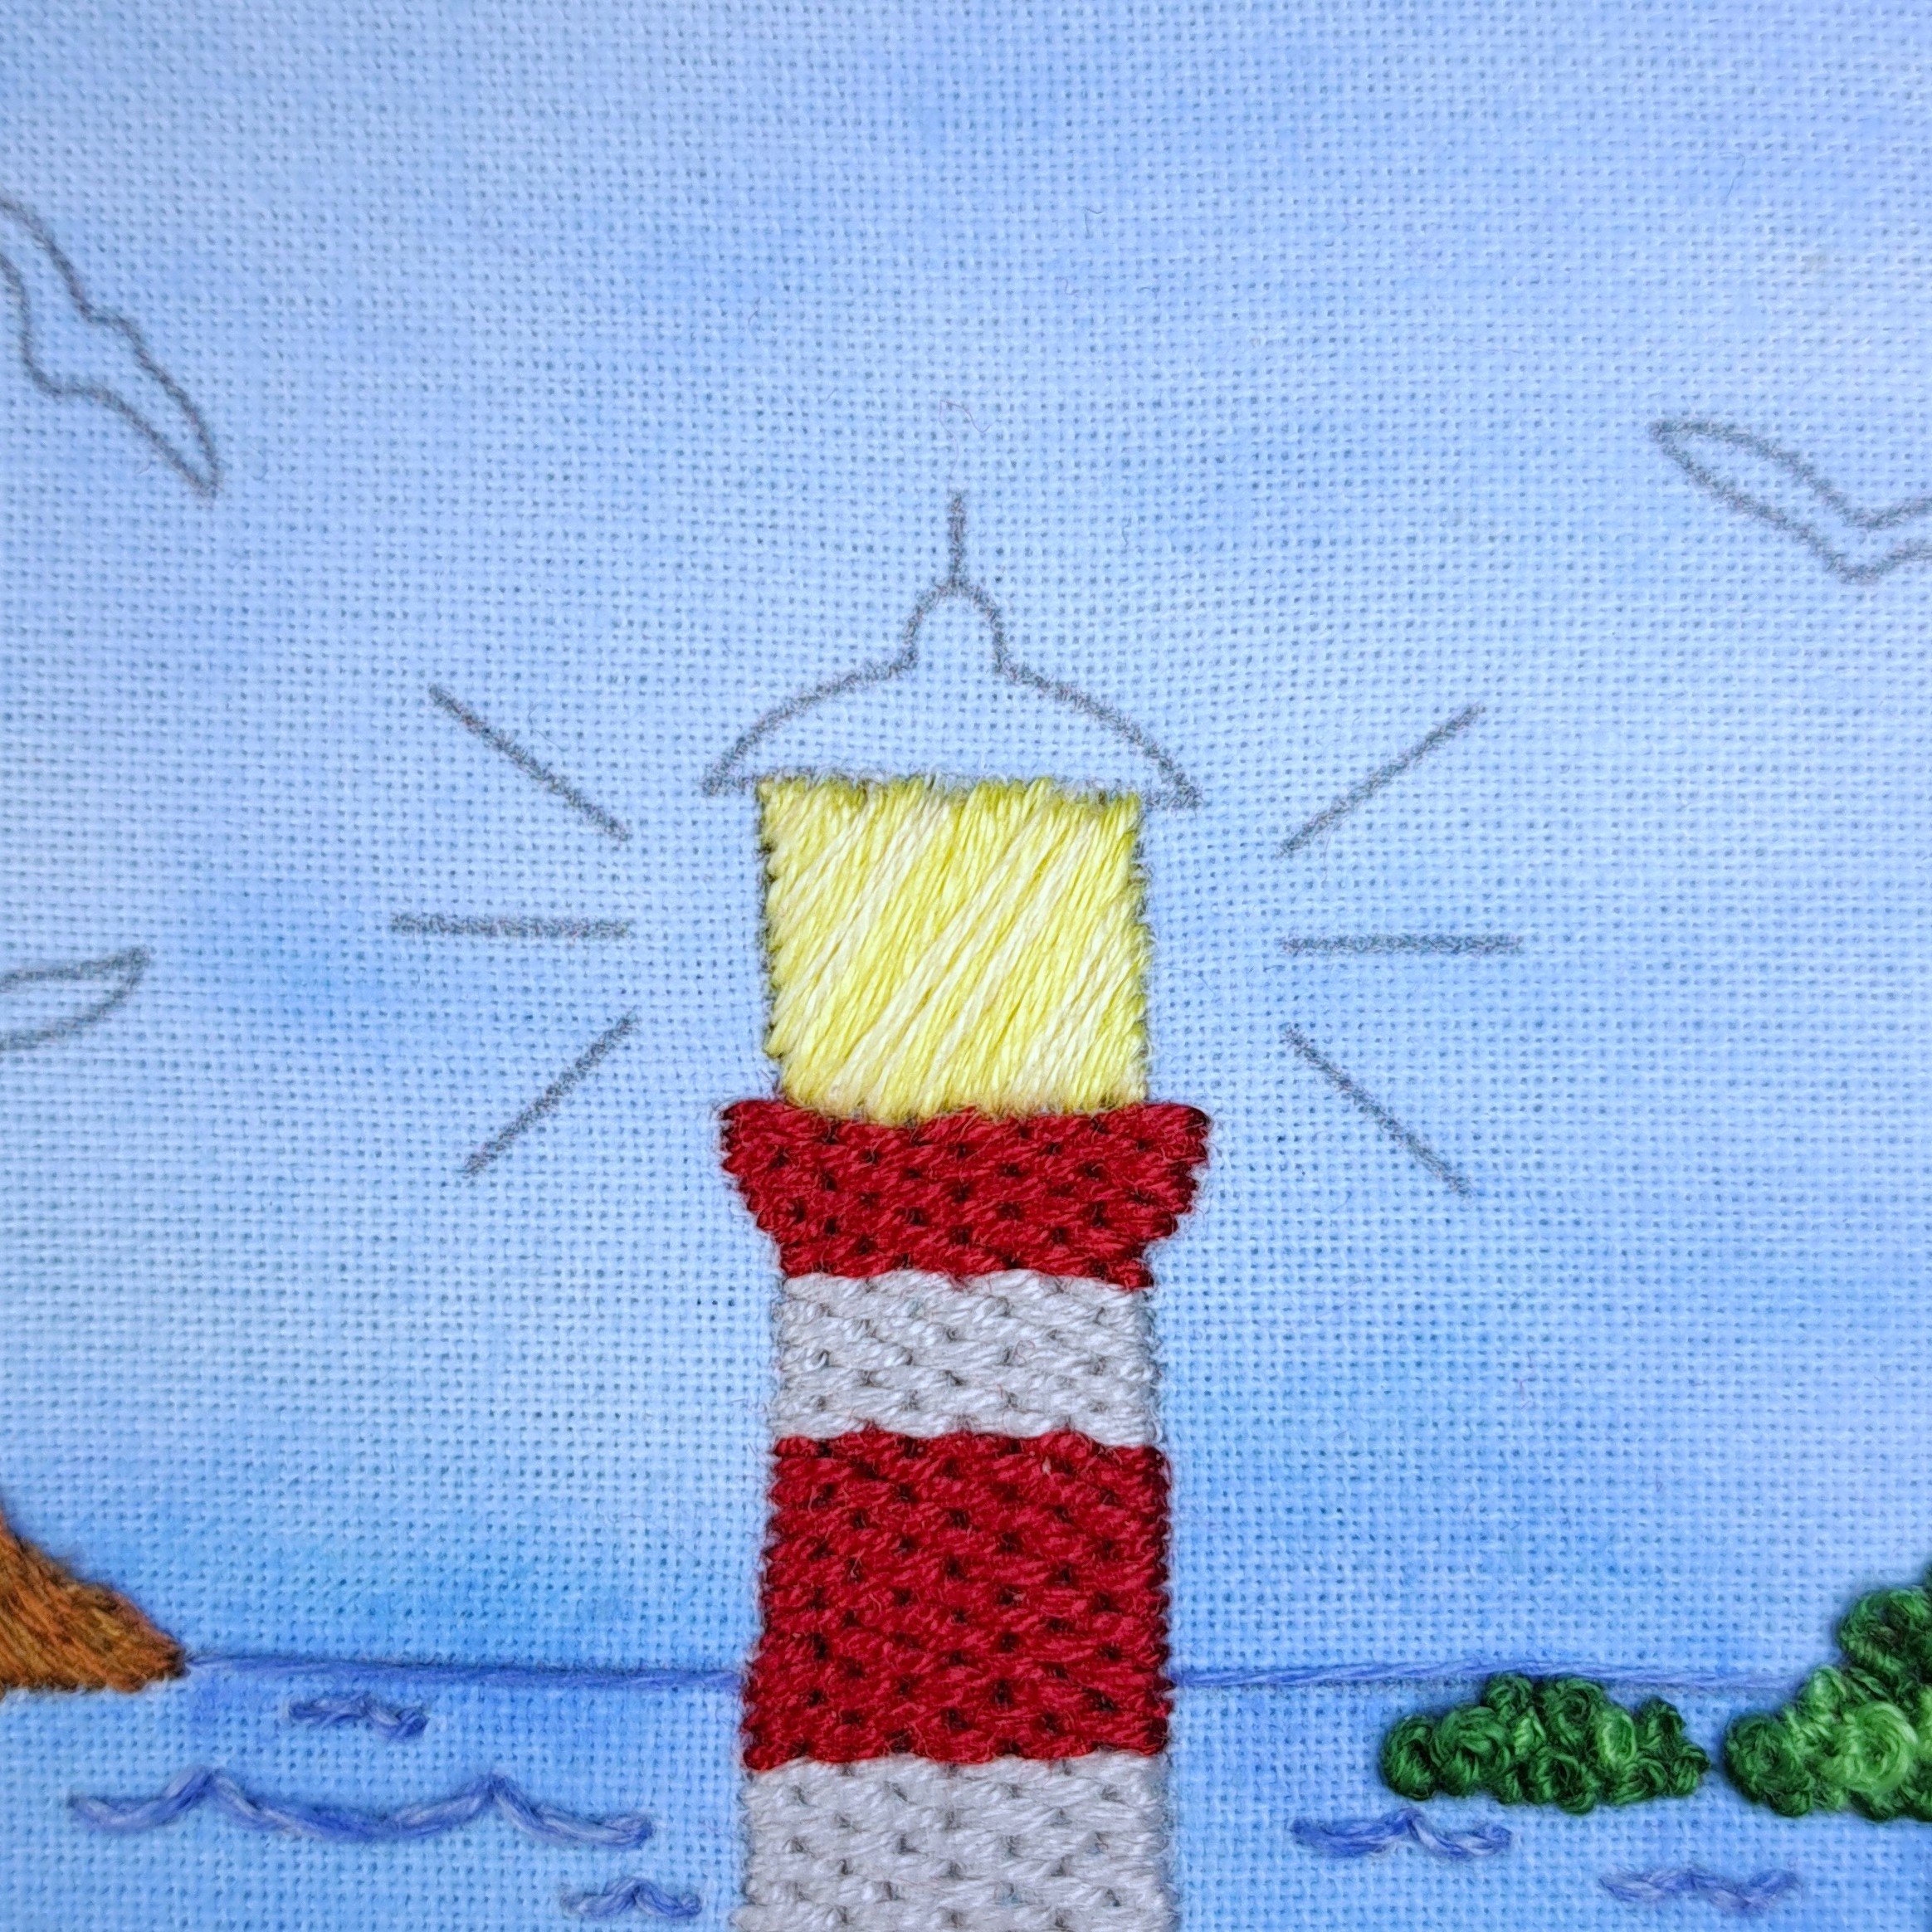
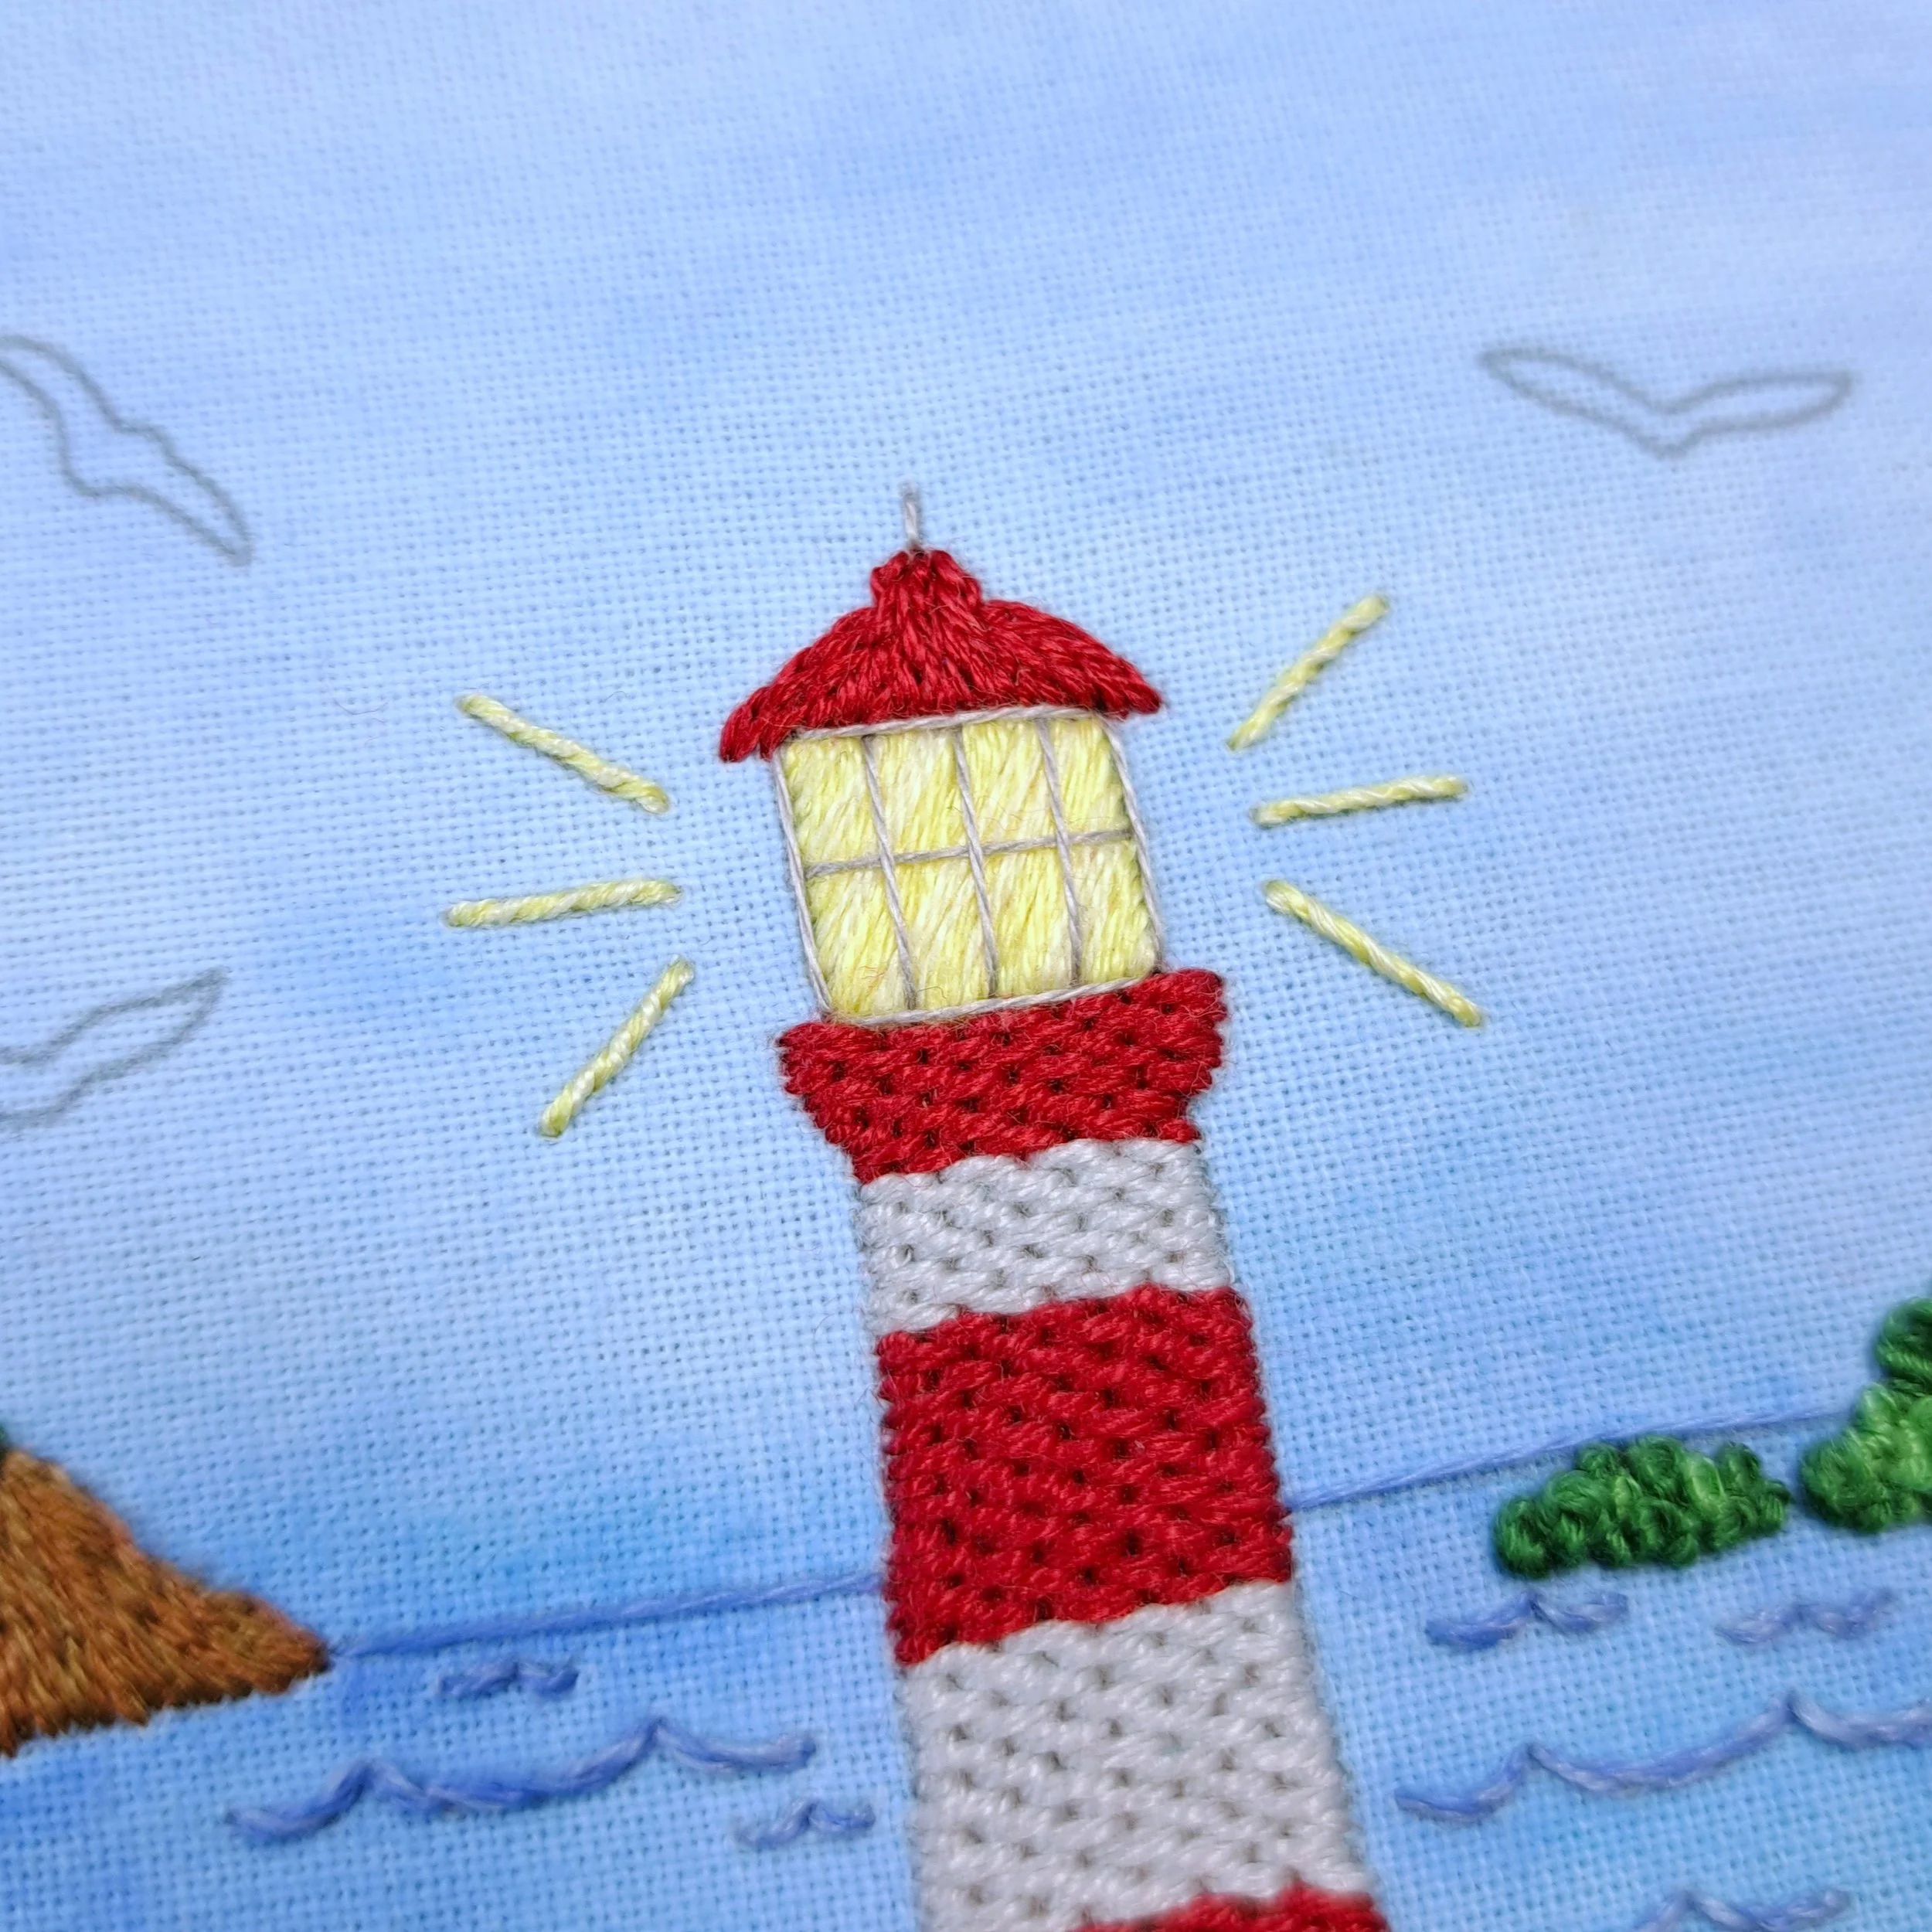
The Lighthouse
For me, it just had to be Brick Stitch here. I find it much easier to keep a neat and even Brick Stitch if I draw guidelines first - especially with an uneven shape like this. It can be a bit of a faff drawing the lines on, but once they’re there, the stitching becomes much less to think about. I like using two different coloured fabric pens - a black one and a blue one. Since I’m aiming to completely cover these lines with stitching, as long as they don’t go beyond the lighthouse, you could use any pen or pencil that makes a nice thin line.
First, I draw lines with the black pen, spaced about a stitch length apart, following the curves of the lighthouse sides. Because of the shape, these lines (the stitch lengths) get closer together near the top, so keep in mind that if you space the stitches small at the bottom, they’ll be super tiny at the top.
Once the black lines are drawn, I add a line in between each black one using the blue pen. I know these lines look a little crazy at this point, but once you start stitching the pattern becomes clear.
Here’s how I use the guidelines: the first row of Brick Stitches goes from black line to black line, then the second row goes from blue line to blue line, then back to black to black, and so on - right up the lighthouse.
✨ A little tip:
Keep an eye on the sides - you want the rows to stay even horizontally. I know, there’s a lot to think about! I won’t lie though, I did let some of my rows go uneven here and there. To fix those, I popped in a few double stitches (shh, don’t tell anyone 😏). You might spot them if you’re looking, but only if you’re really scrutinising... which, let’s be honest, you probably are now 😅 But hey, we’re all friends here!
I went for classic alternating red and a very light grey for my lighthouse. I stitched each section one at a time, working my way up (rather than all the red sections first) so I could keep the Brick pattern flowing nicely.
Stitch – Brick Stitch
Thread colour – Anchor 19 (Red) and DMC 02 (Light Grey)
Number of strands – 4
Needle size – Medium
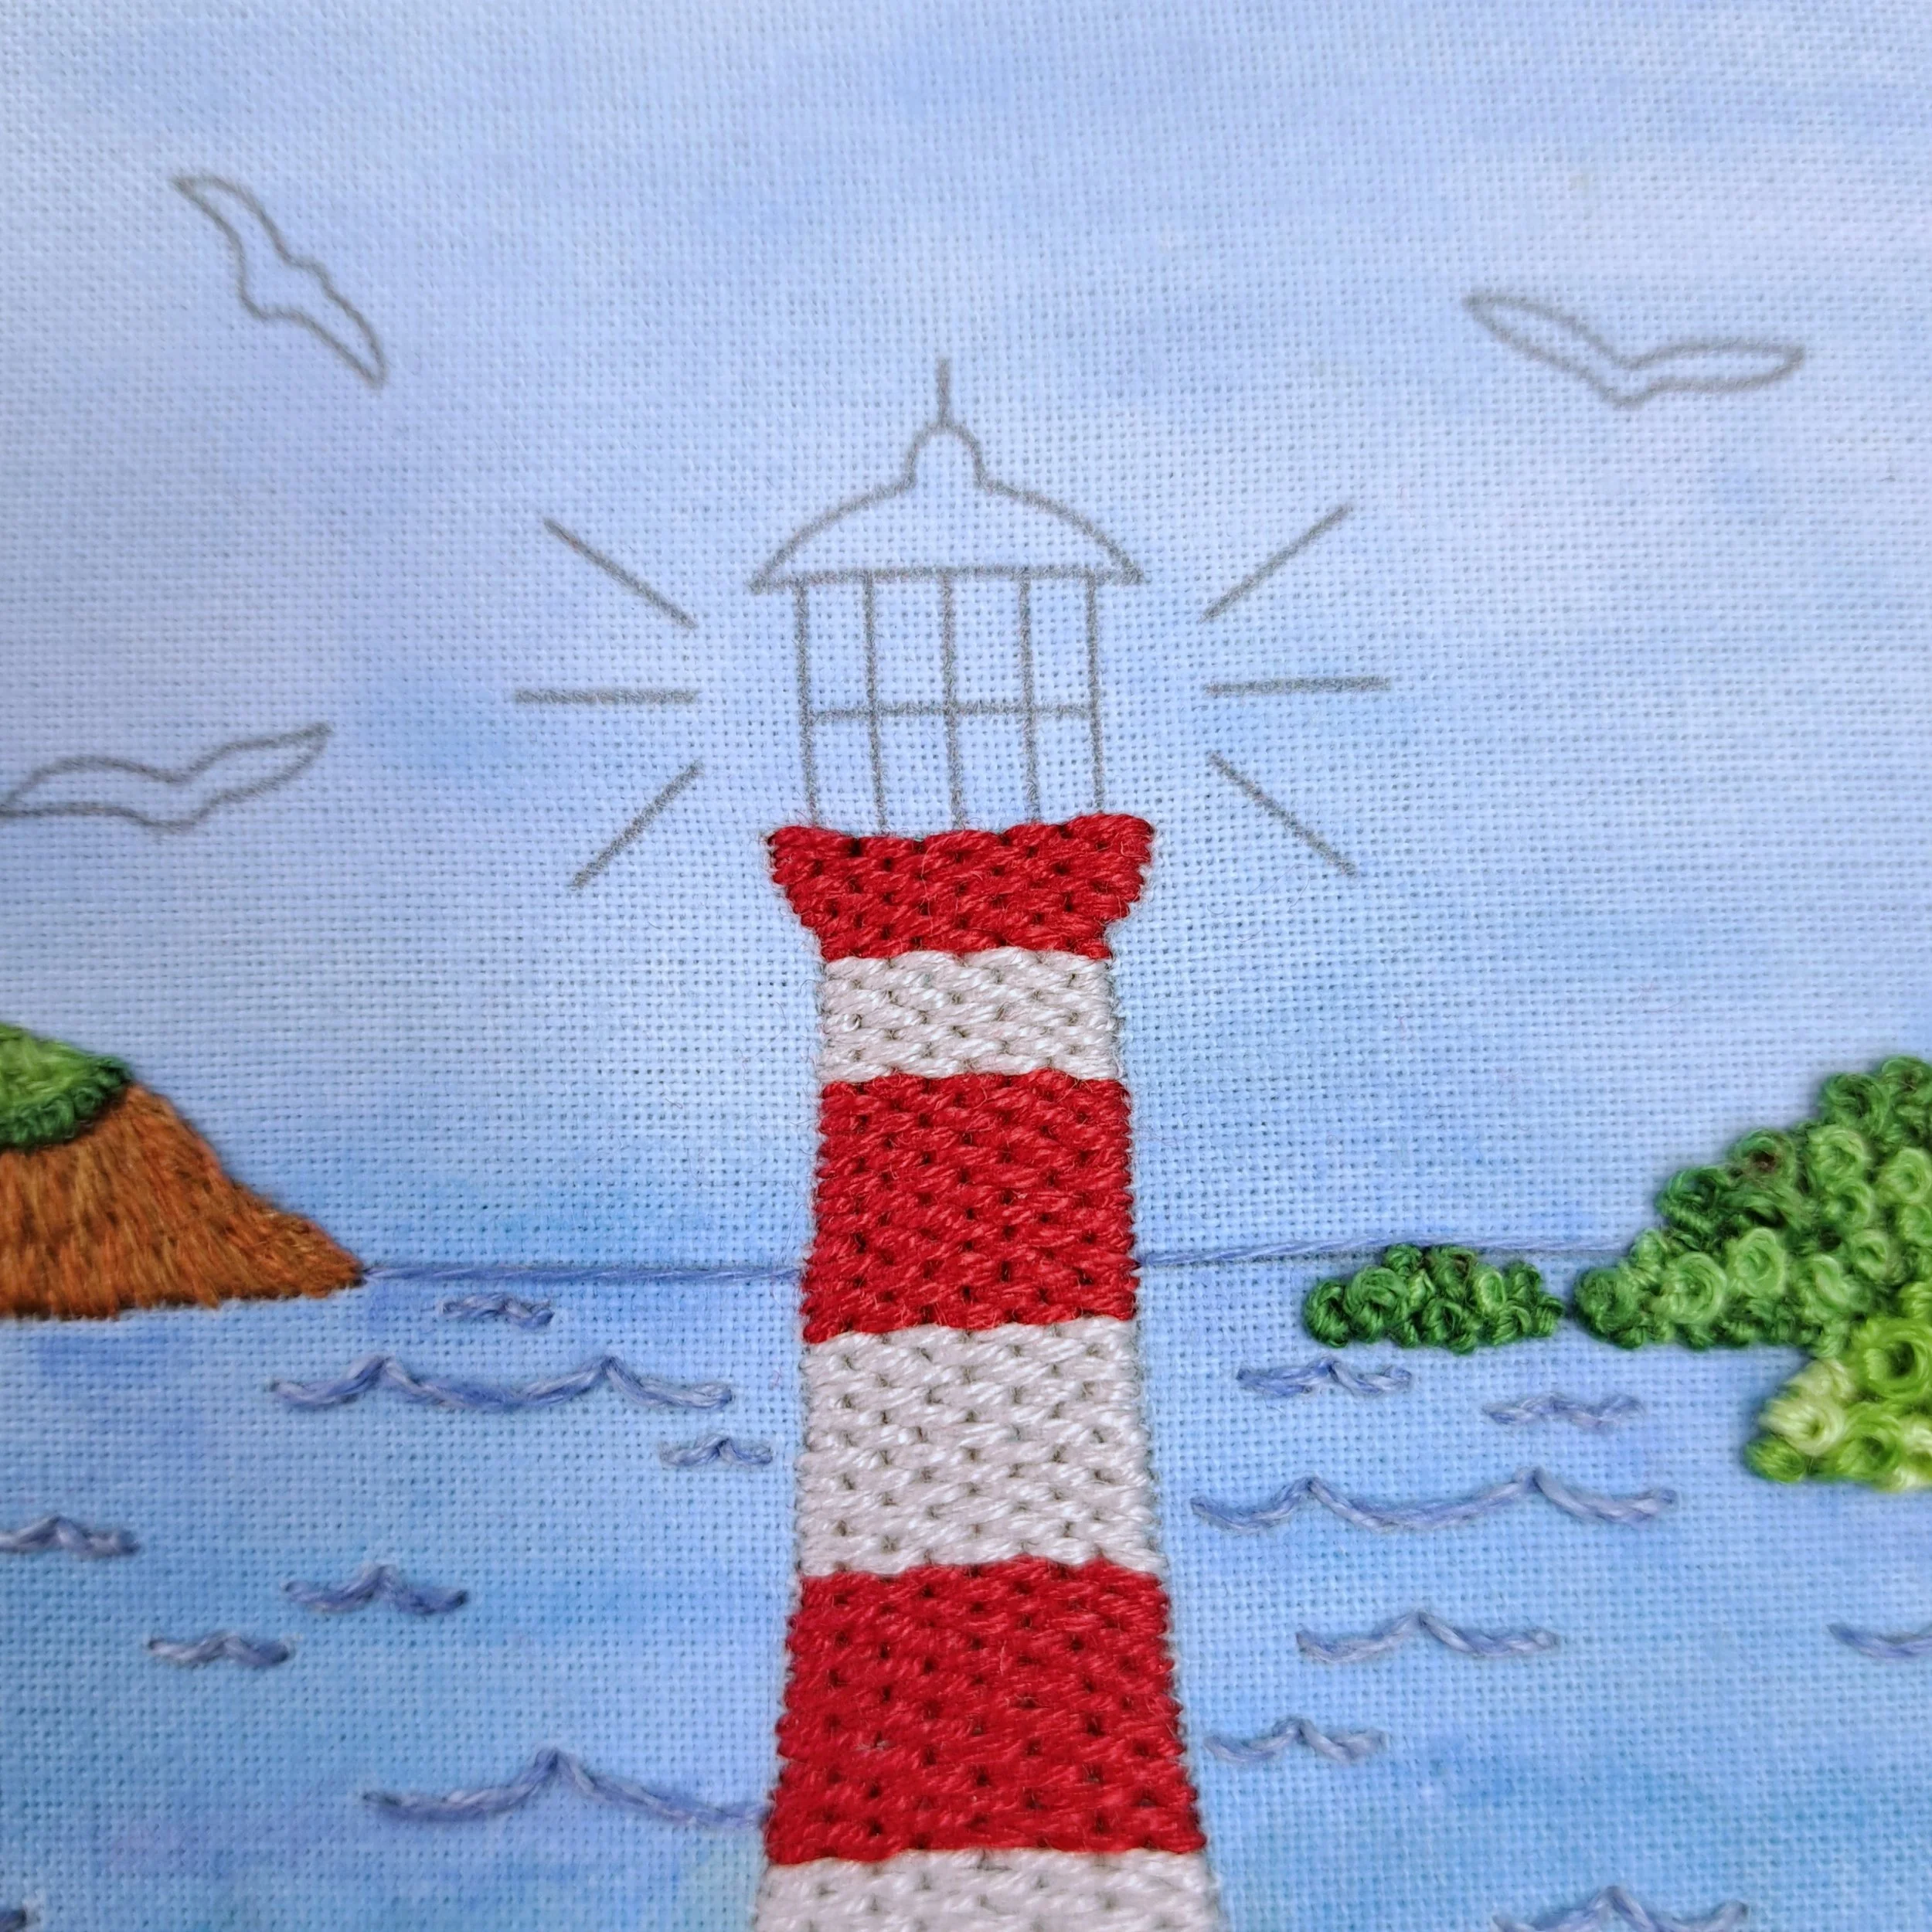
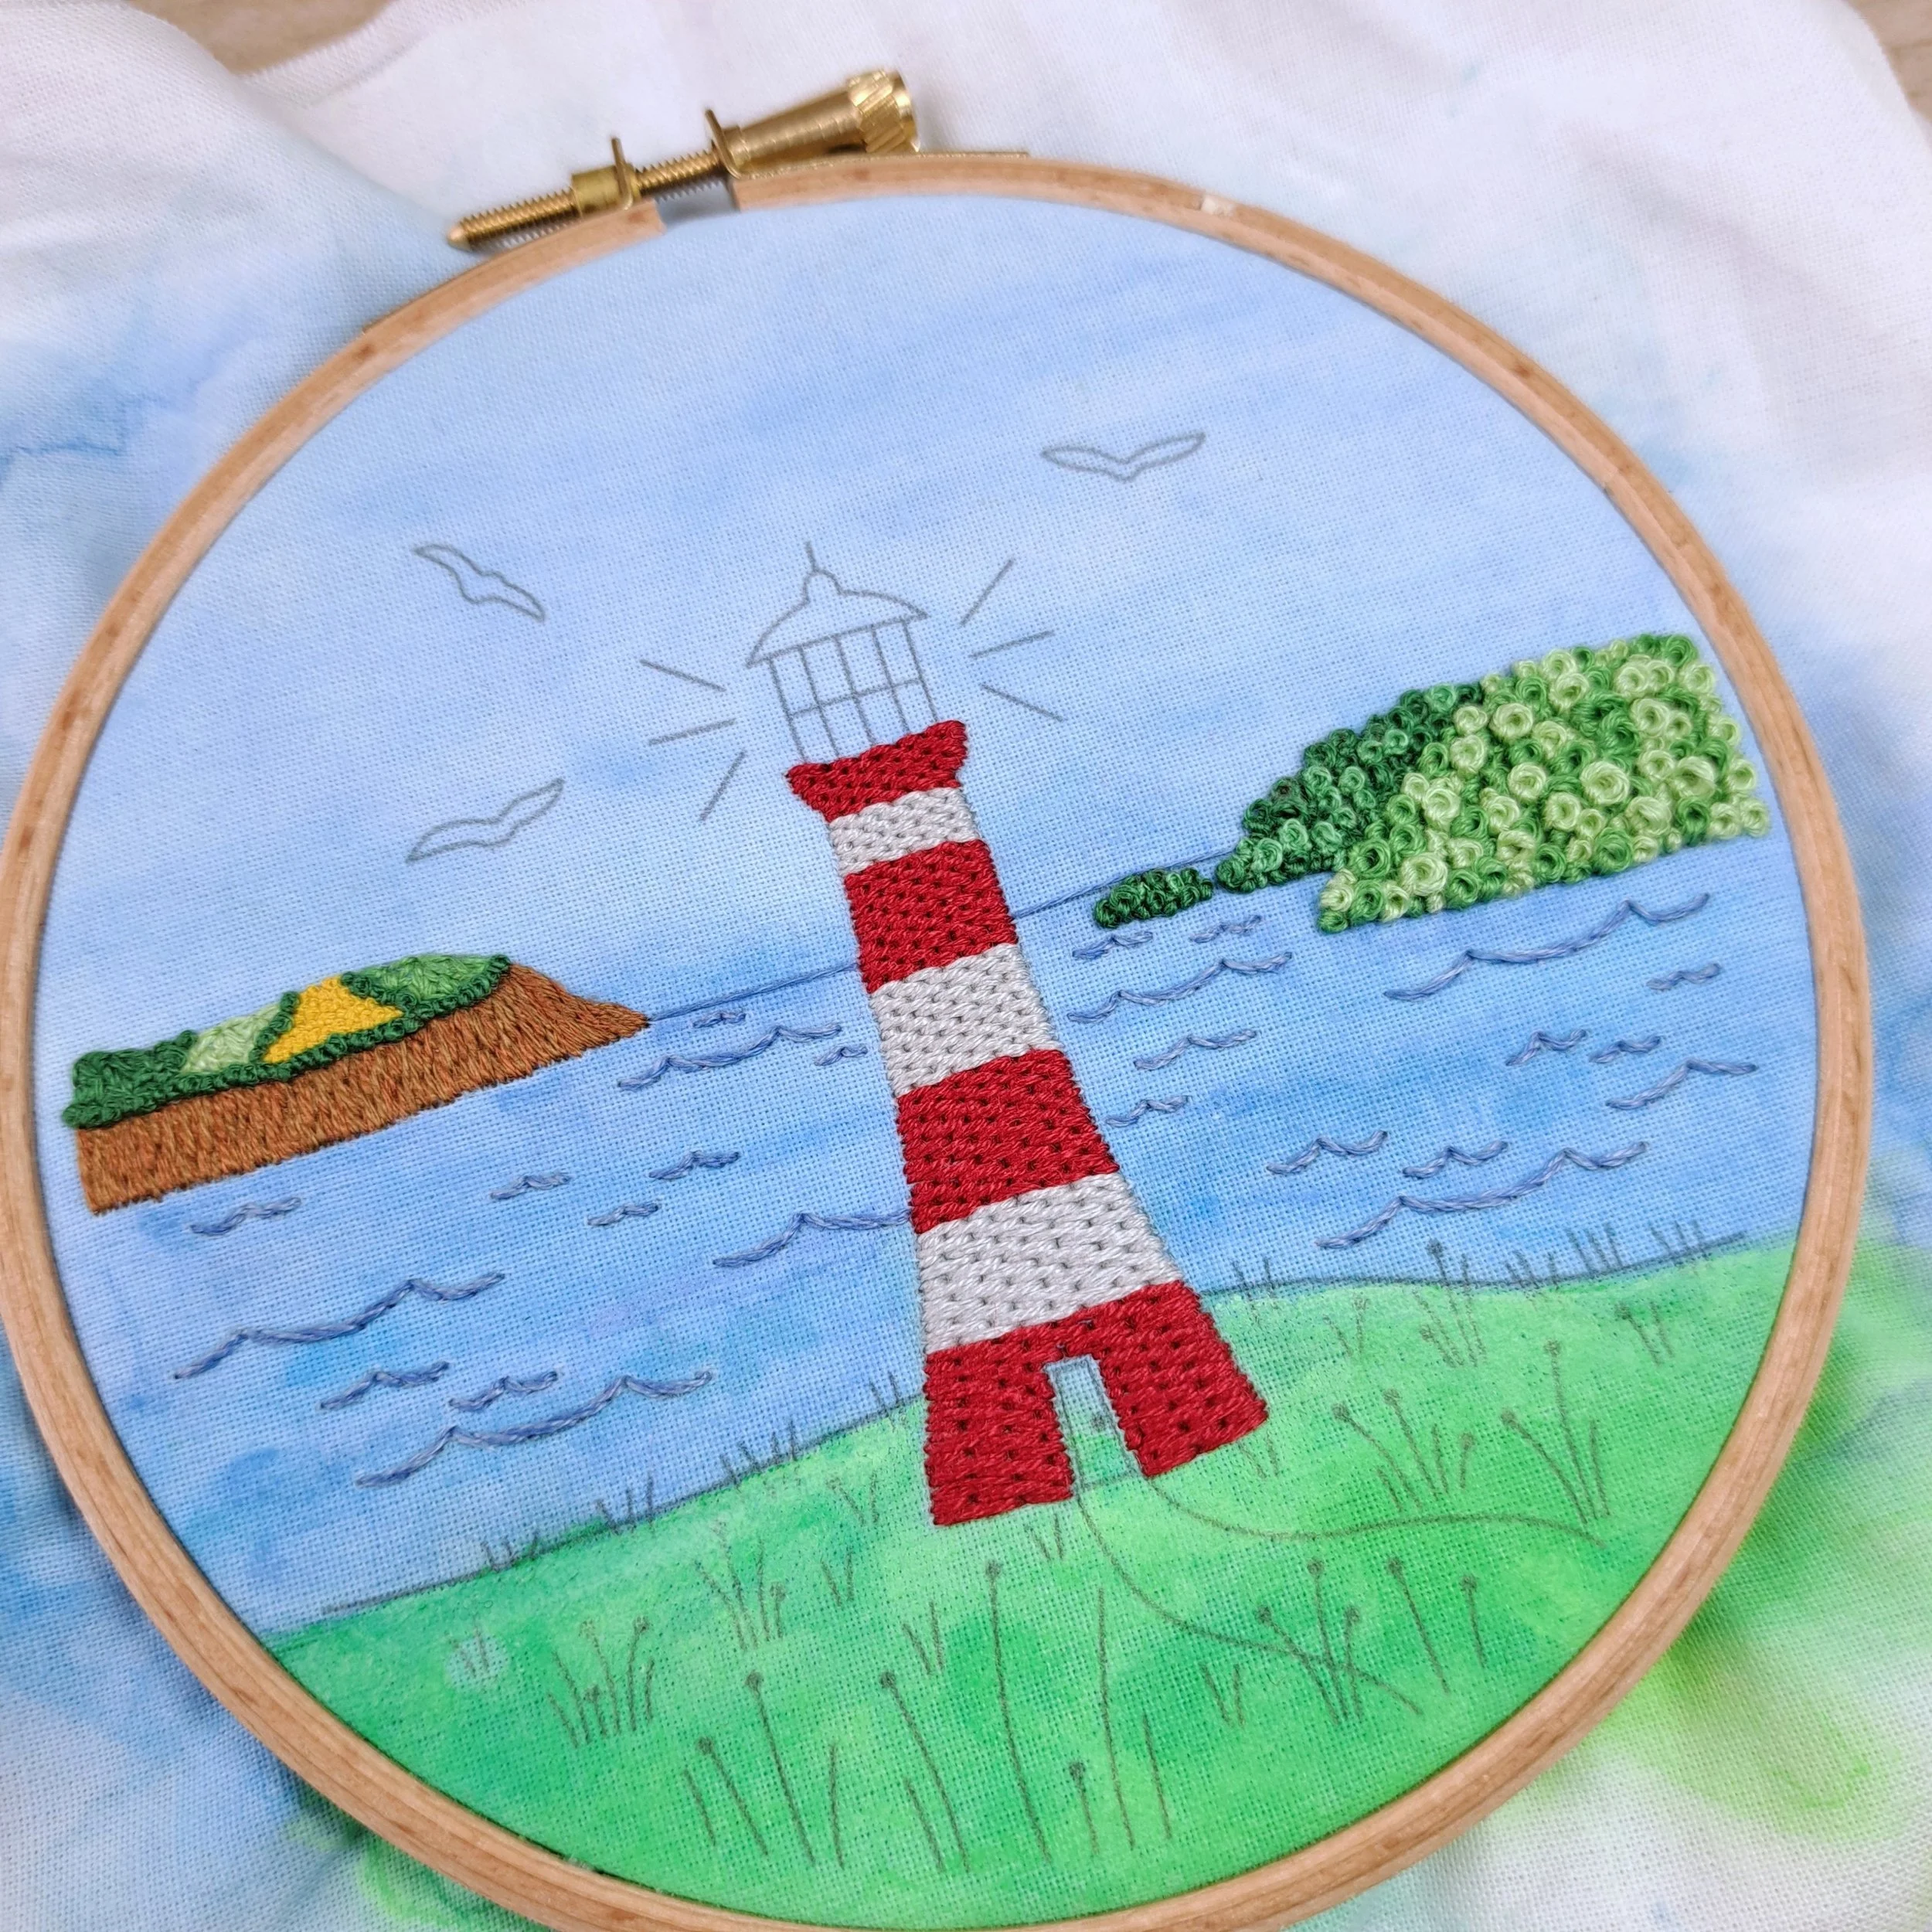
This is how we’re looking so far! 🪡
The Door
I stitched vertical rows of Split Stitch here. Some of the stitches overlapped the lighthouse Brick Stitch a little bit - I used this to help straighten up the edges.
Stitch – Split Stitch
Thread colour – DMC 08 (Dark Driftwood)
Number of strands – 2
Needle size – Small
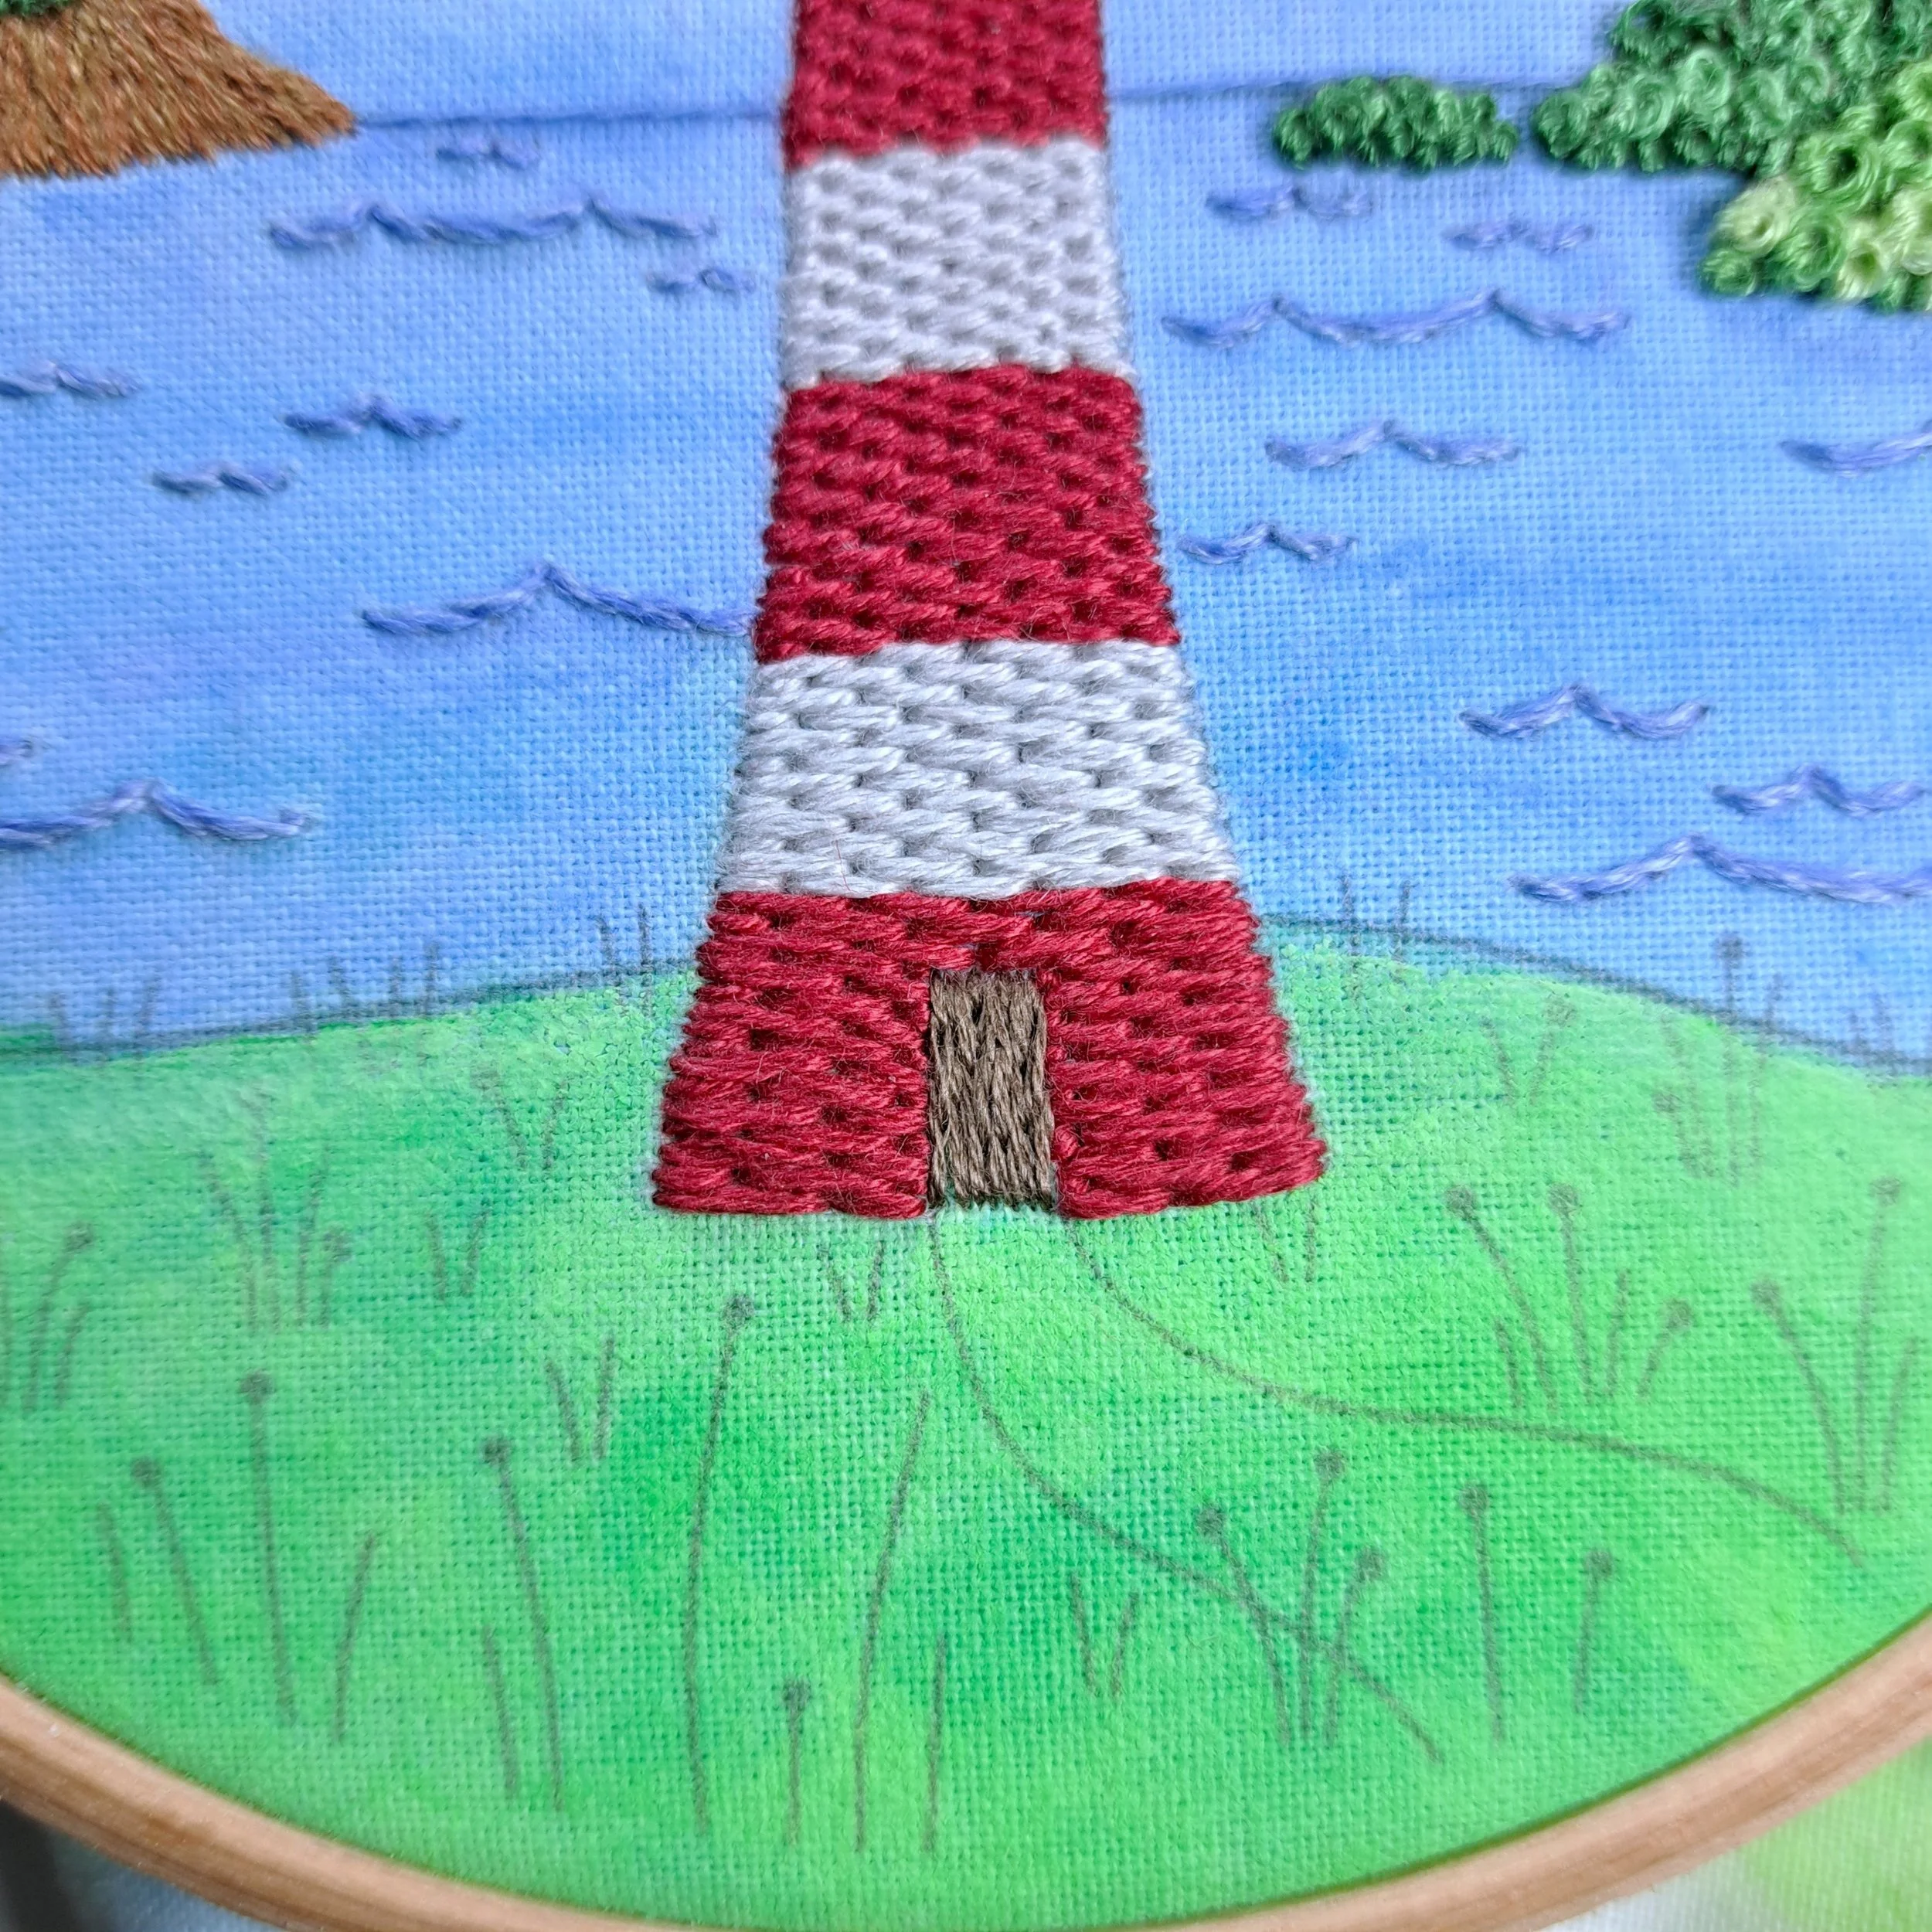
The Door Frame
I stitched 3 Straight Stitches around the edge of the door to frame it nicely. I nearly went with a contrasting colour here, but in the end, I stuck with the same colour as the door.
Stitch – Straight Stitch
Thread colour – DMC 08 (Dark Driftwood)
Number of strands – 1
Needle size – Small
Usually, I’d stitch the little door handle next to finish off the door, but I couldn’t decide on a colour, so I came back to it later.
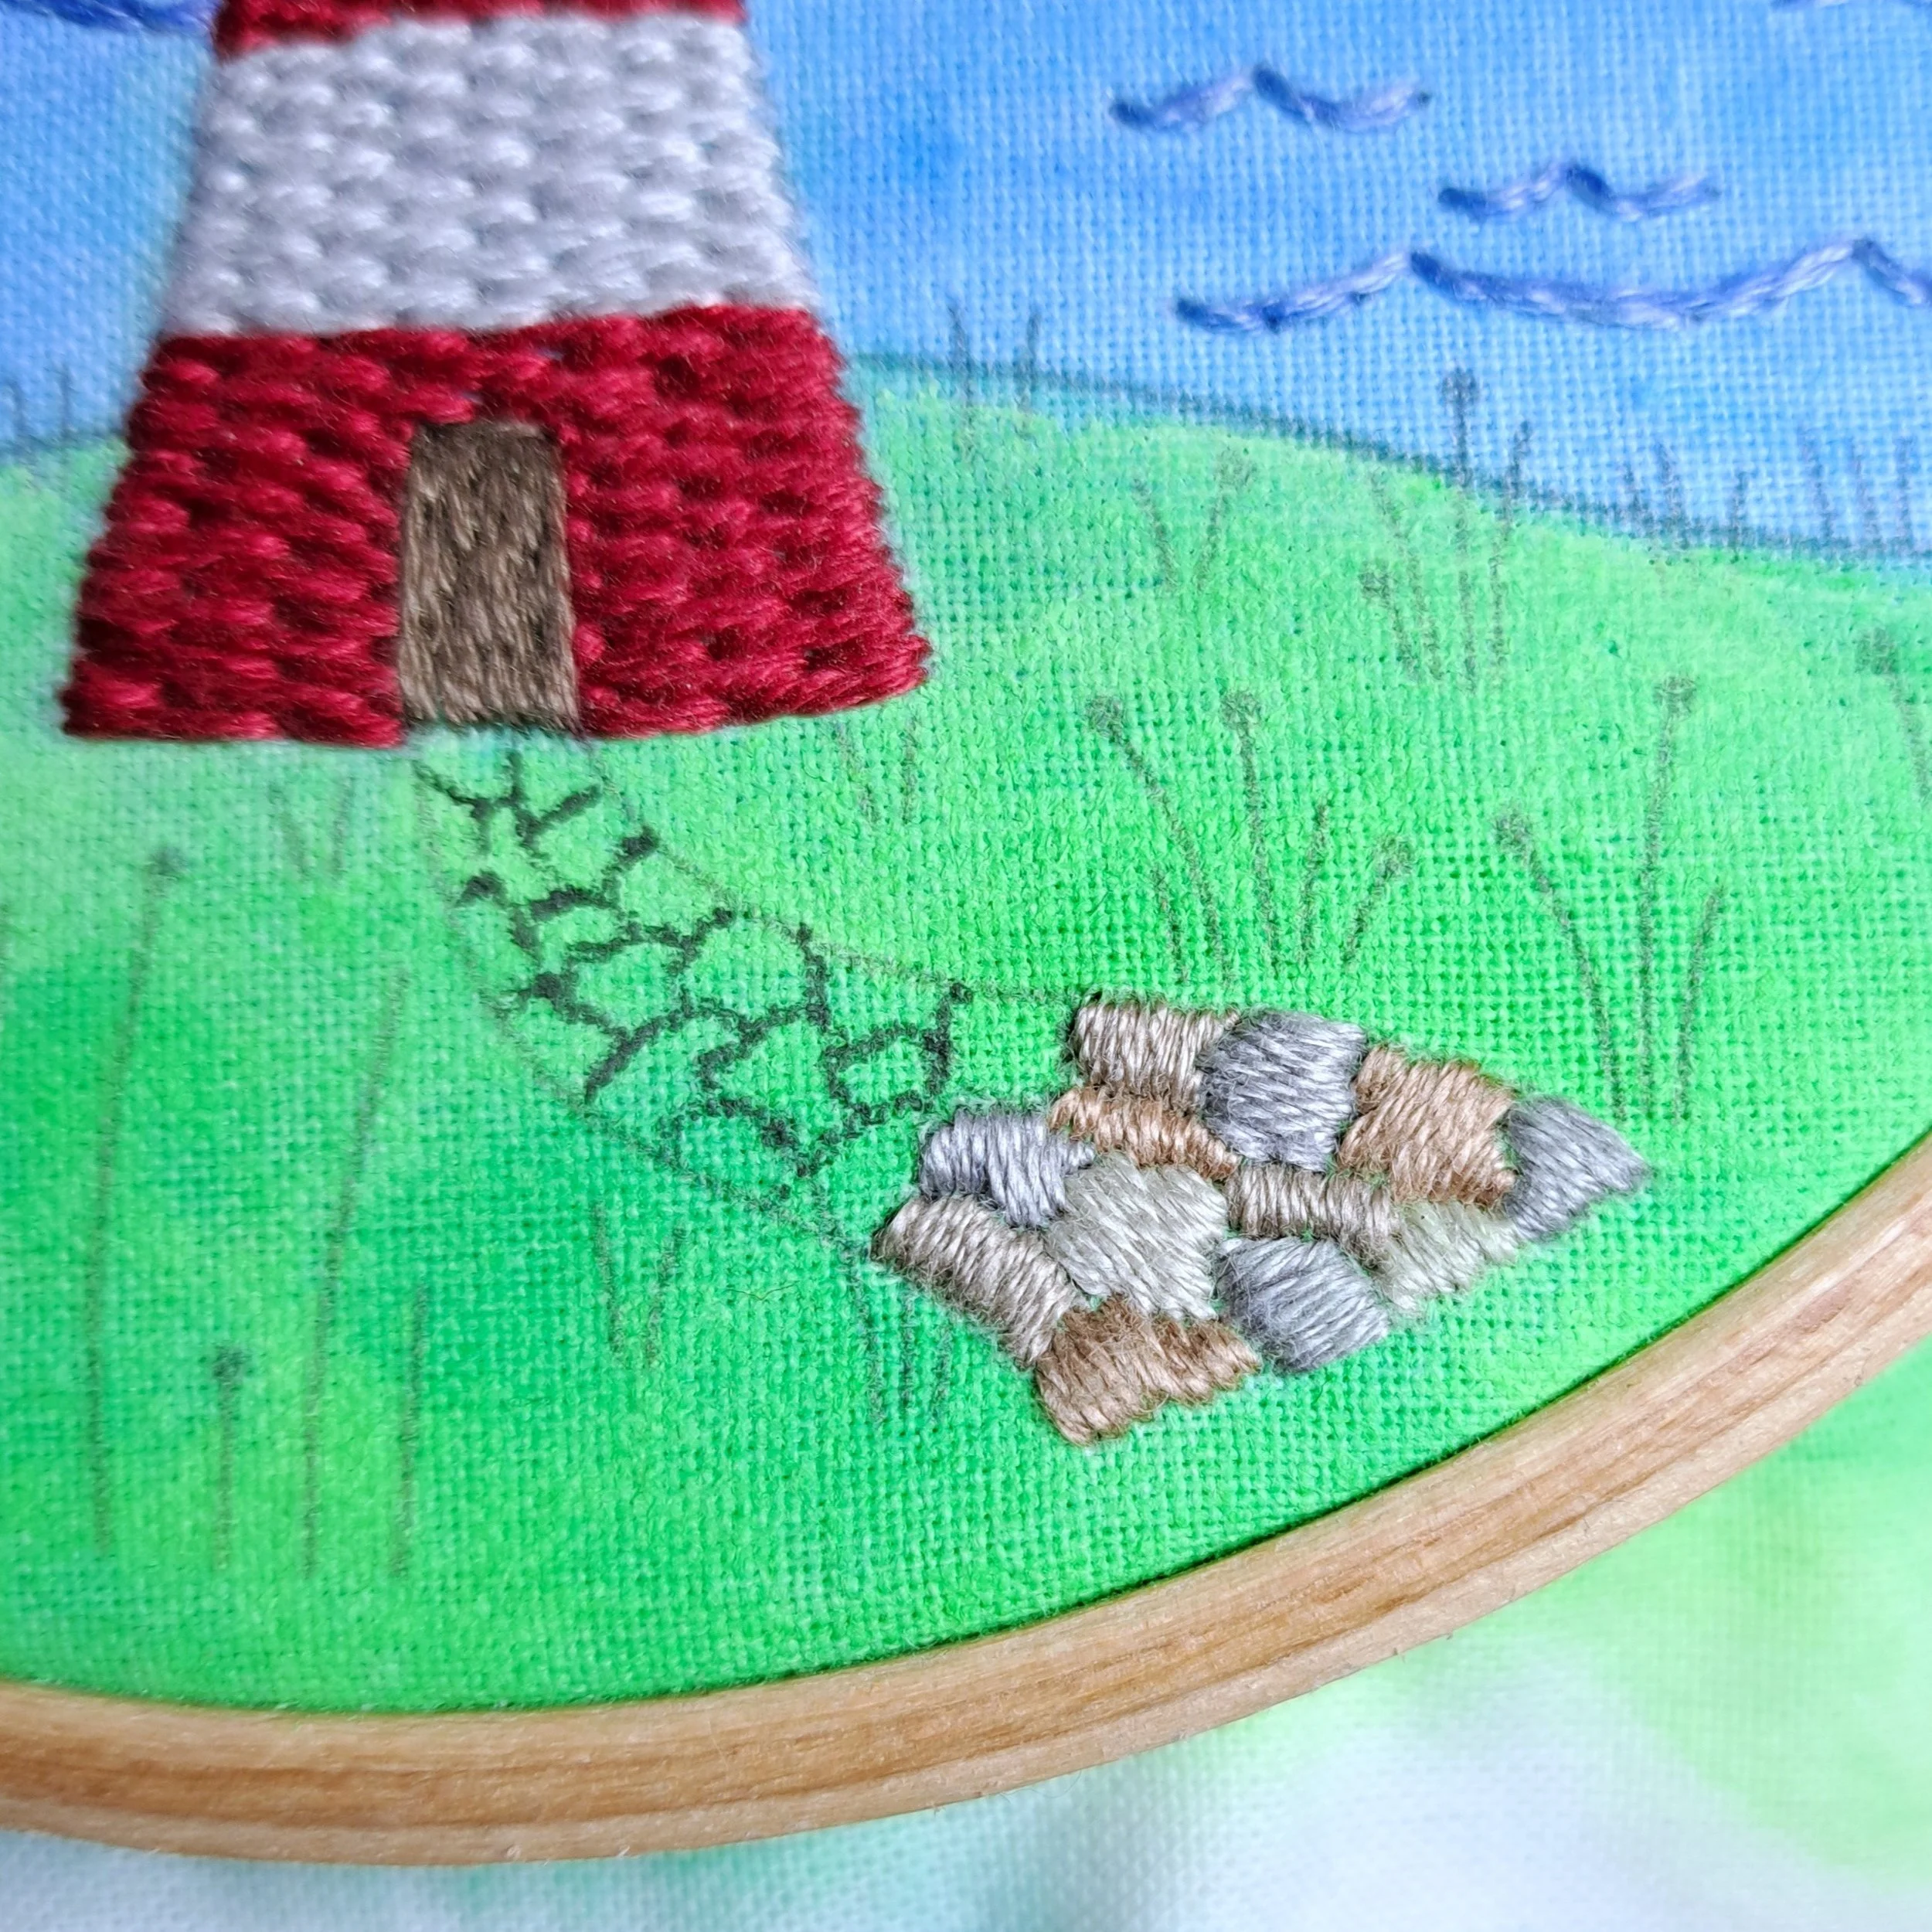
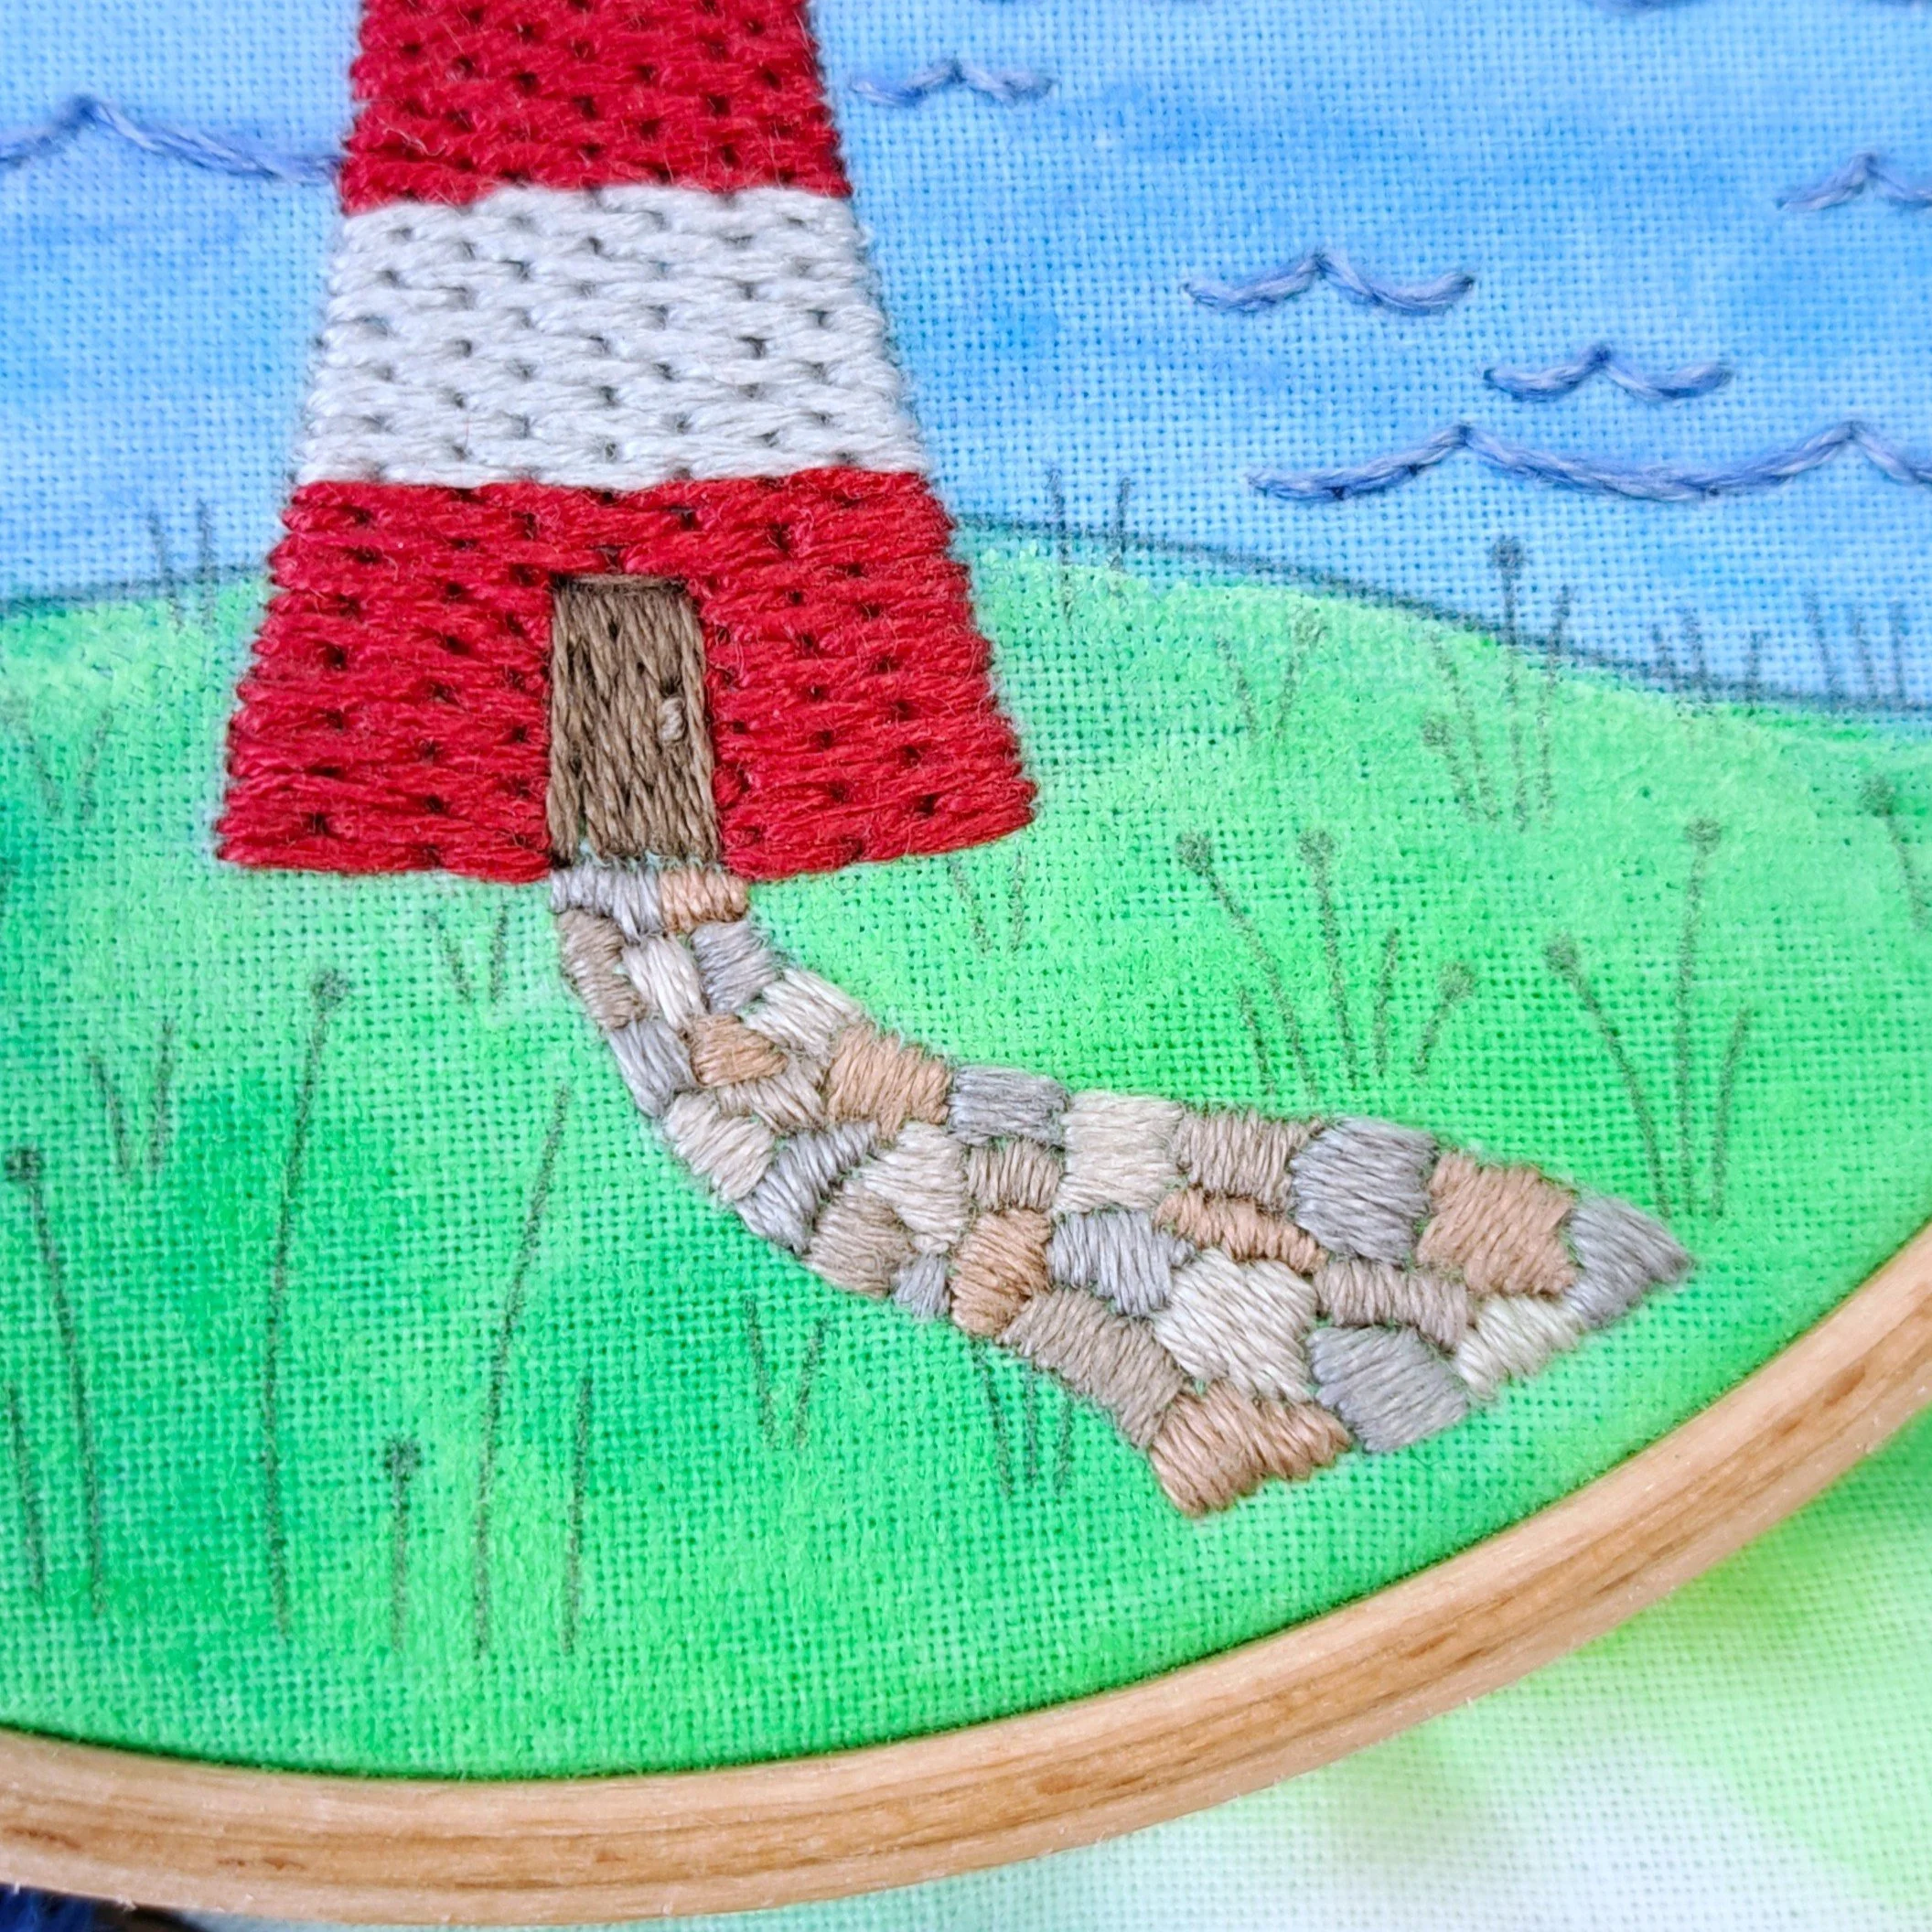
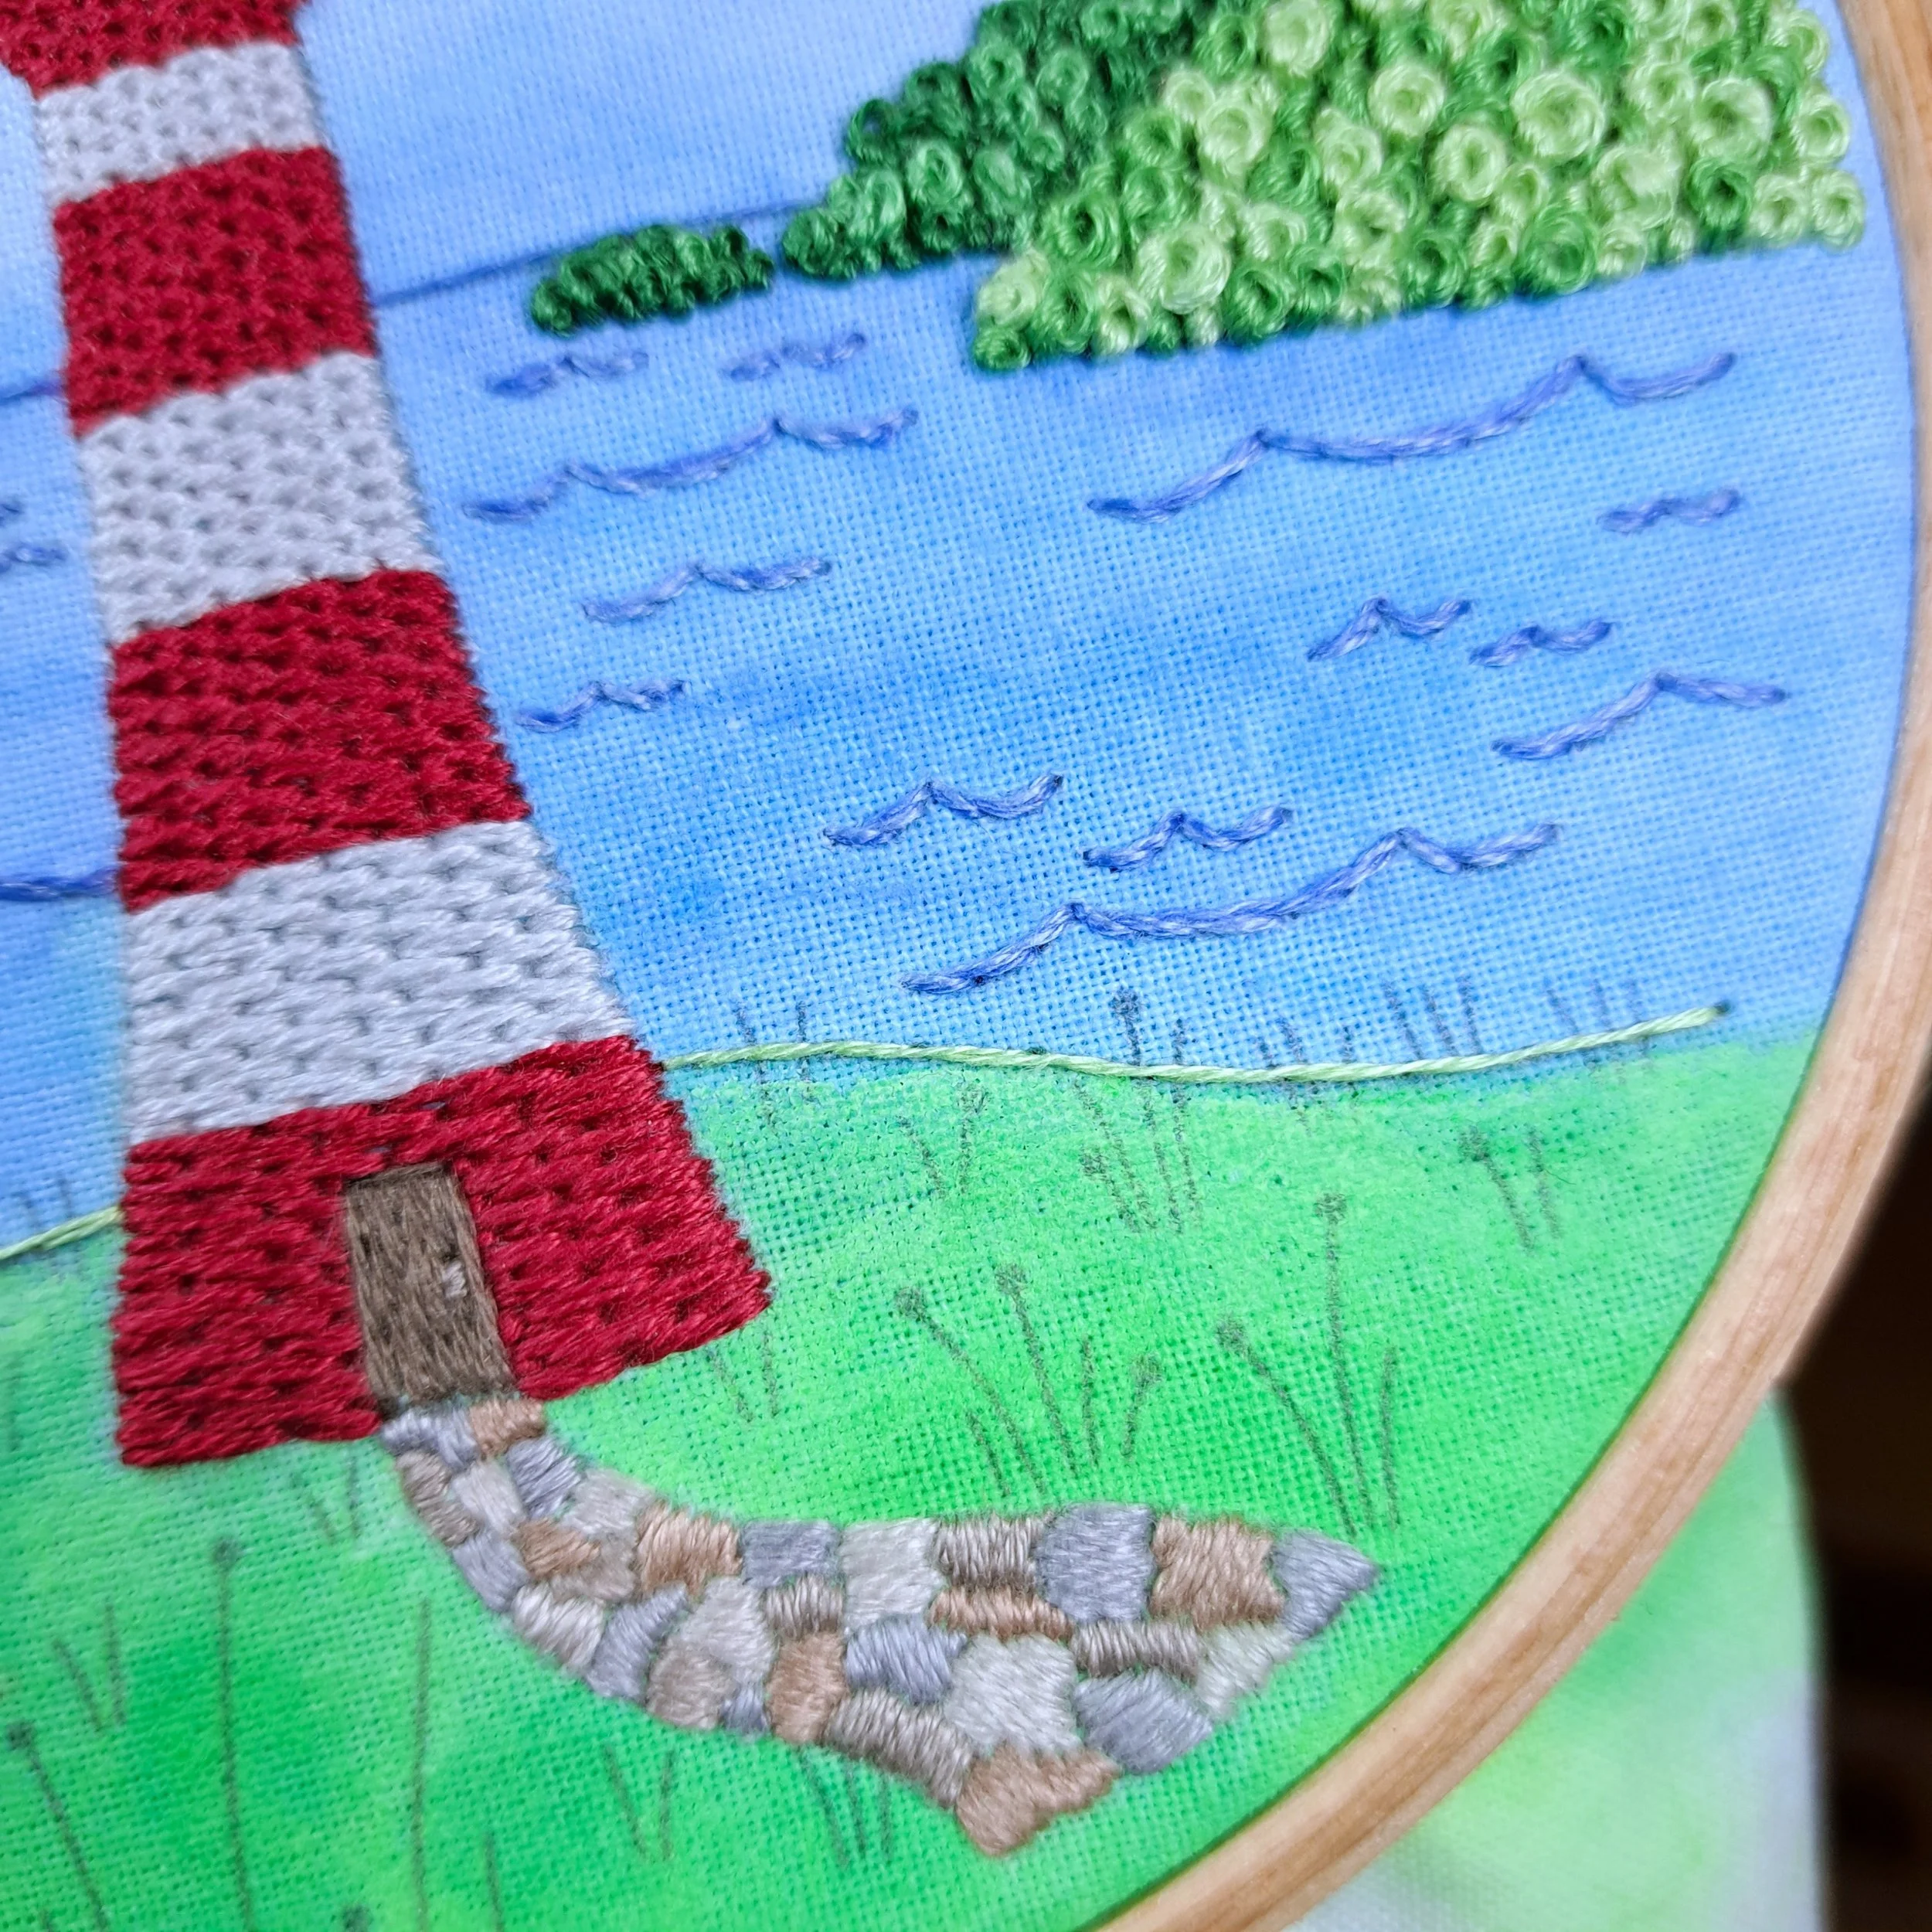
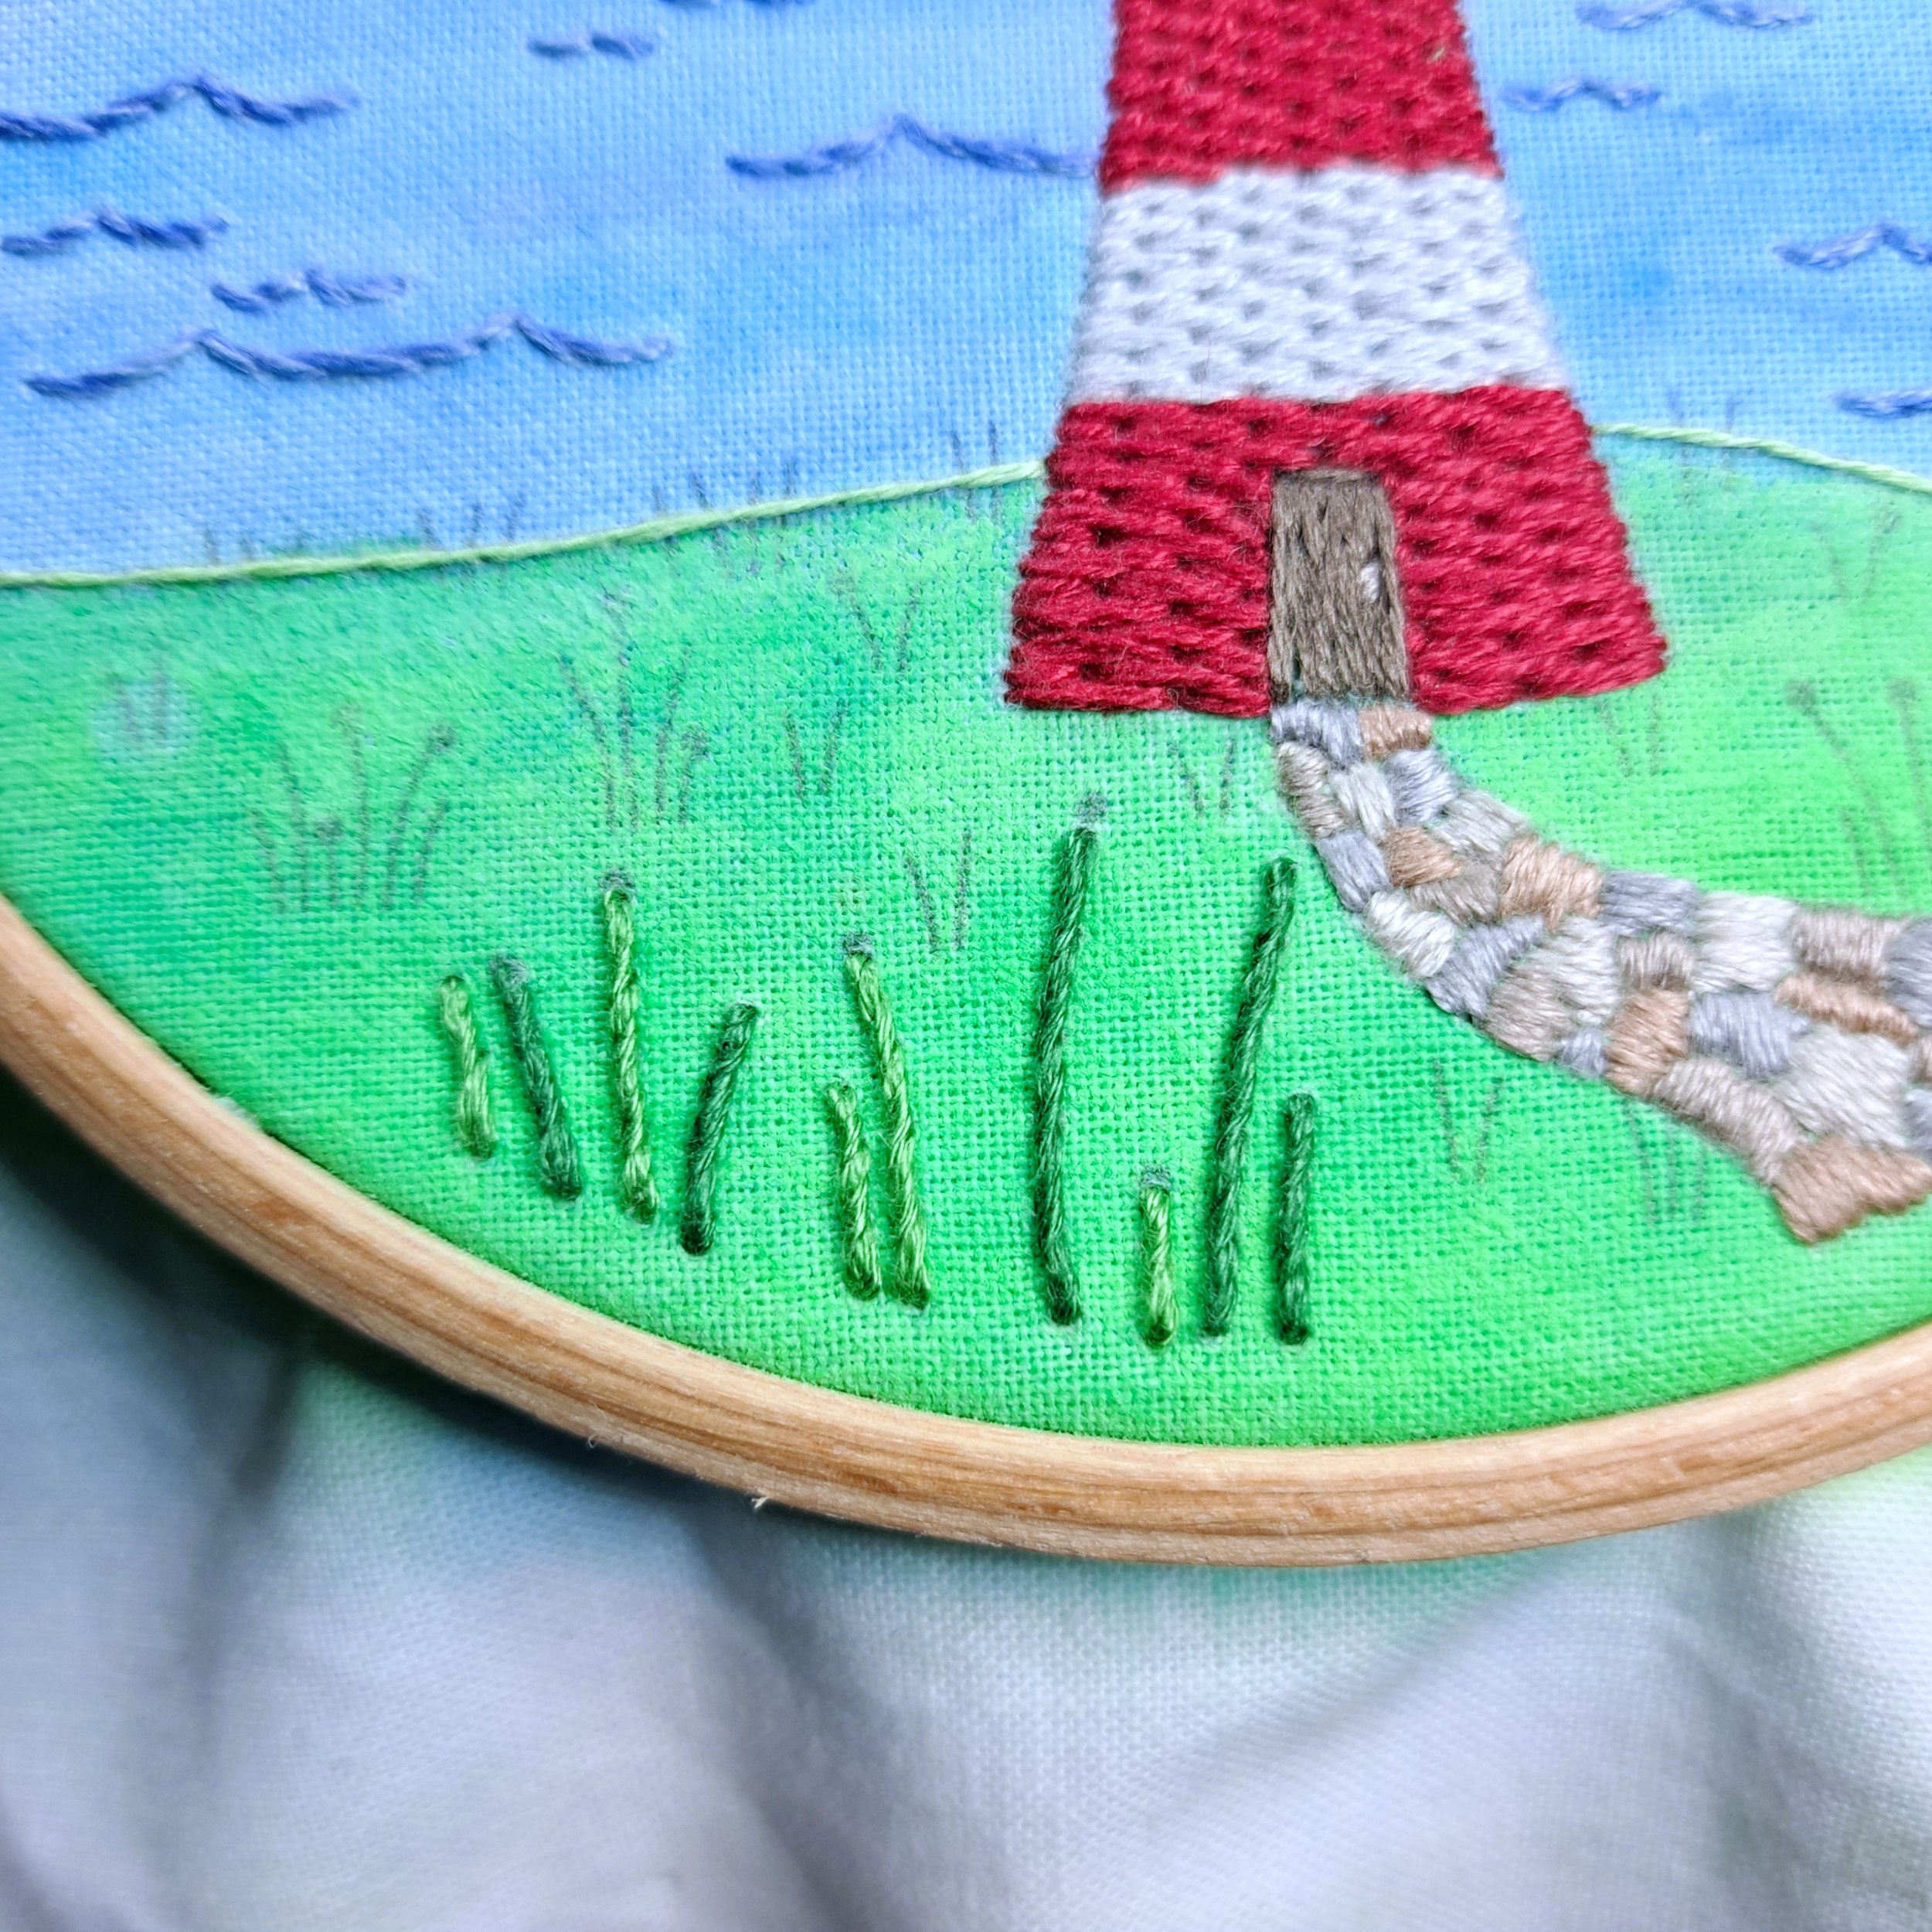
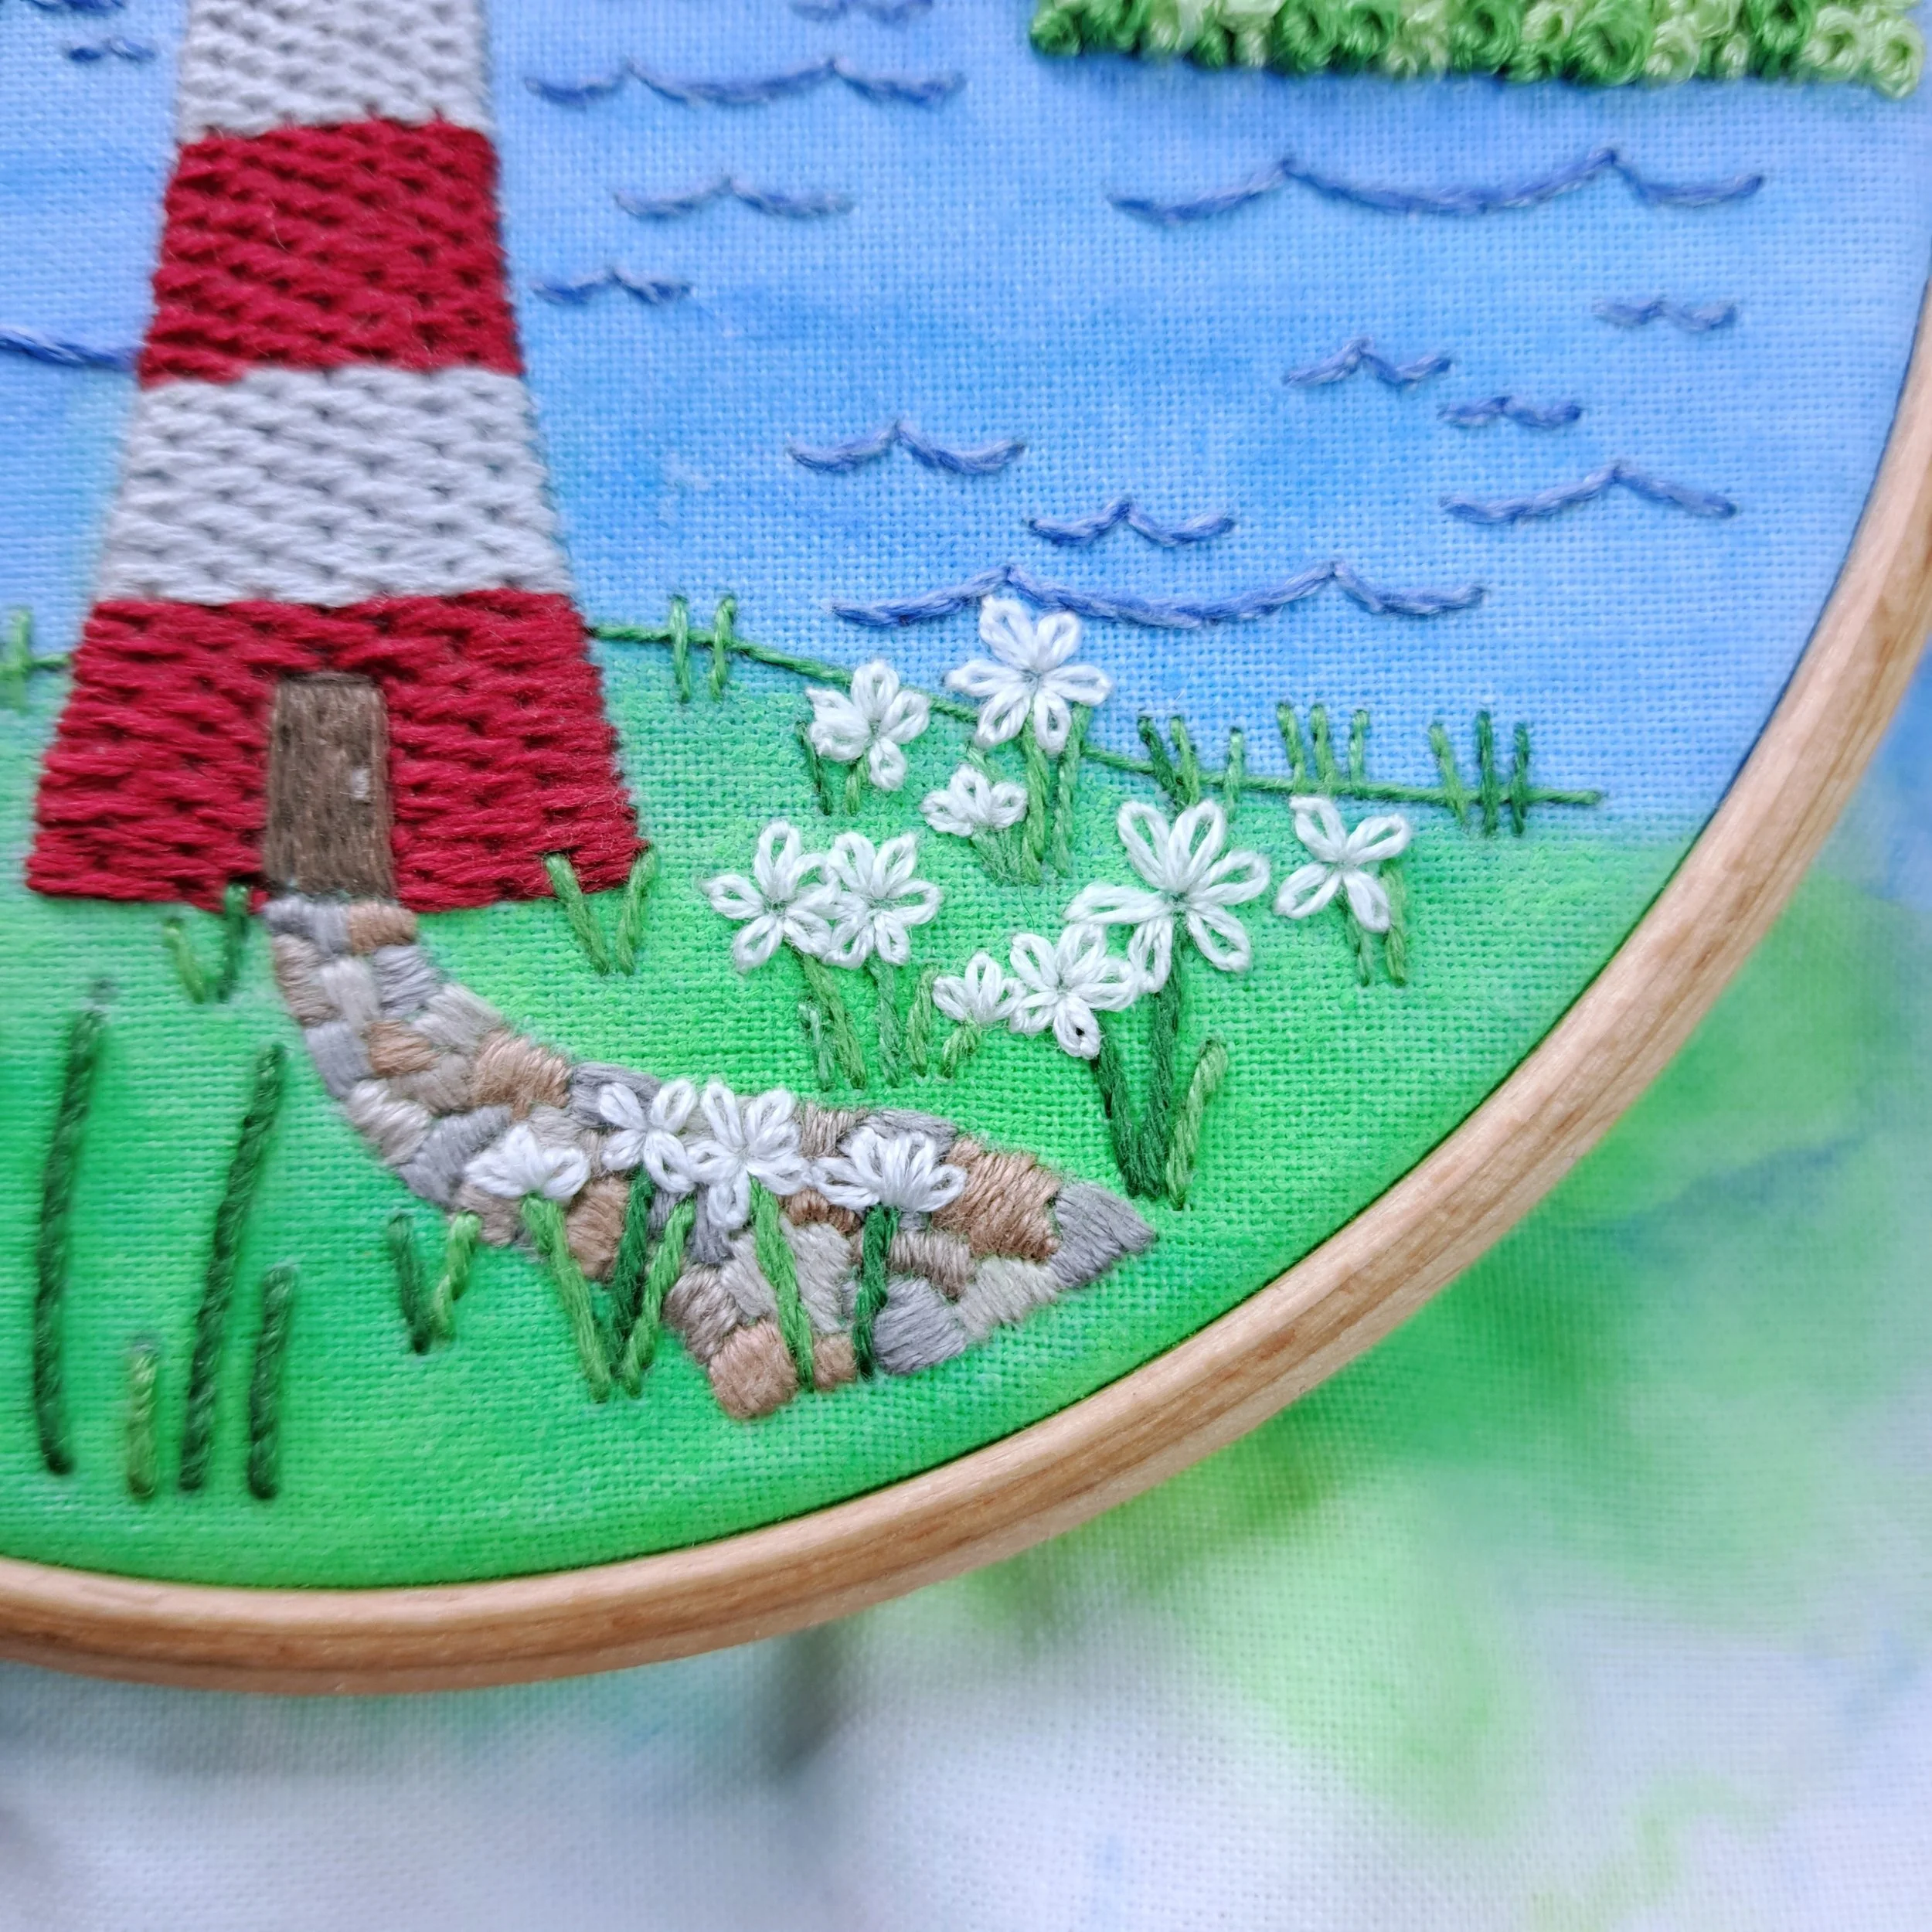
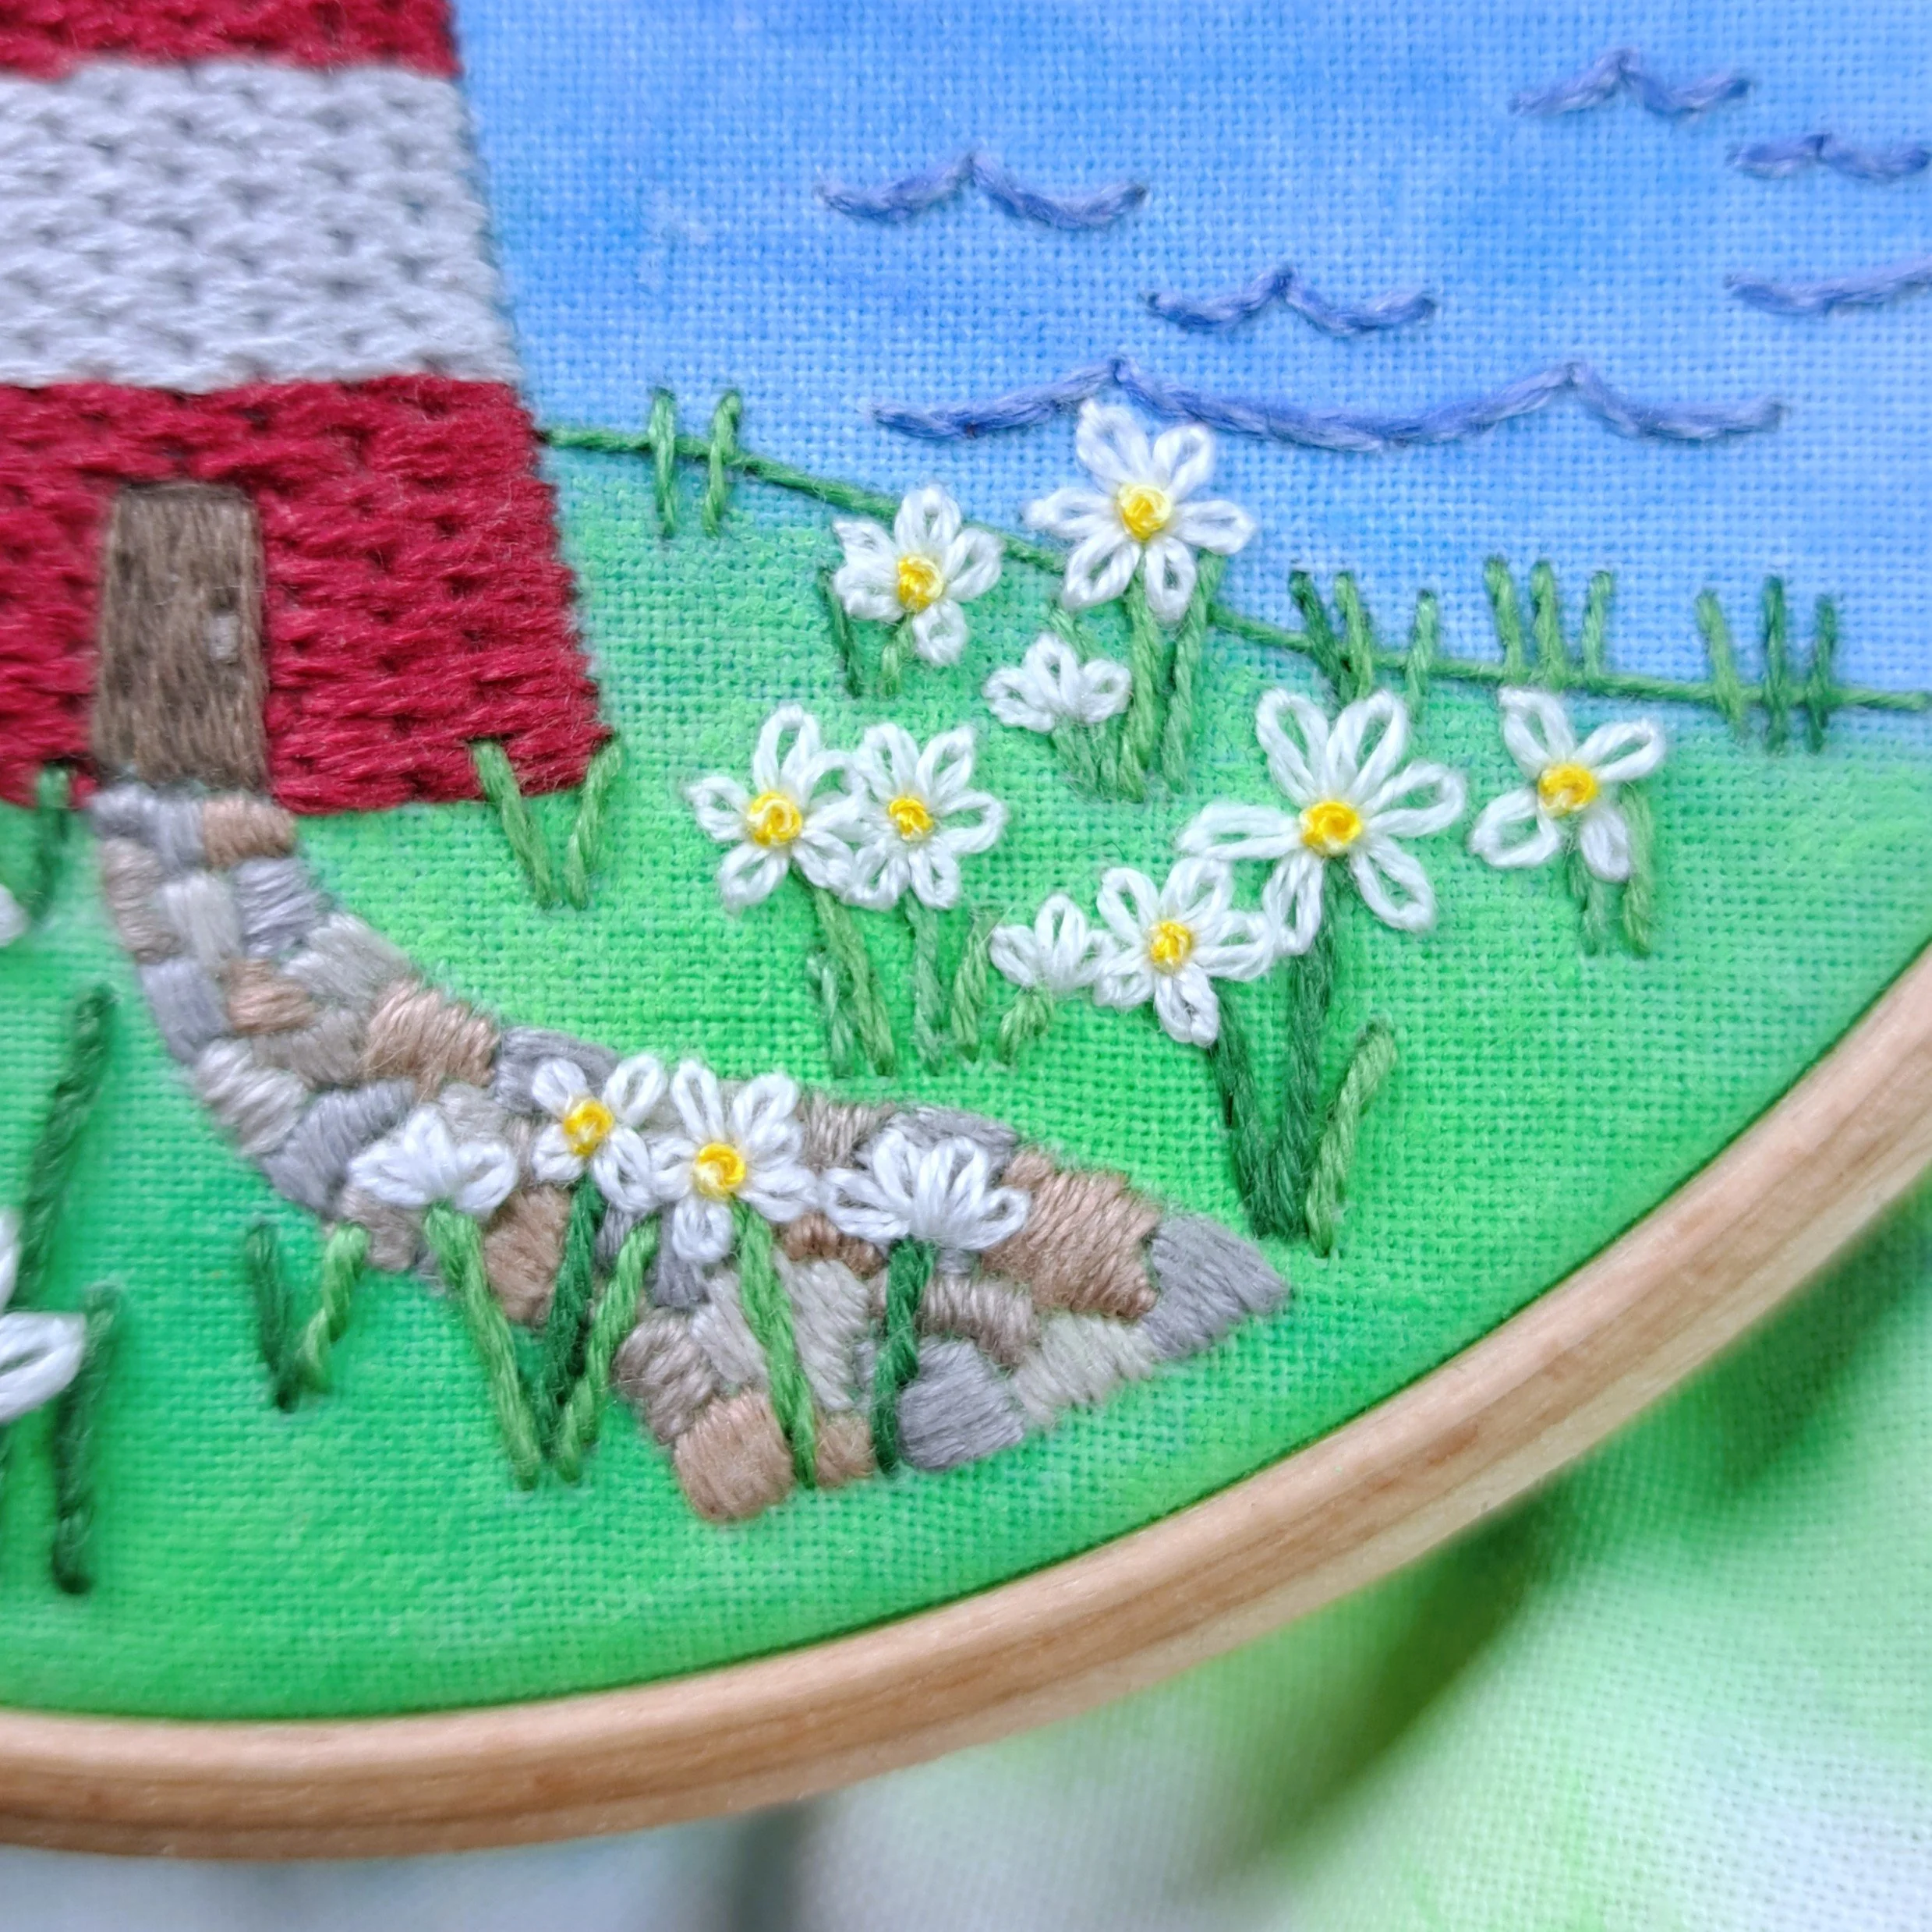
The Path
So, my original plan for the path was to paint it brown and then do a gappy Seed Stitch over the top. But you might remember me saying I was worried about the paint bleeding into my grass, so I quit while I was ahead with the painting. My Plan B was going to be filling the path with Split Stitch... but then I had a splash of inspiration - cobbles!
I wasn’t sure it would turn out how I pictured, so I tested it with one row first. But I was so happy with that first row, I went for it!
To start, I drew some squiggly cobble/paved shapes on the path with my fabric pen. I made all the shapes uneven and drew them slightly smaller the closer they got to the lighthouse.
I just drew on one row to start so I could test it out.
Then I filled each shape with Satin Stitches, stitching them in all different directions (mainly horizontal and vertical), but tried not to overthink it.
I began stitching with 3 colours - I thought that would be enough - but quickly added a 4th. I really didn’t want the same colours next to each other, and it didn’t take long before I had to add that extra colour to avoid it.
I chose a colour for each cobble as I went along. It might have been quicker to stitch all of one colour at a time, but I didn’t trust myself not to end up with matching colours side by side.
I think my path turned out super cute! Now, that’s not something I ever thought I’d say 😏
✨ A little tip:
Some grasses go over the top of the path. I stitched straight over these and will add the grasses later. They don’t need to be exactly in the same place - I use the picture of the panel as my reference.
Stitch – Satin Stitch
Thread colours – Anchor 379 (Fawn Brown), Anchor 399 (Grey), DMC 06 (Light Driftwood) & DMC 07 (Driftwood)
Number of strands – 2
Needle size – Small
Once I was happy with how the first row was looking, I went ahead and drew on the rest of the cobblestone shapes.
The Door Handle
Now that I’d added even more colours to my palette with the path, I picked one of those colours for my door handle to finally finish off that cute little lighthouse door.
I started with just one Couch Stitch here, but it didn’t feel quite big enough. So I added a few more couch stitches on top - ended up doing four in total.
Stitch – Couch Stitch
Thread colour – DMC 07 (Driftwood)
Number of strands – 2
Needle size – Small
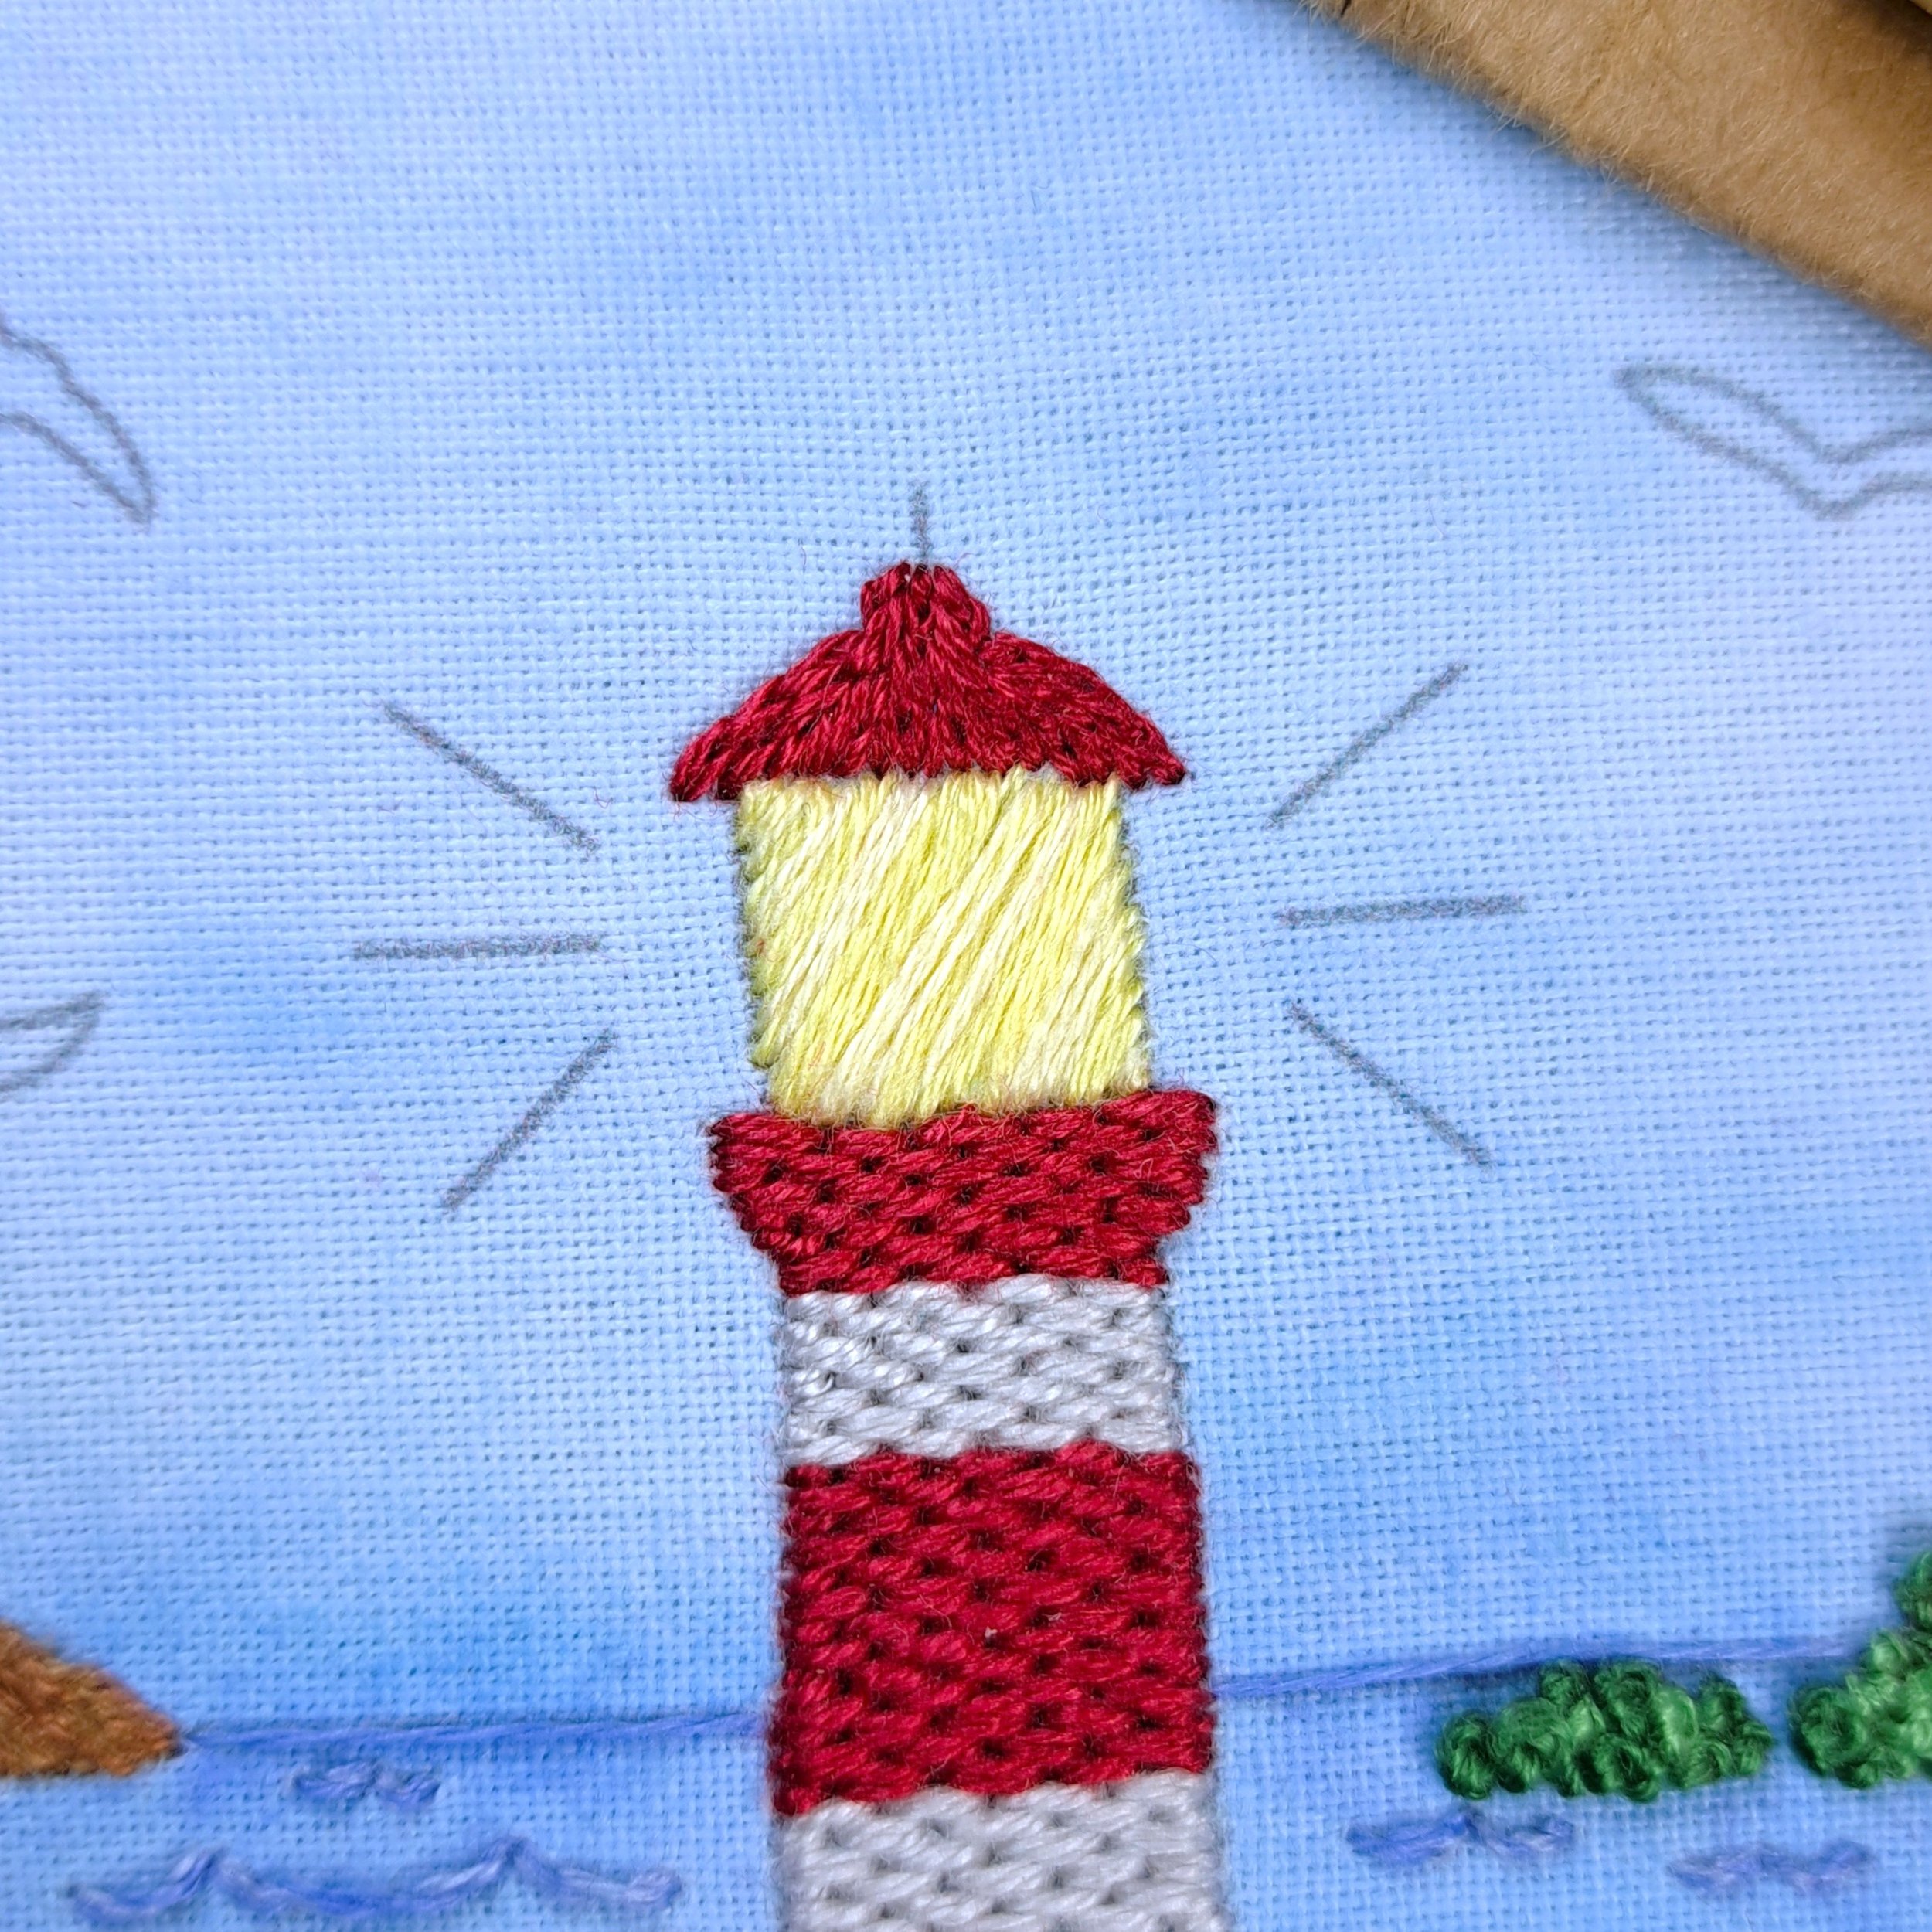
The Lantern
I went for a nice yellow for my lantern – like it’s on and glowing away. I know, I know, it’s a daytime scene so you probably wouldn’t see it glowing. But hey, if I want it to glow, it can glow! 😅
I started by stitching a few Straight Stitches at the angle I wanted, then filled it in with Satin Stitch. I find that popping in those initial straight stitches helps keep my angles consistent.
Stitch – Diagonal Satin Stitch
Thread colour – Anchor 293 (Mid Yellow)
Number of strands – 2
Needle size – Small

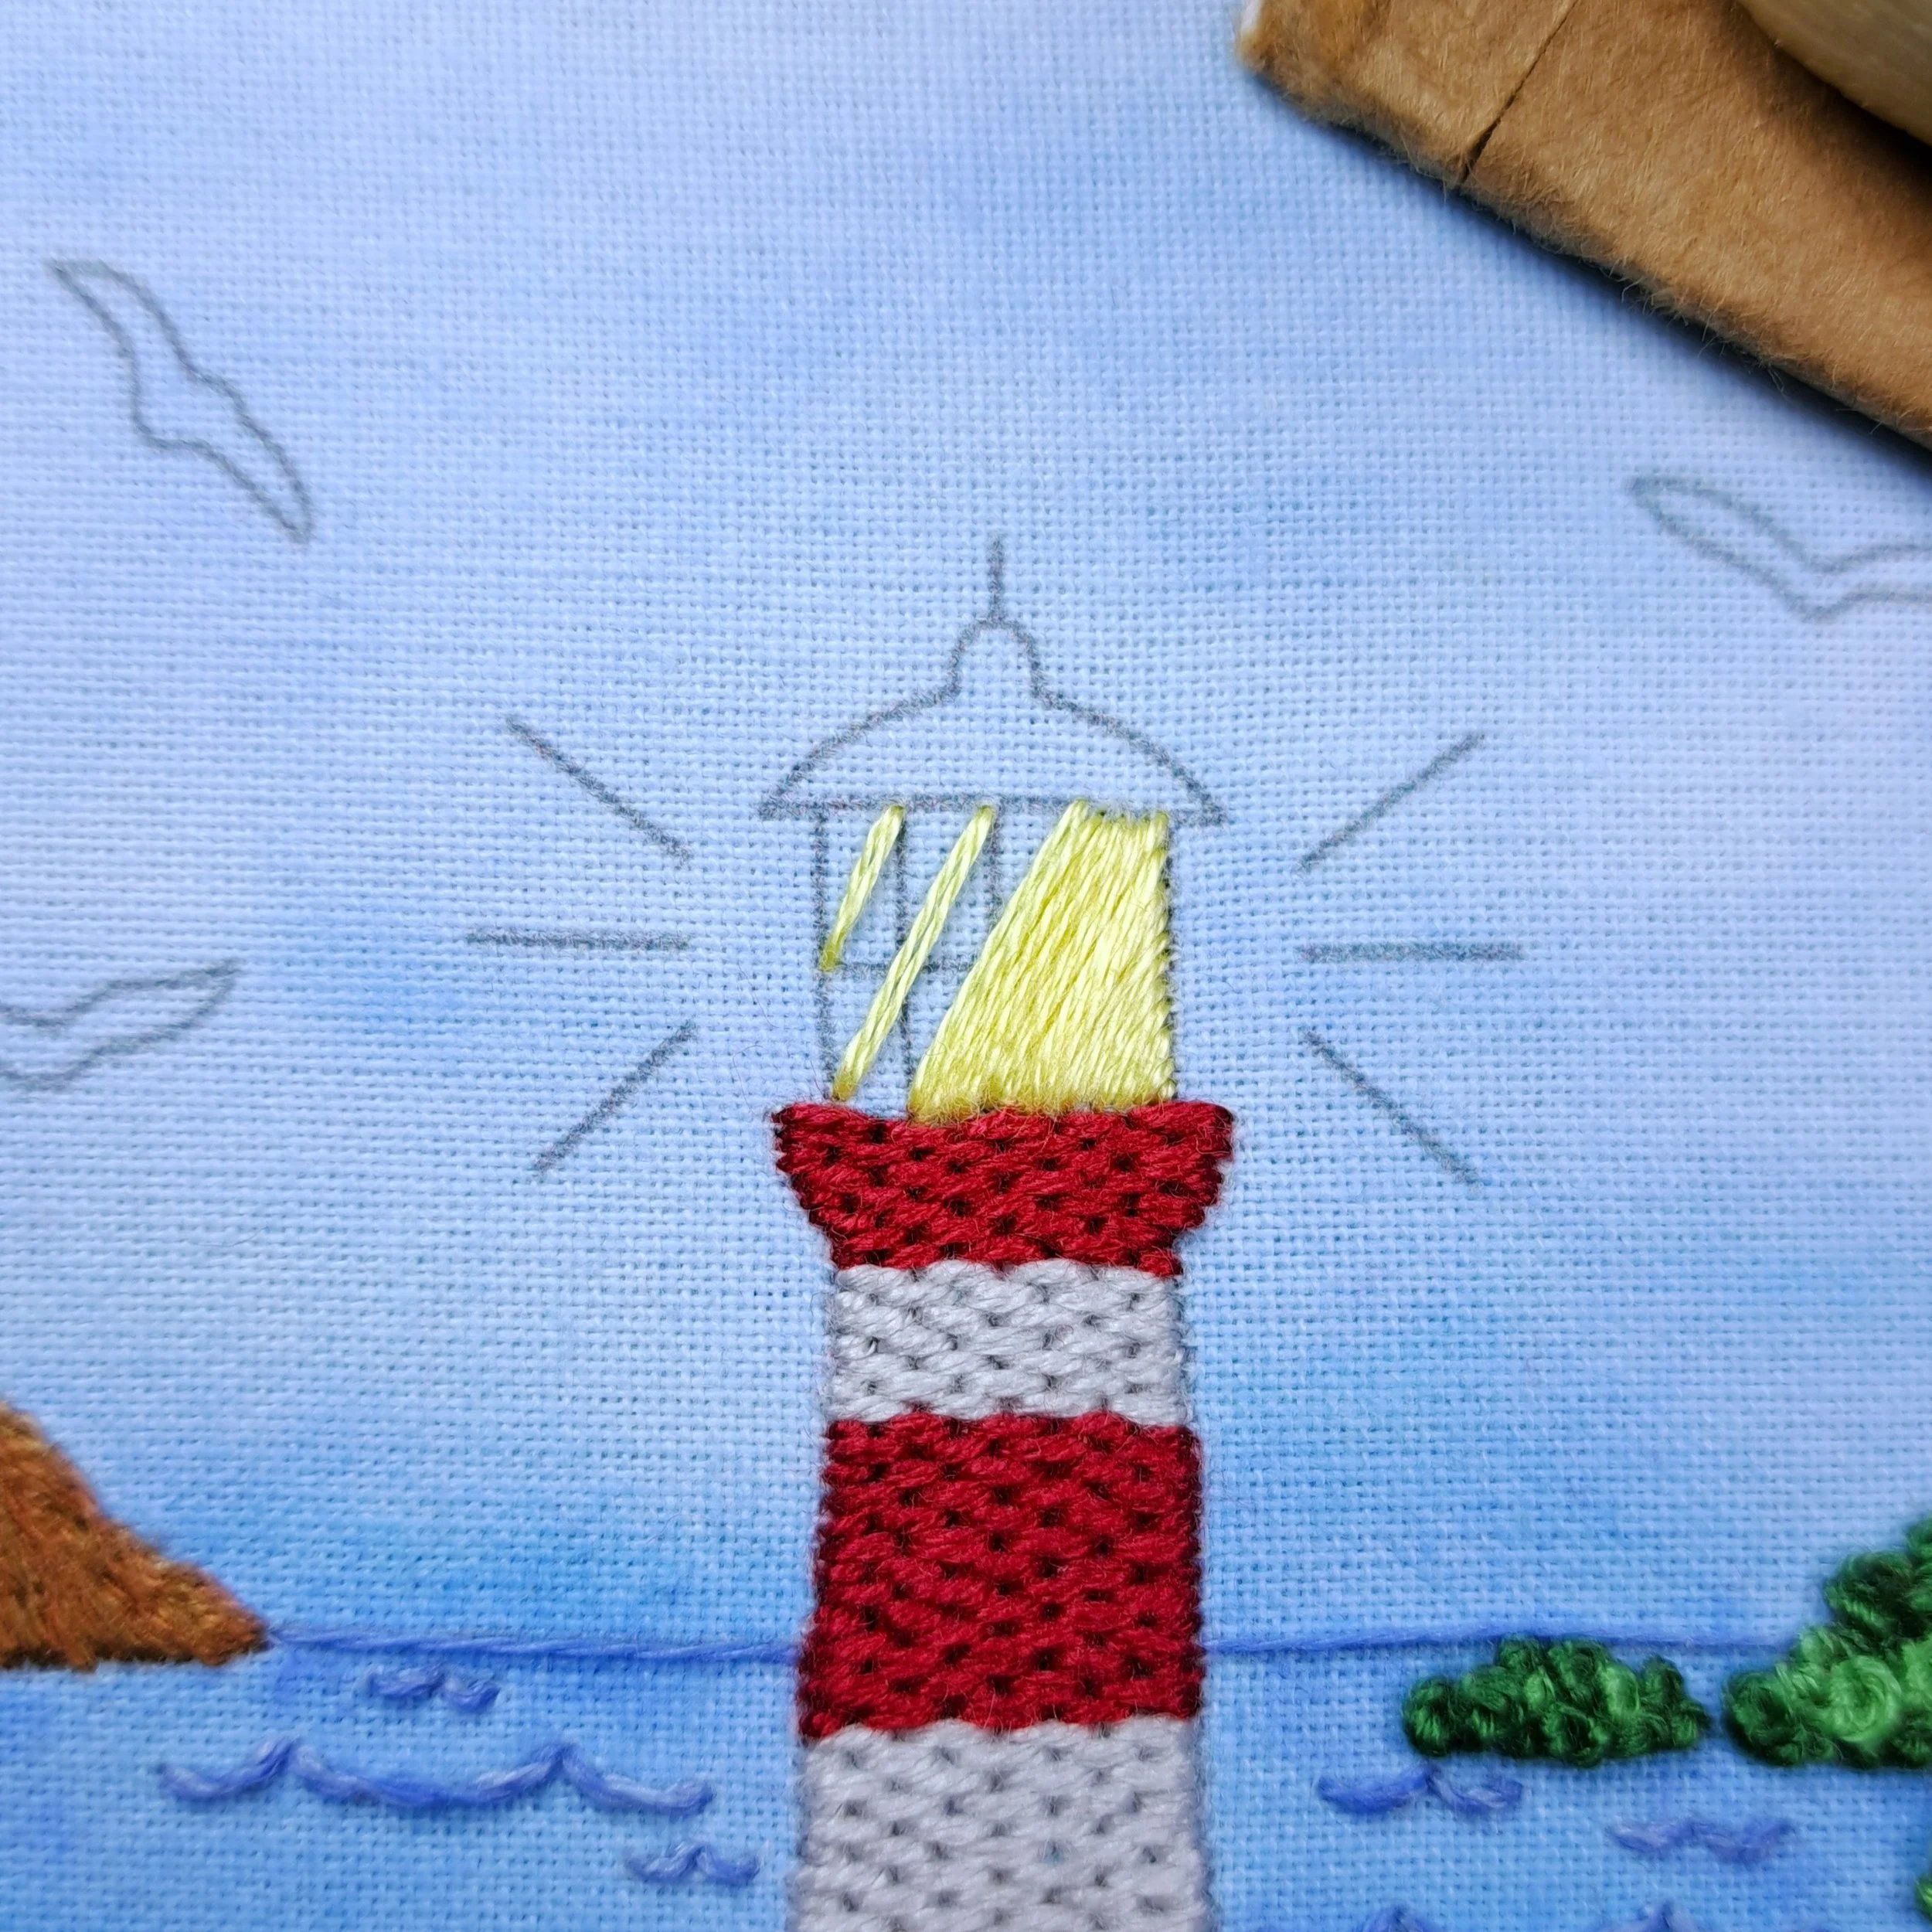
Some Lantern Highlights
I added a few highlights by stitching some Straight Stitches over the satin stitches of the lantern using a paler yellow. I didn’t worry about making them even or patterned - just kept them roughly at the same angle as the satin stitches underneath.
✨ A little tip:
Try laying your thread down first to guide where you put your needle. This helps your Straight Stitches follow the same angle as the satin stitches below.
Stitch – Straight Stitch
Thread colour – Anchor 292 (Pale Yellow)
Number of strands – 1
Needle size – Small
The Cap
I started with 3 vertical rows of Split Stitch - one on each edge and one straight down the middle of the cap. Then I filled in each section with more rows of vertical Split Stitch until the cap was completely filled in.
Stitch – Split Stitch
Thread colour – Anchor 19 (Red)
Number of strands – 3
Needle size – Medium

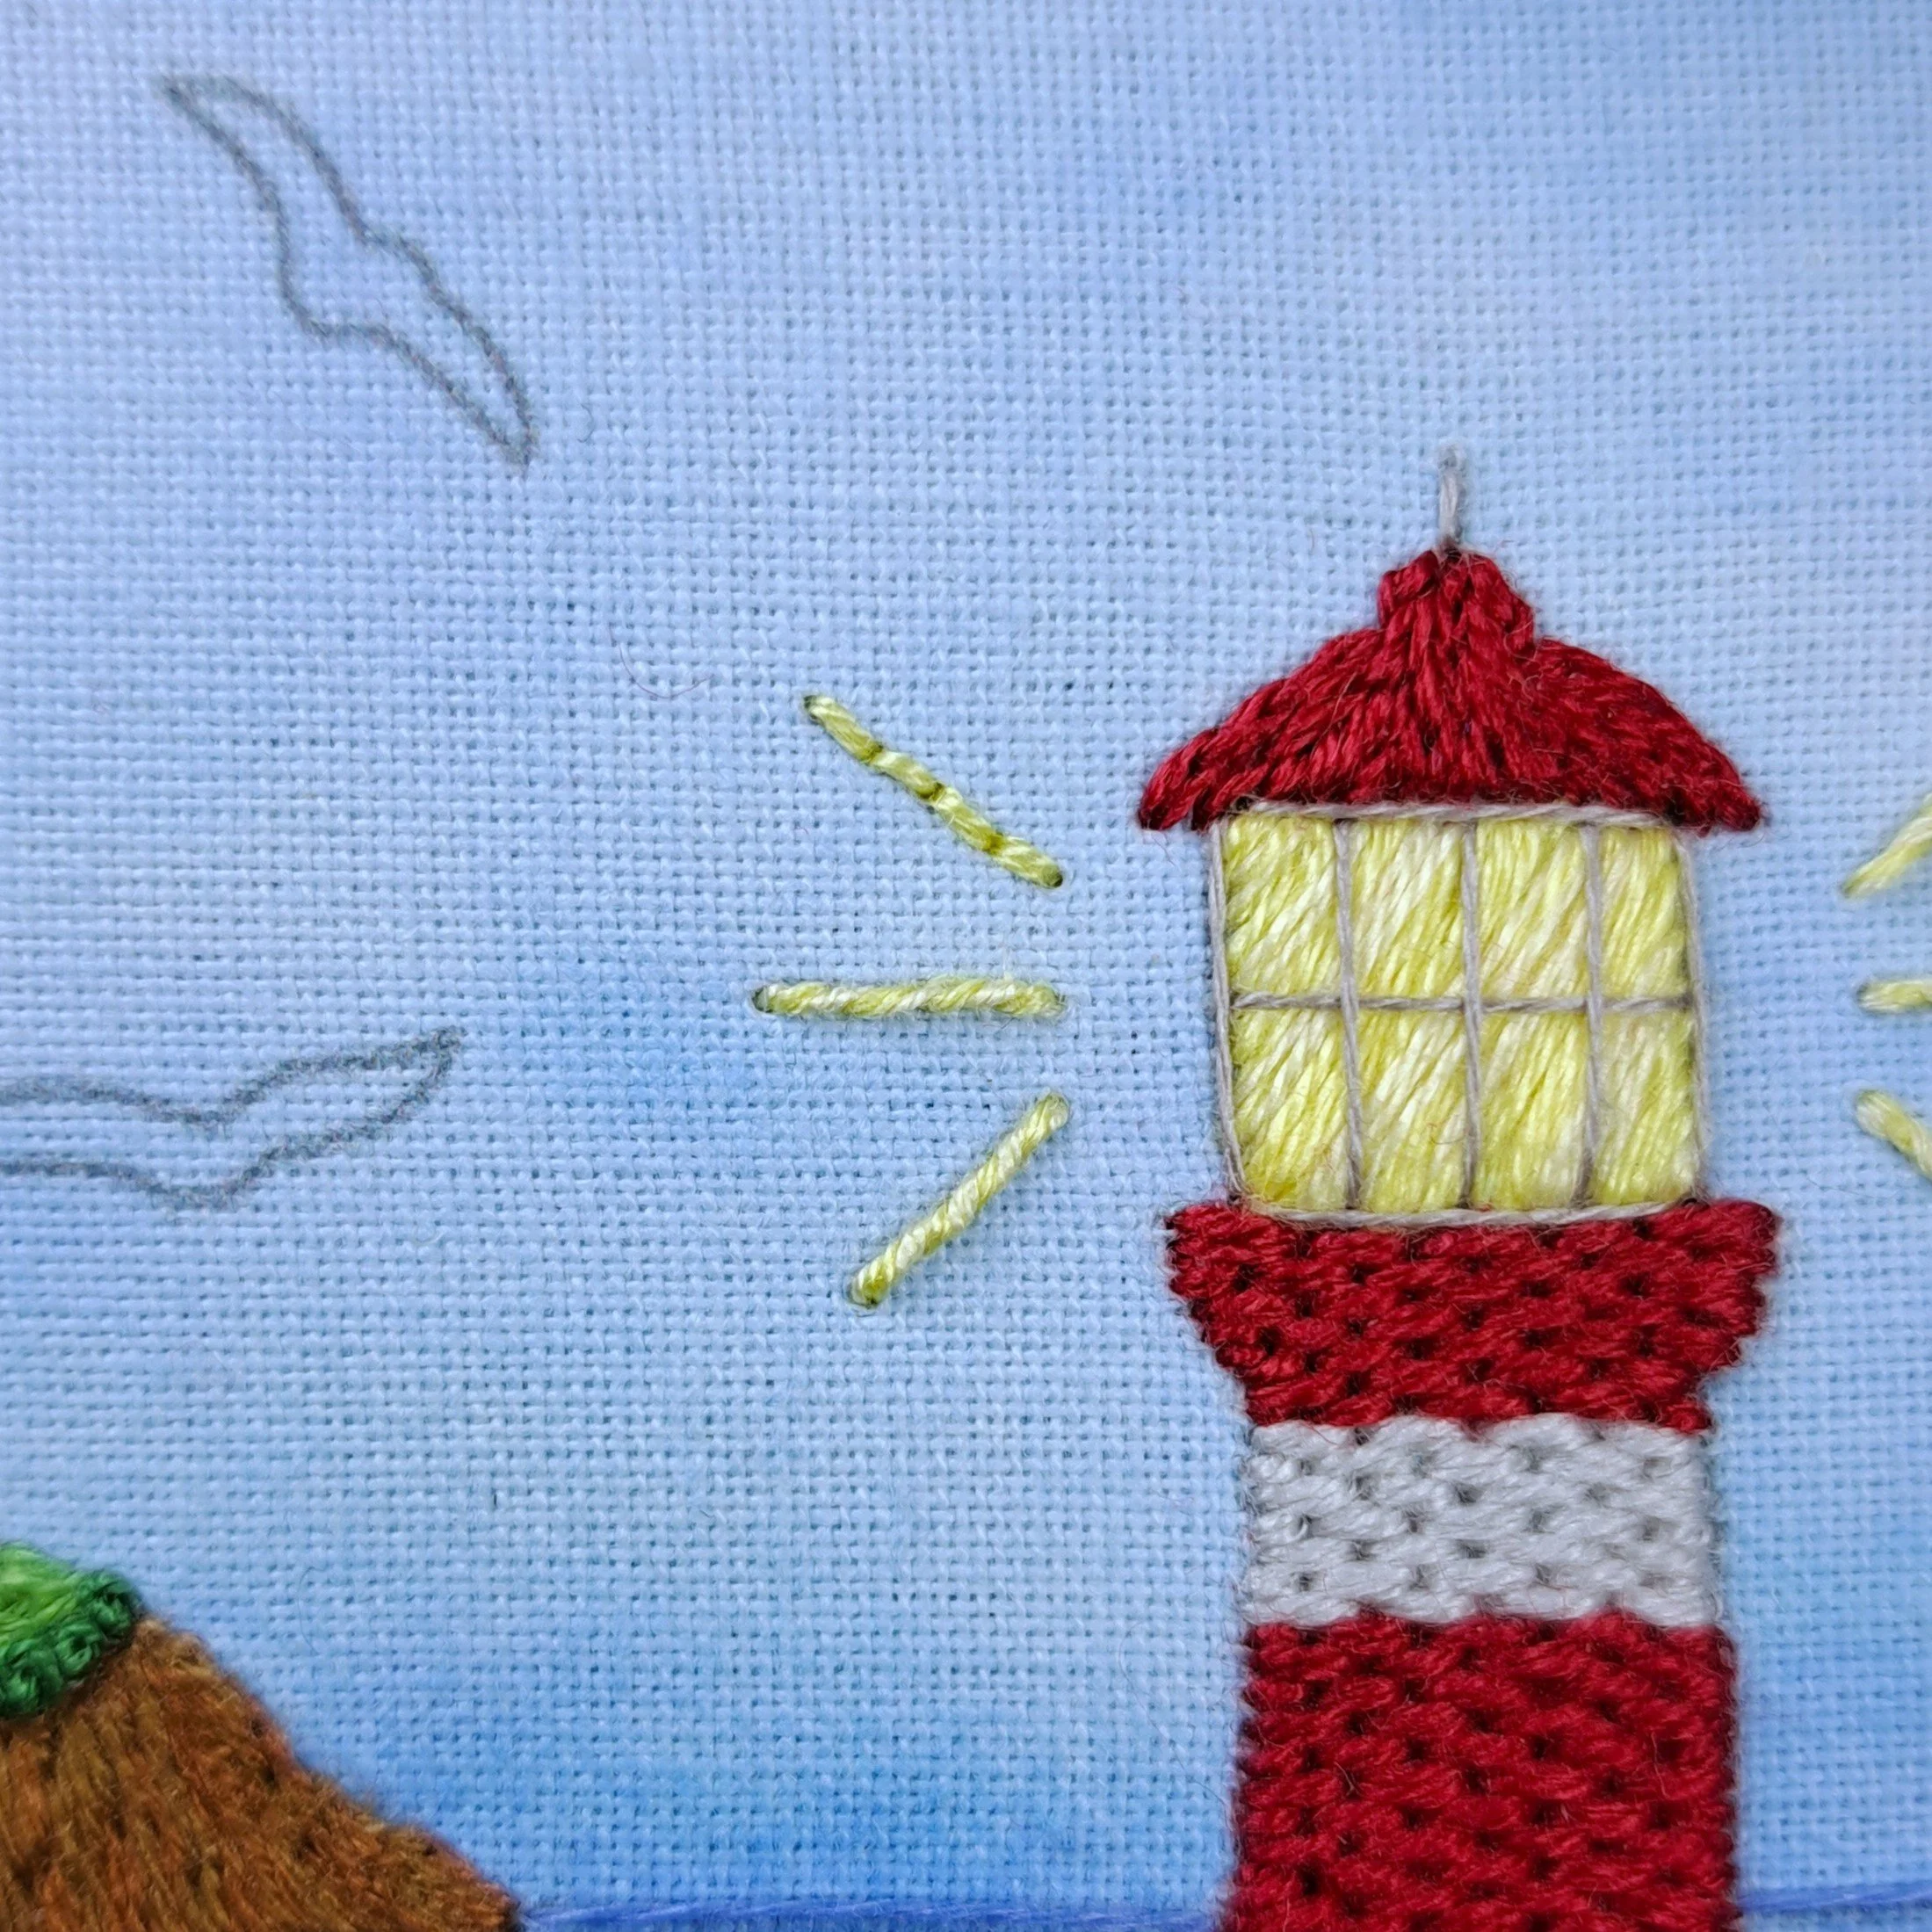
The Window Frame and Lightning Rod
To finish off the lighthouse, I added a few nice and easy Straight Stitches for the lantern window frames and the lightning rod.
✨ A little tip:
To help keep your straight stitches nice and straight, lay the thread down first to use as a guide for where to put your needle.
Stitch – Straight Stitch
Thread colour – Anchor 399 (Grey)
Number of strands – 1
Needle size – Small

The Light Beams
I stitched 4 Backstitches in each light beam using Anchor 293. Then I whipped these backstitches with Anchor 292. I love using a different colour for the whipping - even if it’s subtle - because it makes a fun candy cane effect. It’s really subtle here because my two yellow shades are so close together.
✨ A little tip:
I like to press a finger underneath the hoop, right under the area I’m whipping. It lifts the fabric just enough to help avoid snagging any stitches with the needle.
Stitch – Whipped Backstitch
Thread colour – Anchor 293 (Mid Yellow) for the Backstitches, and Anchor 292 (Pale Yellow) for the whipping
Number of strands – 2
Needle size – Small
The Seagulls
I used two colours for my seagulls to give them a bit of depth. I stitched all the white (Anchor 2) undersides first with horizontal rows of Split Stitch. Each one got a slightly different amount of white to show the birds in different positions.
Then I filled in the seagulls with Anchor 148 (Dark Blue).
Stitch – Split Stitch
Thread colour – Anchor 2 (White) for the underside of each bird, and Anchor 148 (Dark Blue) for the top
Number of strands – 2
Needle size – Small

We just have the grass area left to stitch! 🪡

✨ Enjoying the blog so far?
I’ve poured a lot of time and stitches into this one, so if you’re finding it helpful and feel like leaving a little Ko-fi tip, you can do that below – no pressure at all though! 💛
Now back to the stitching…
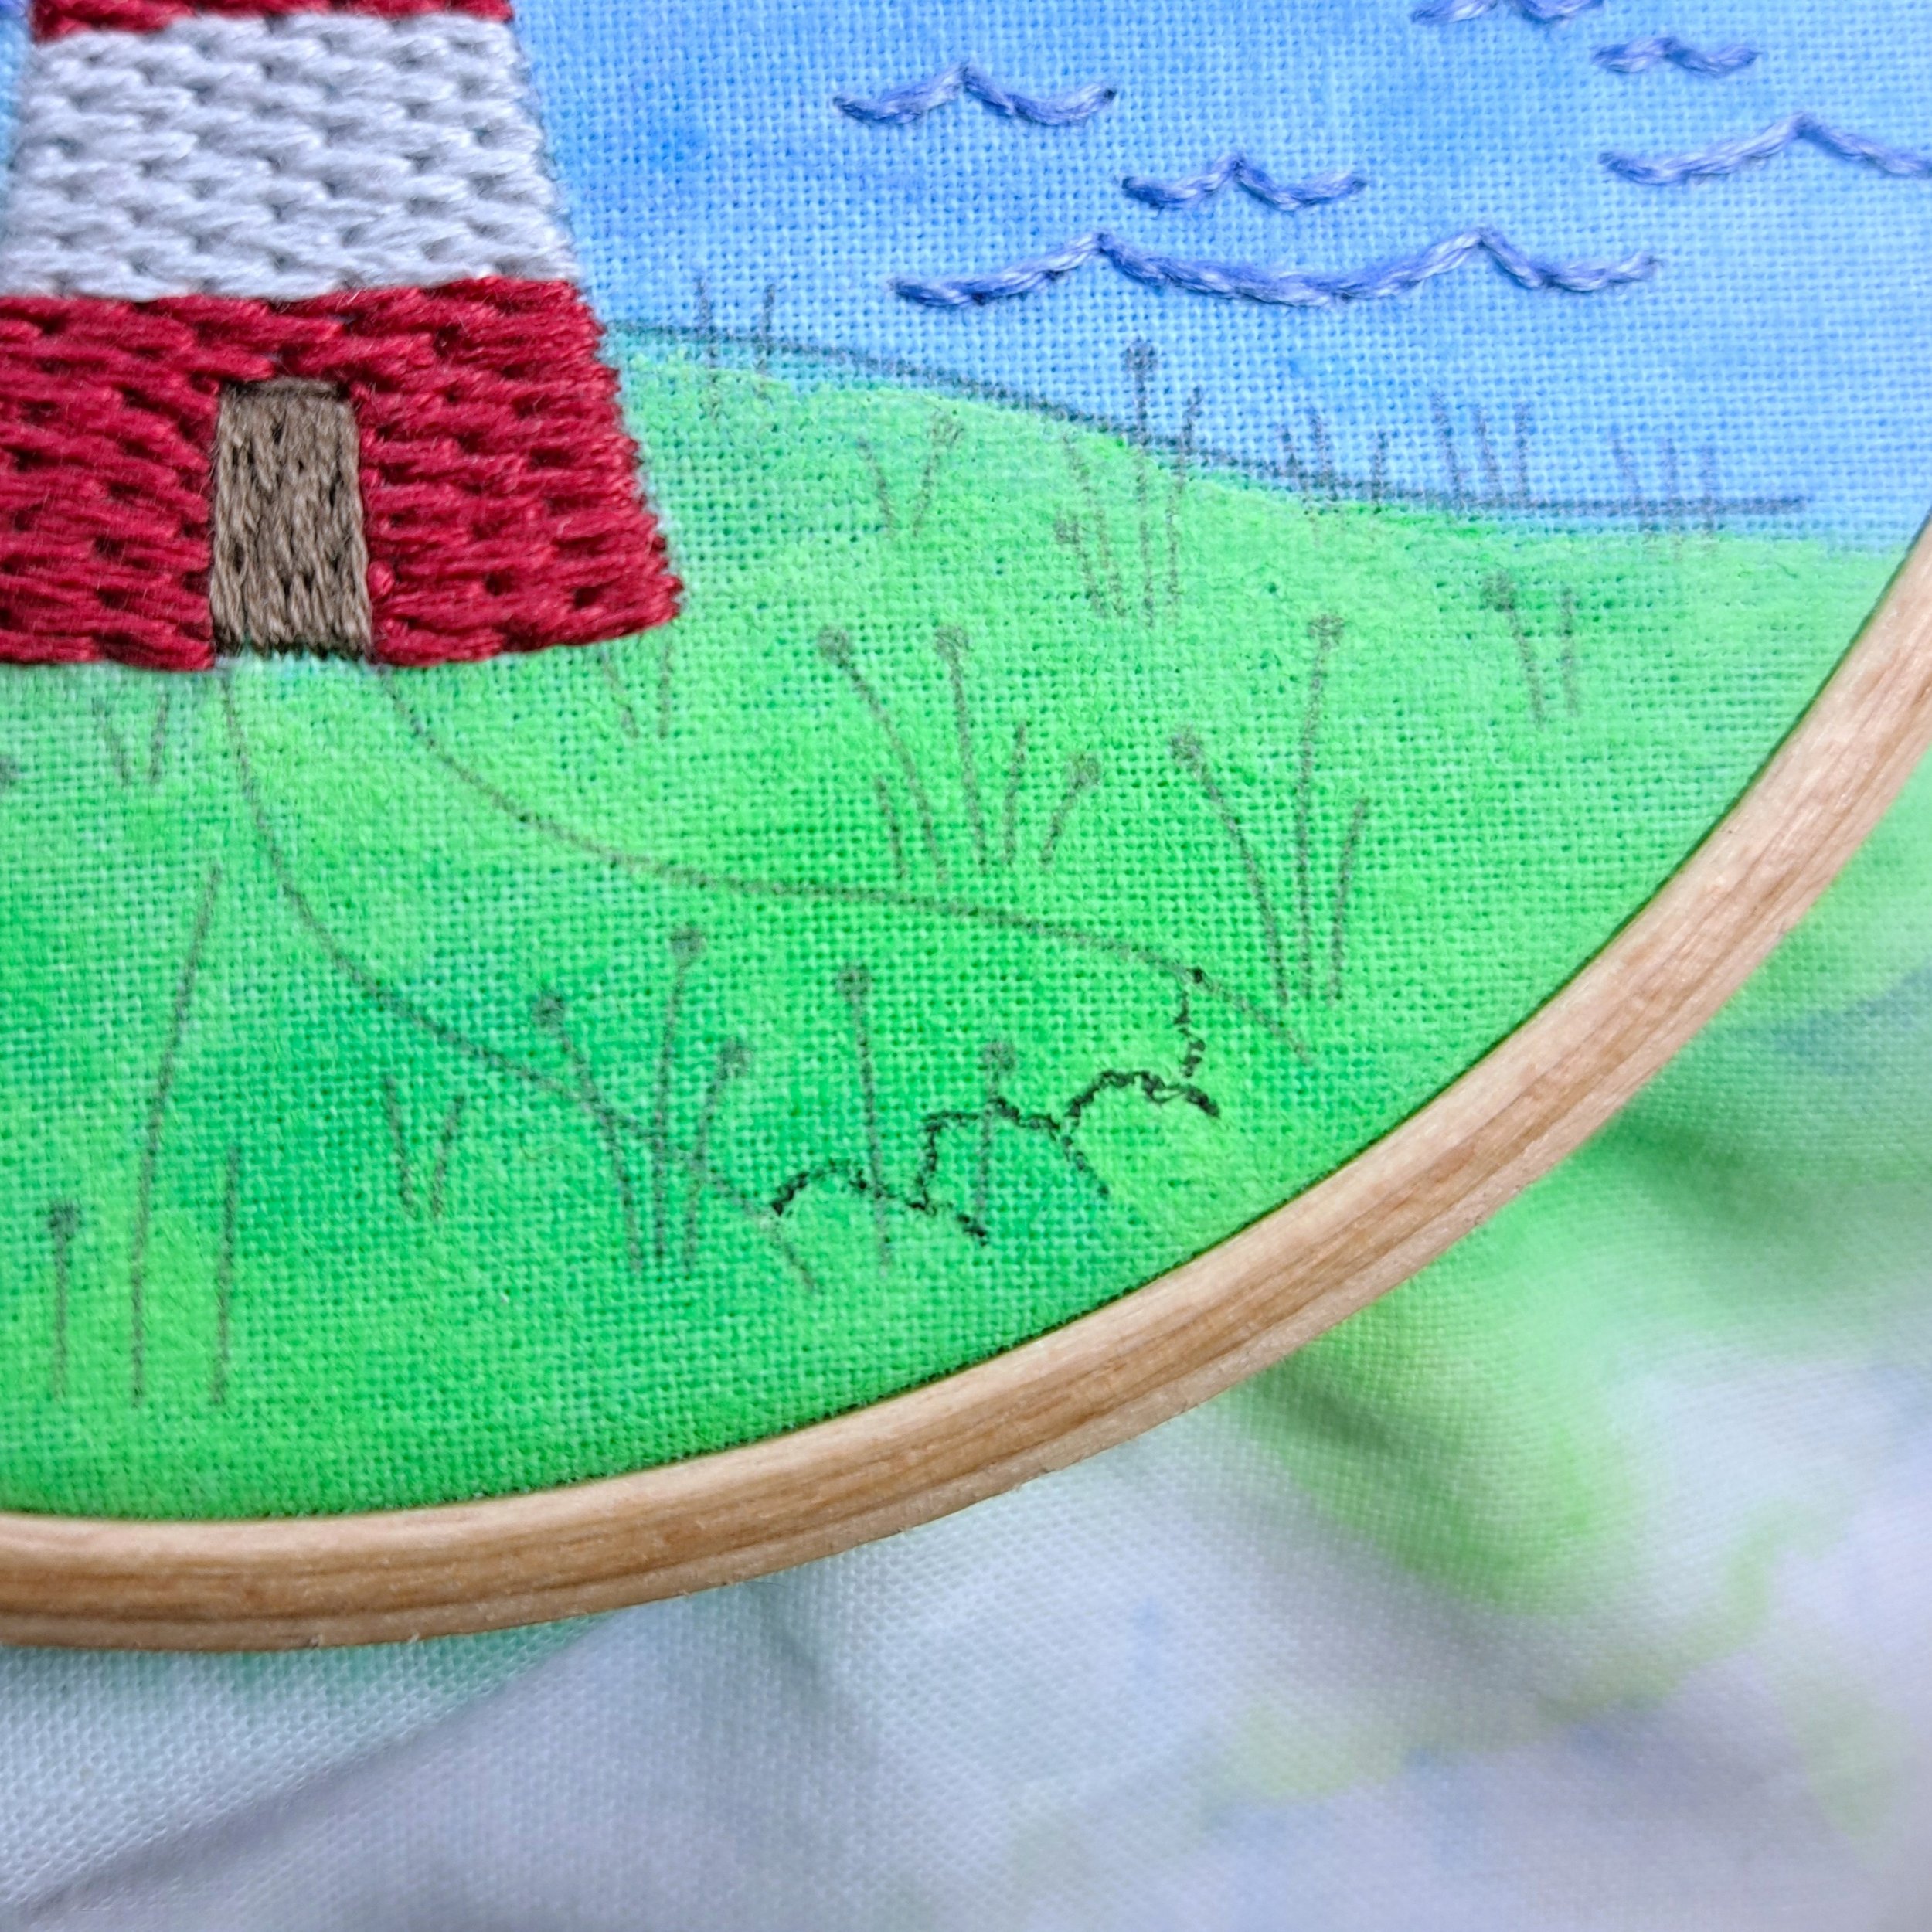
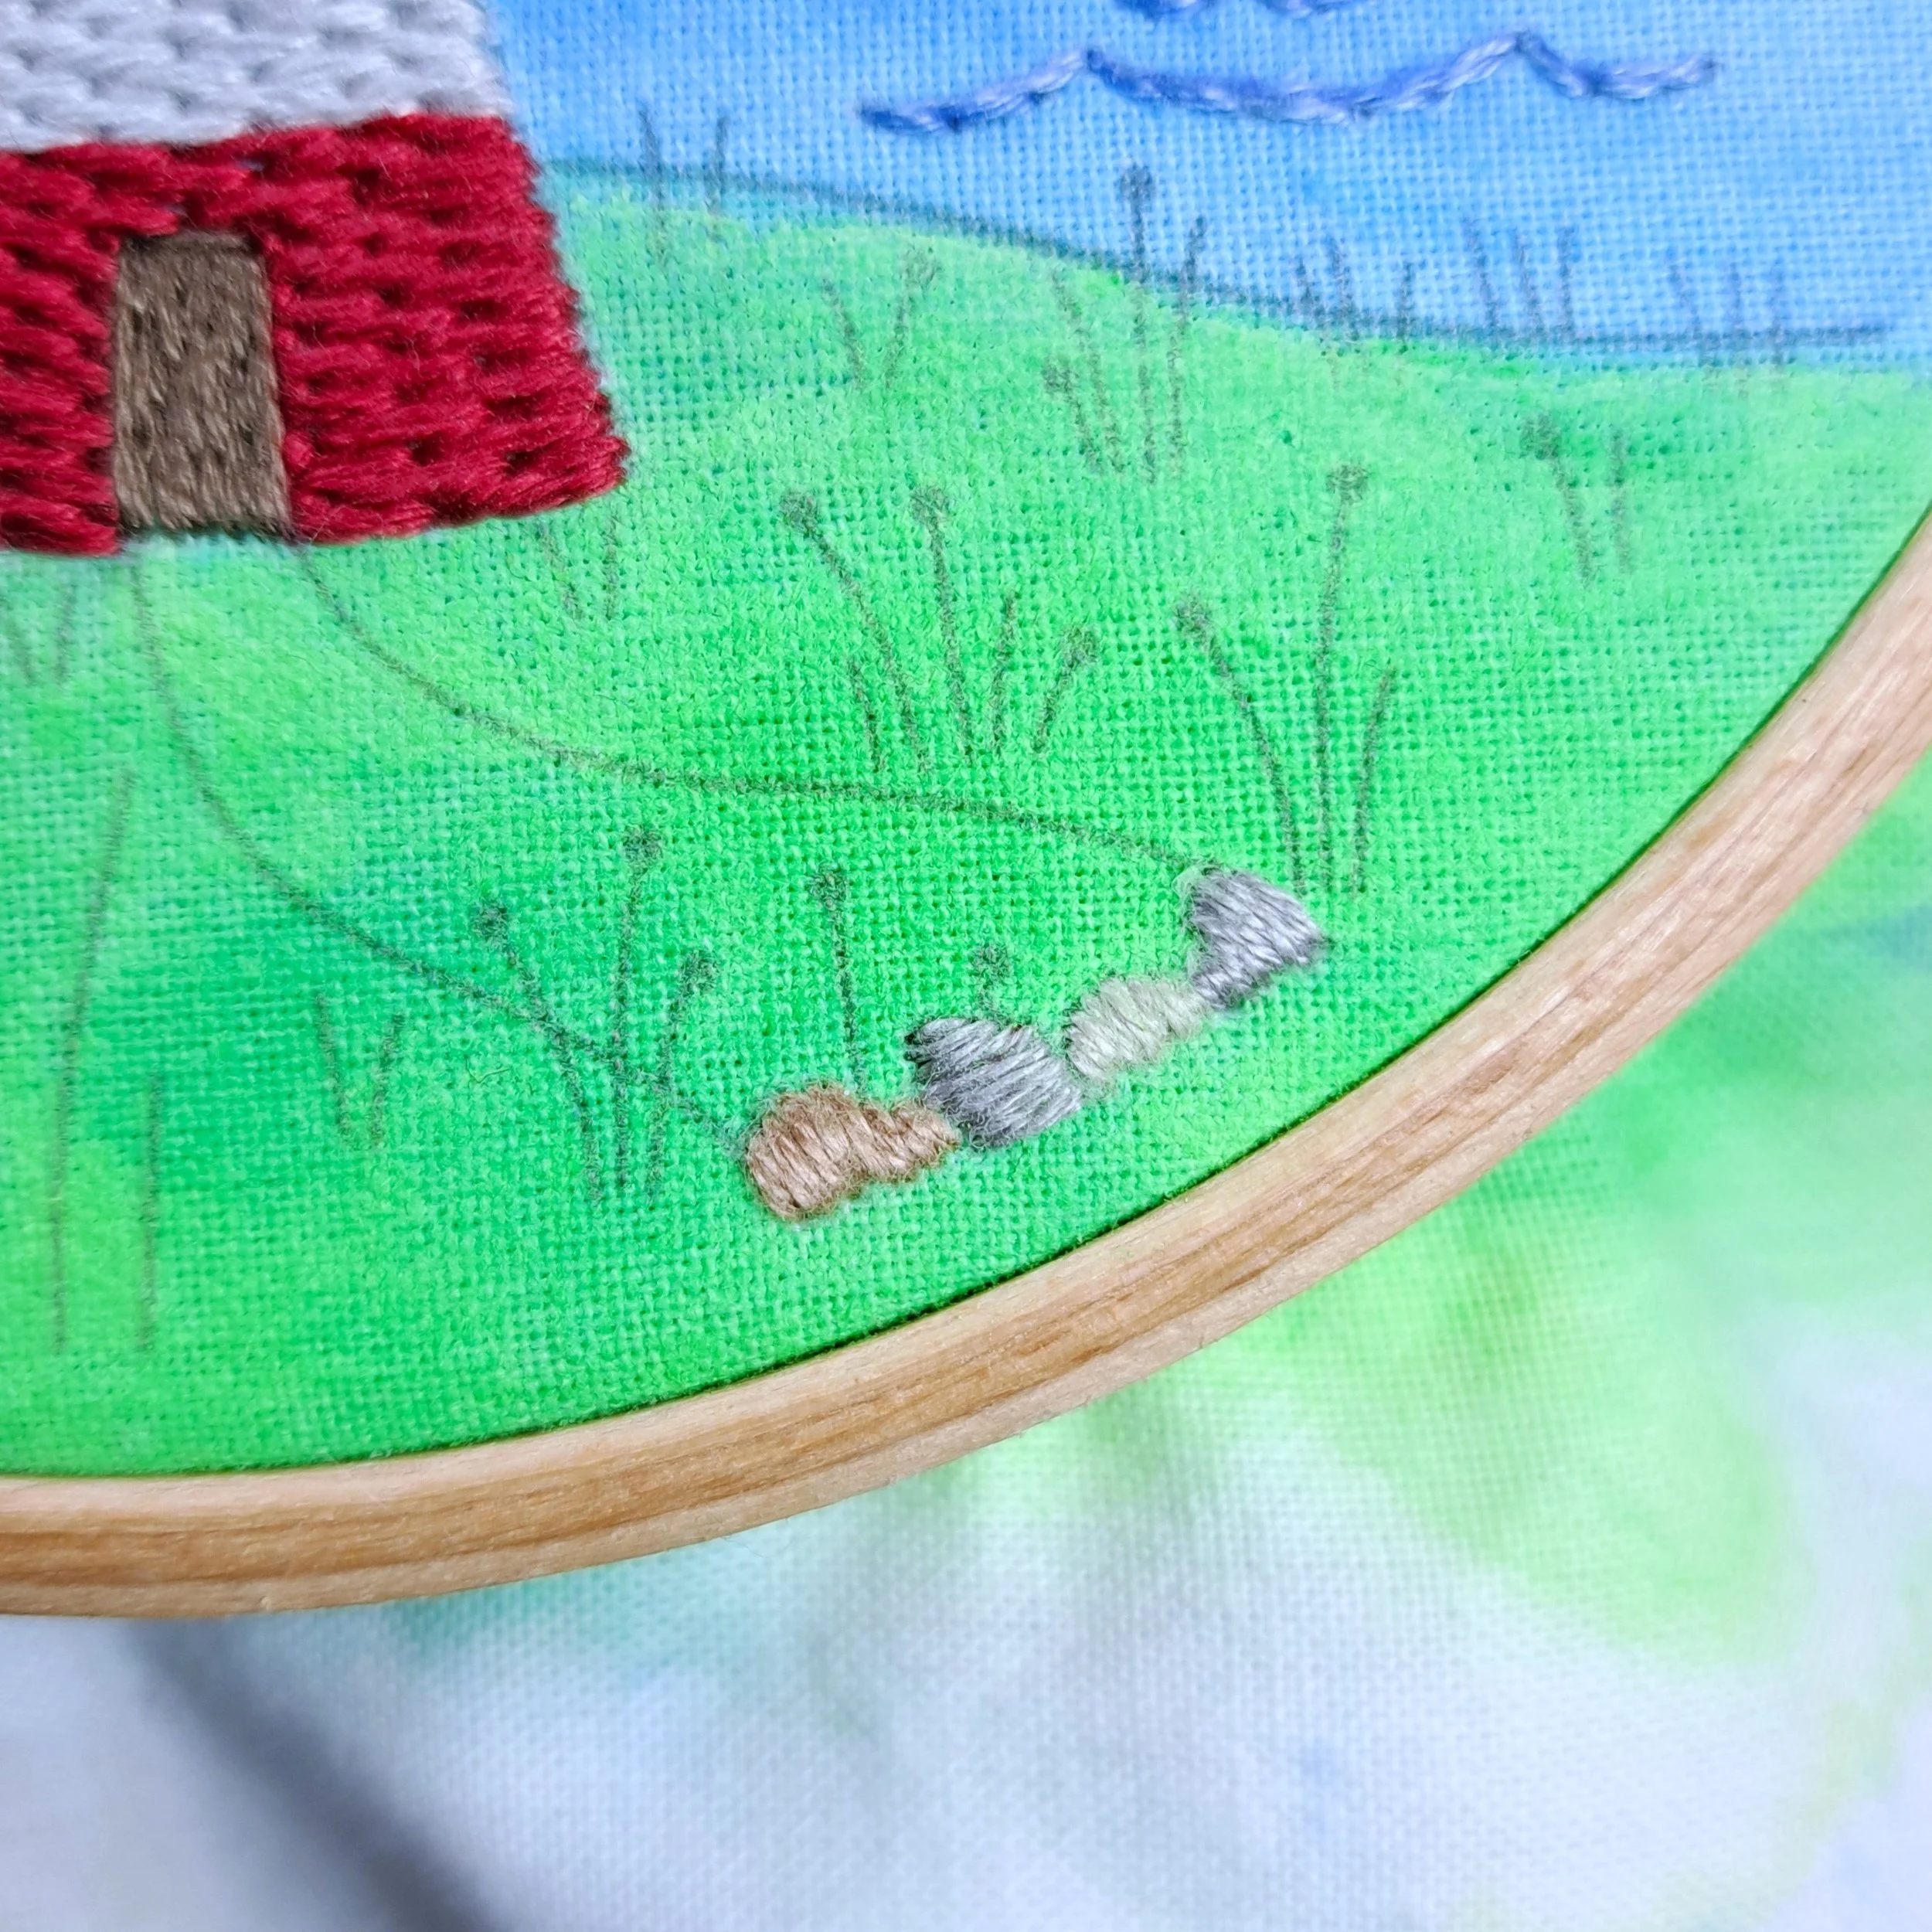
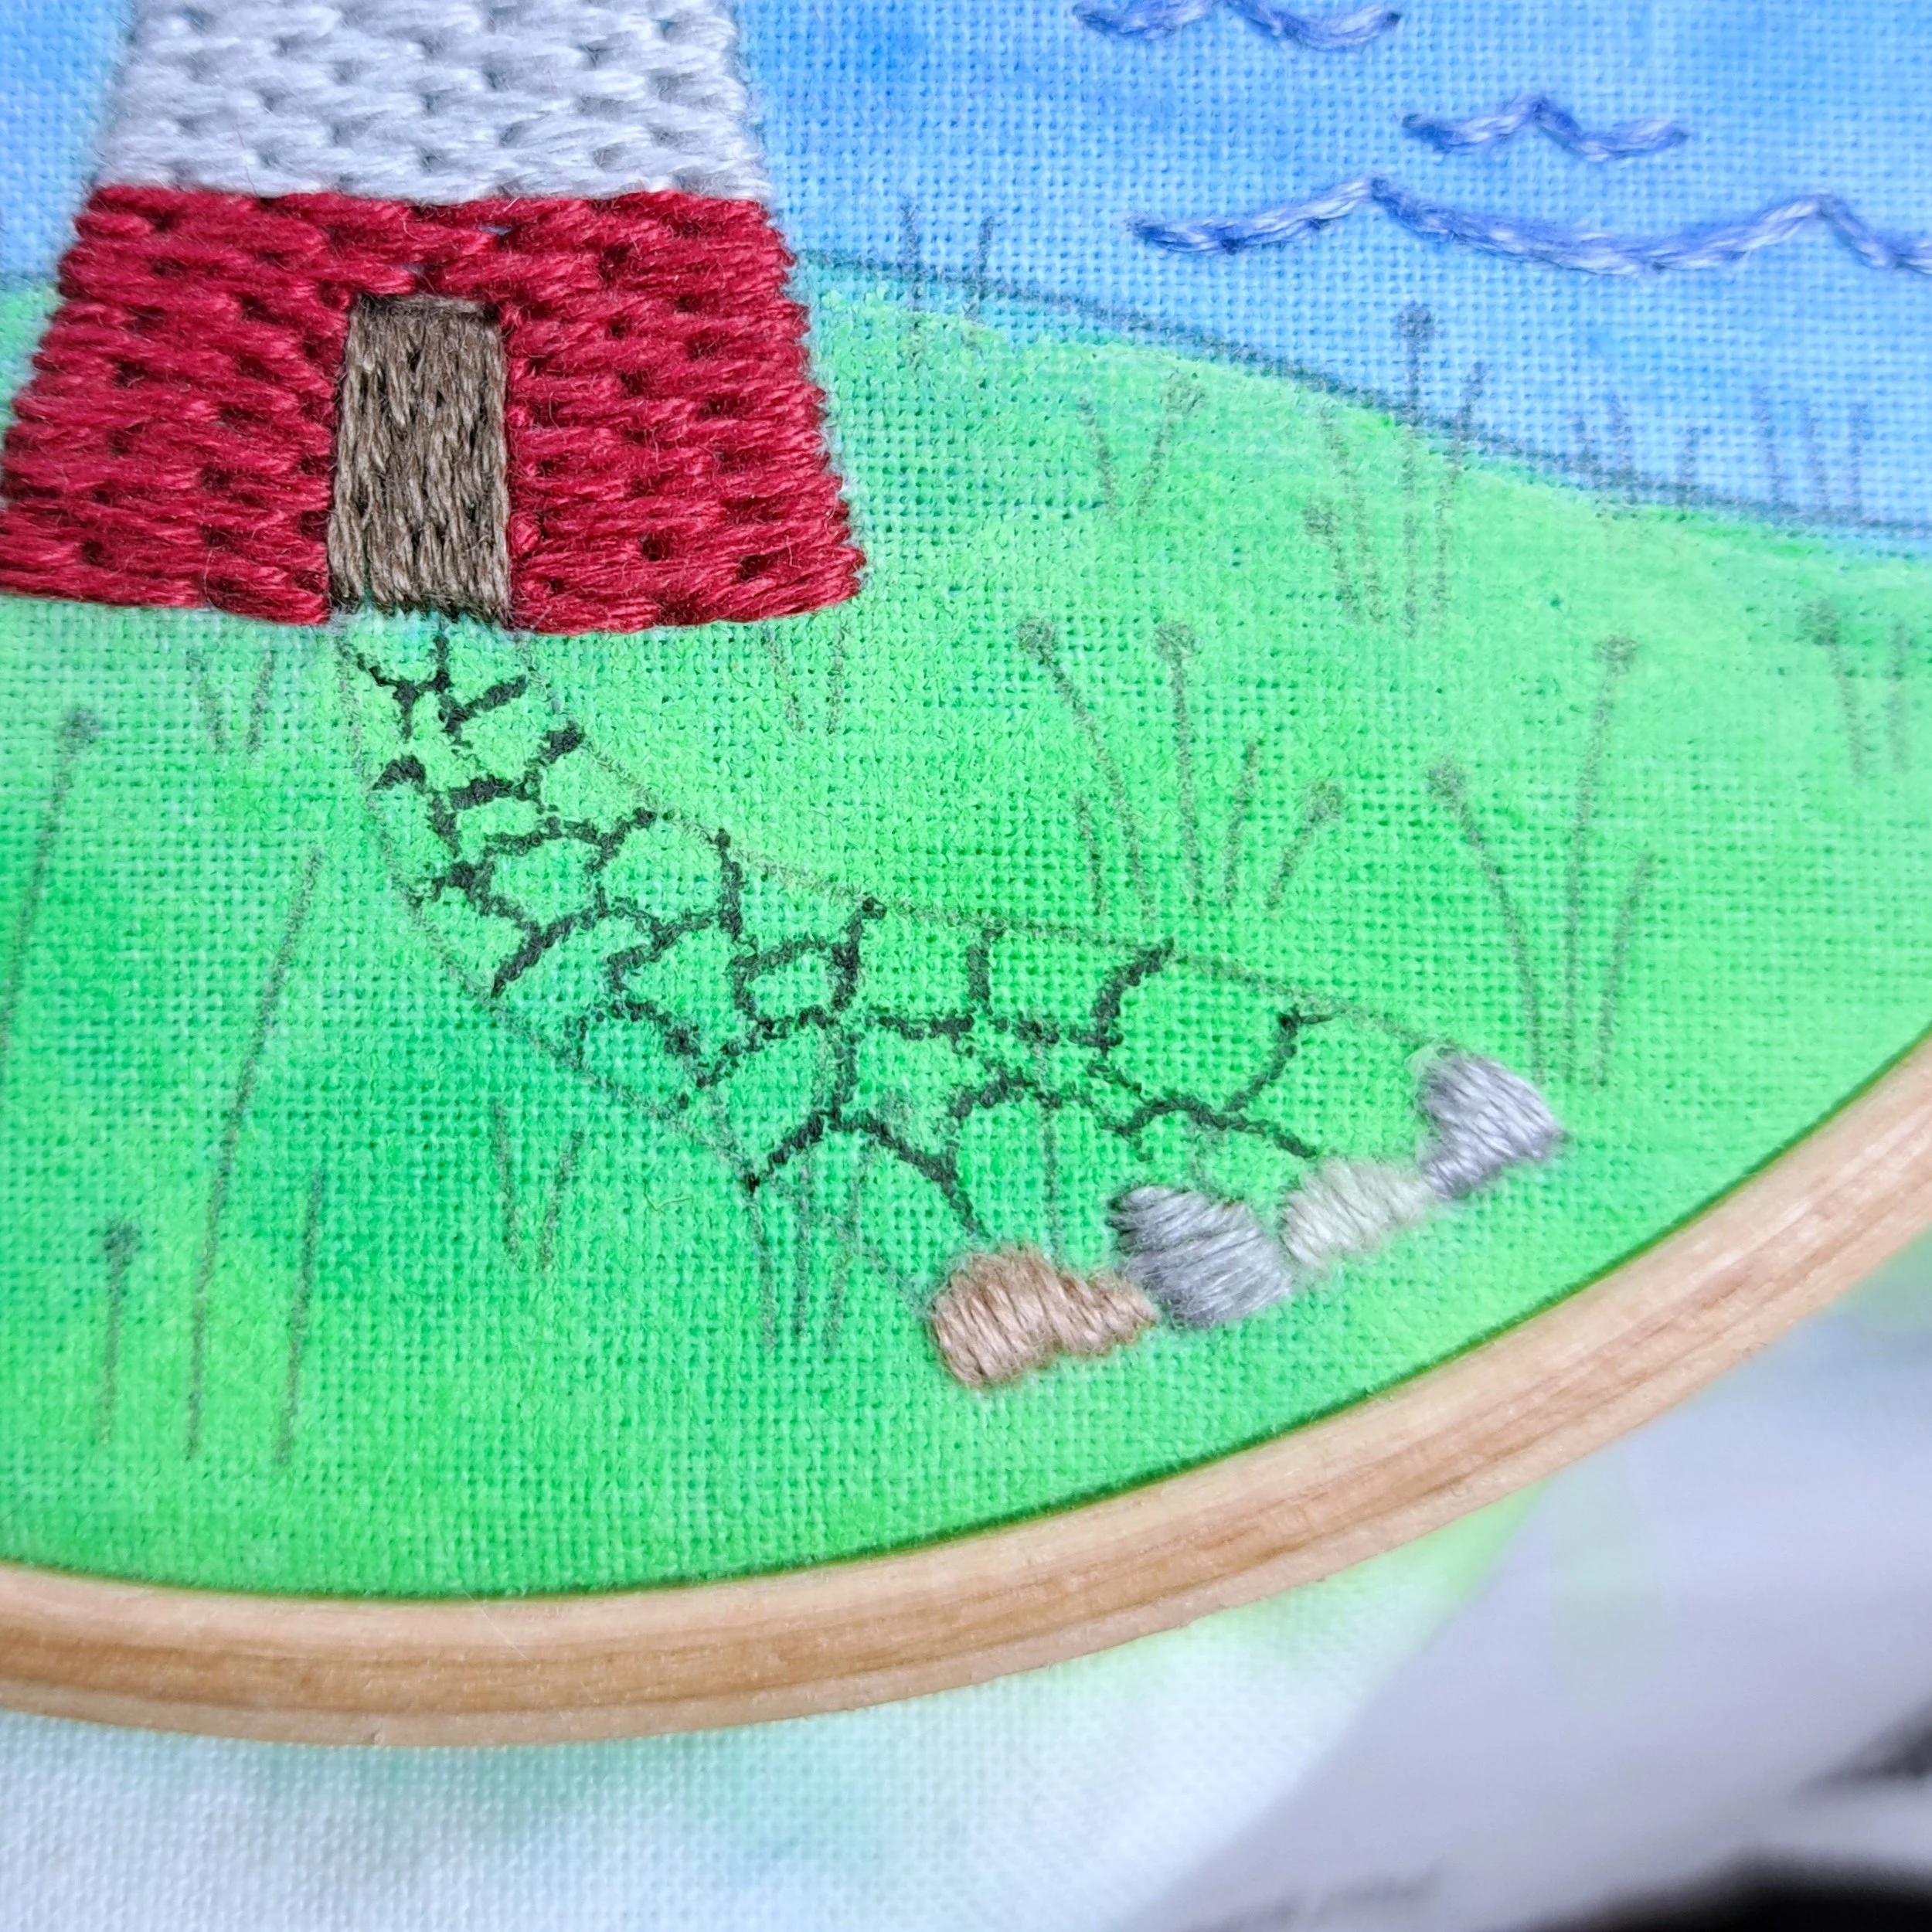
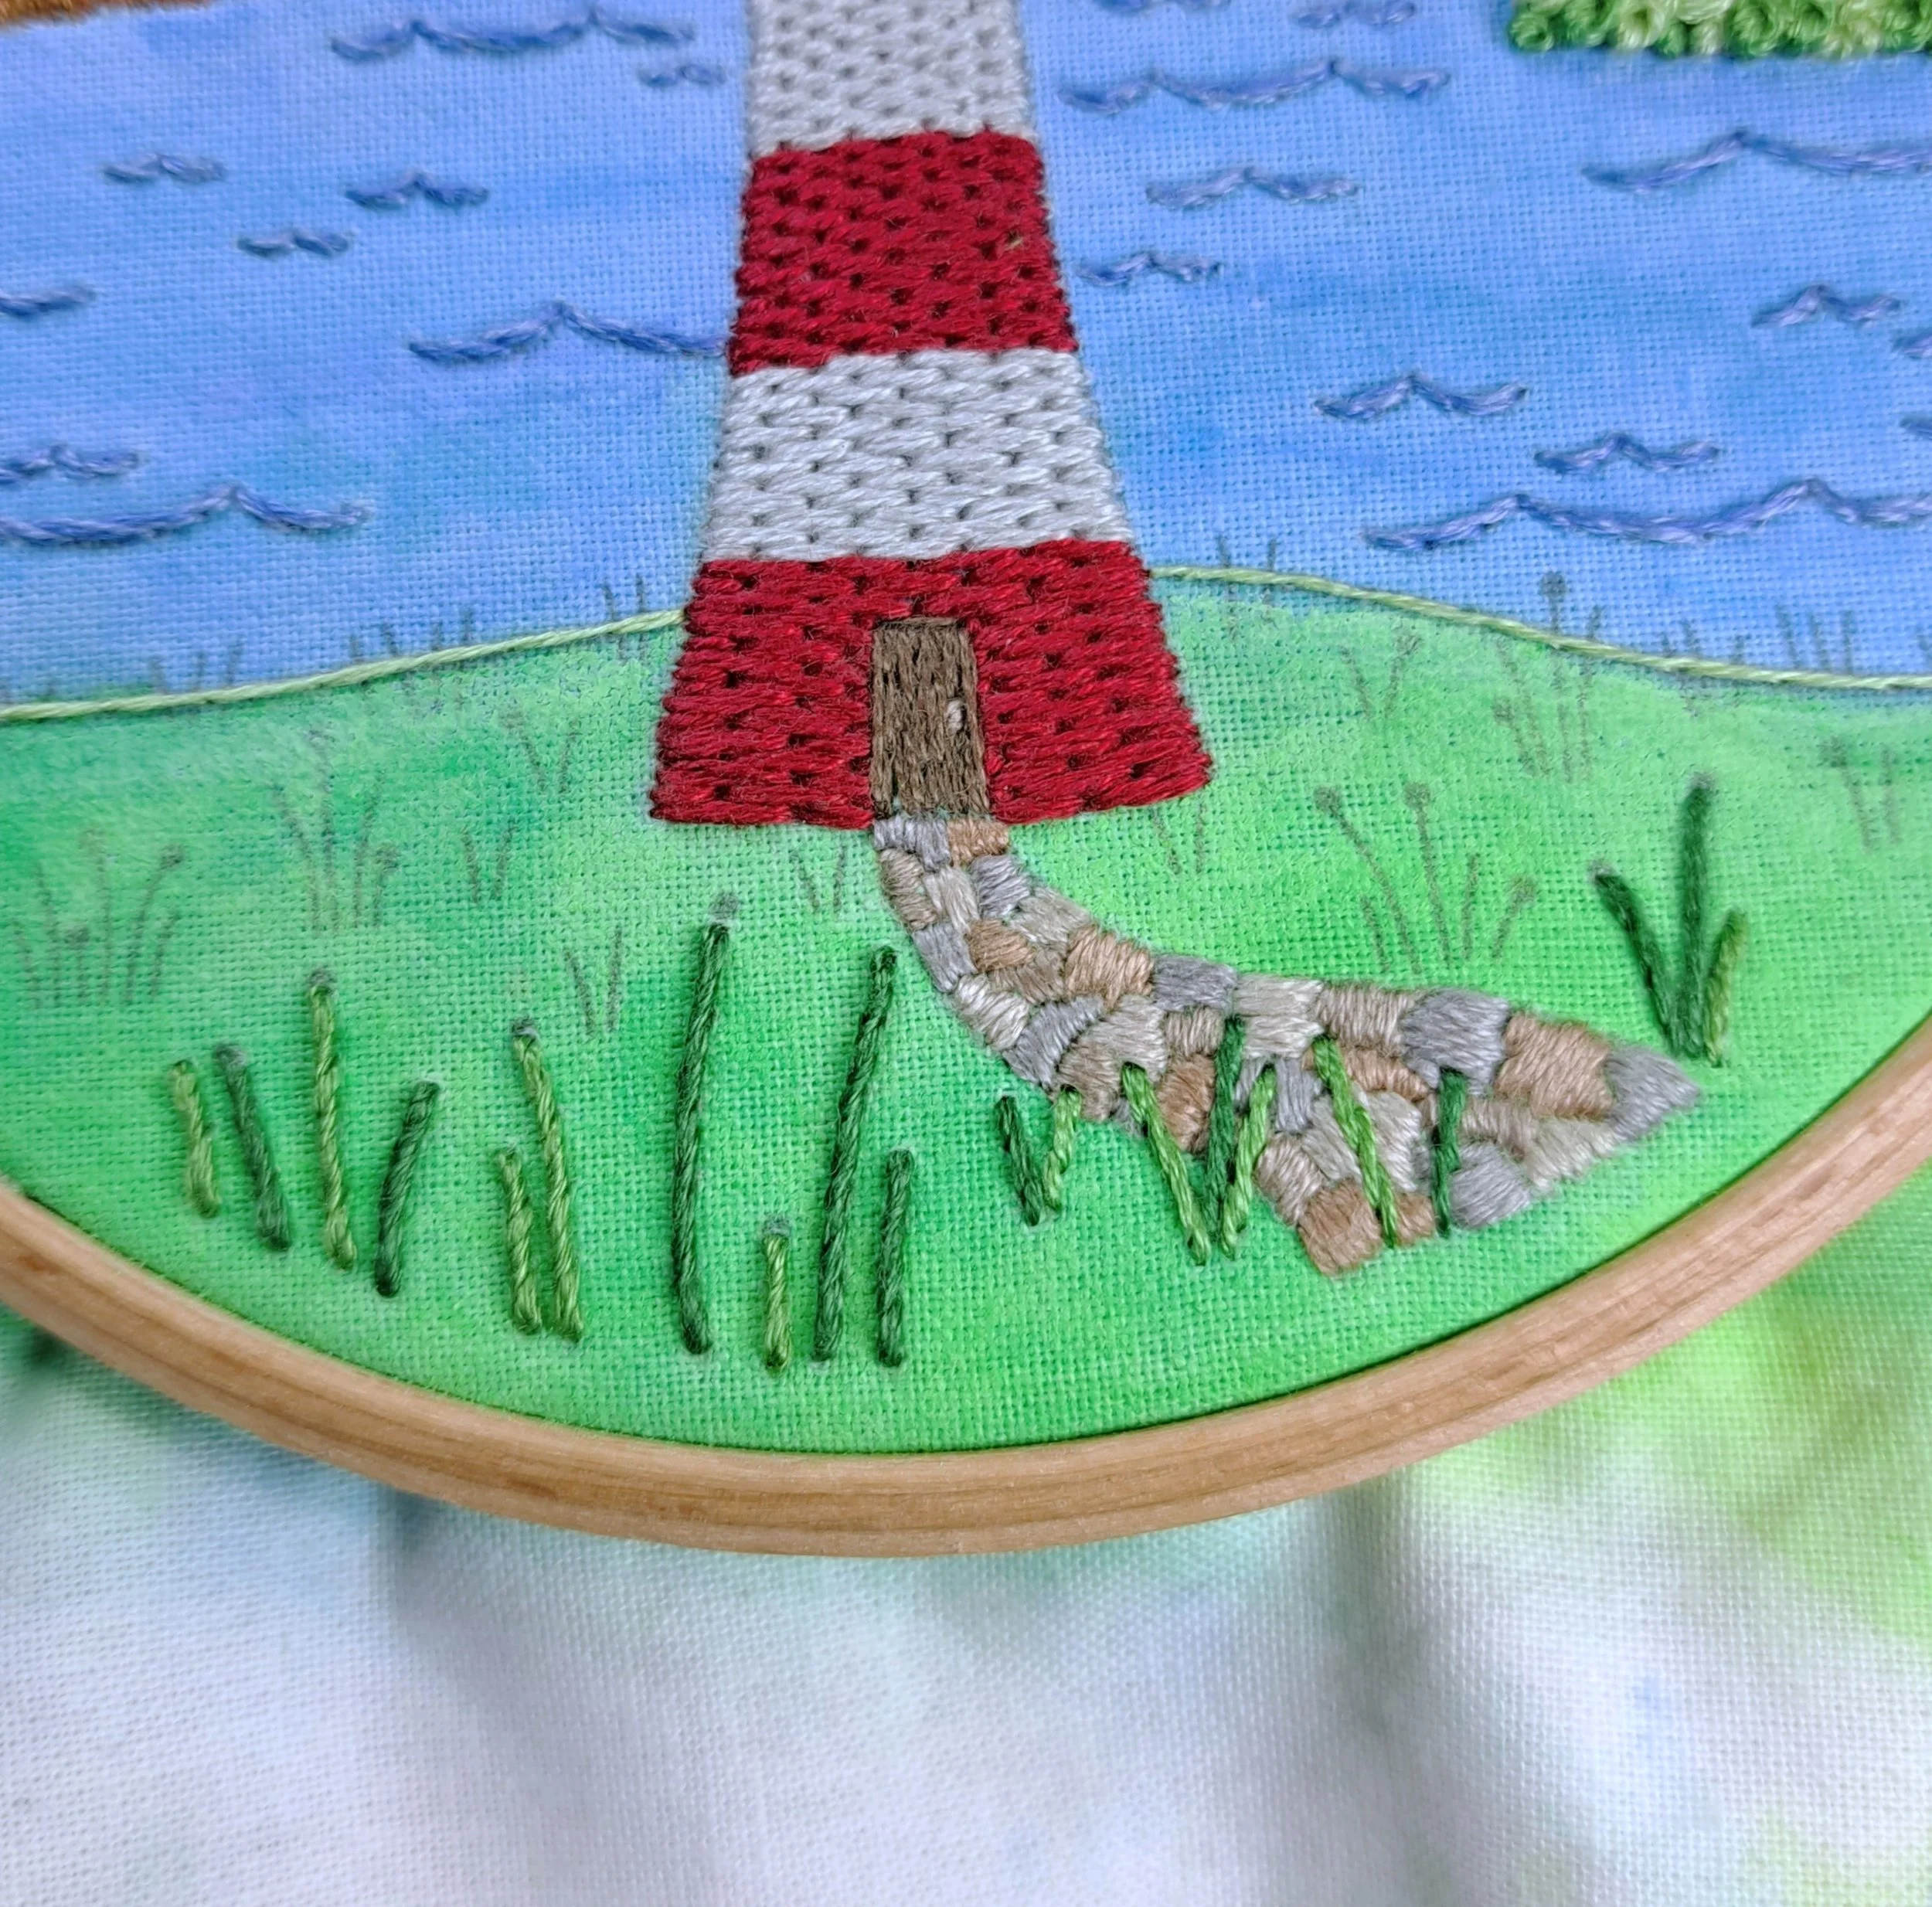
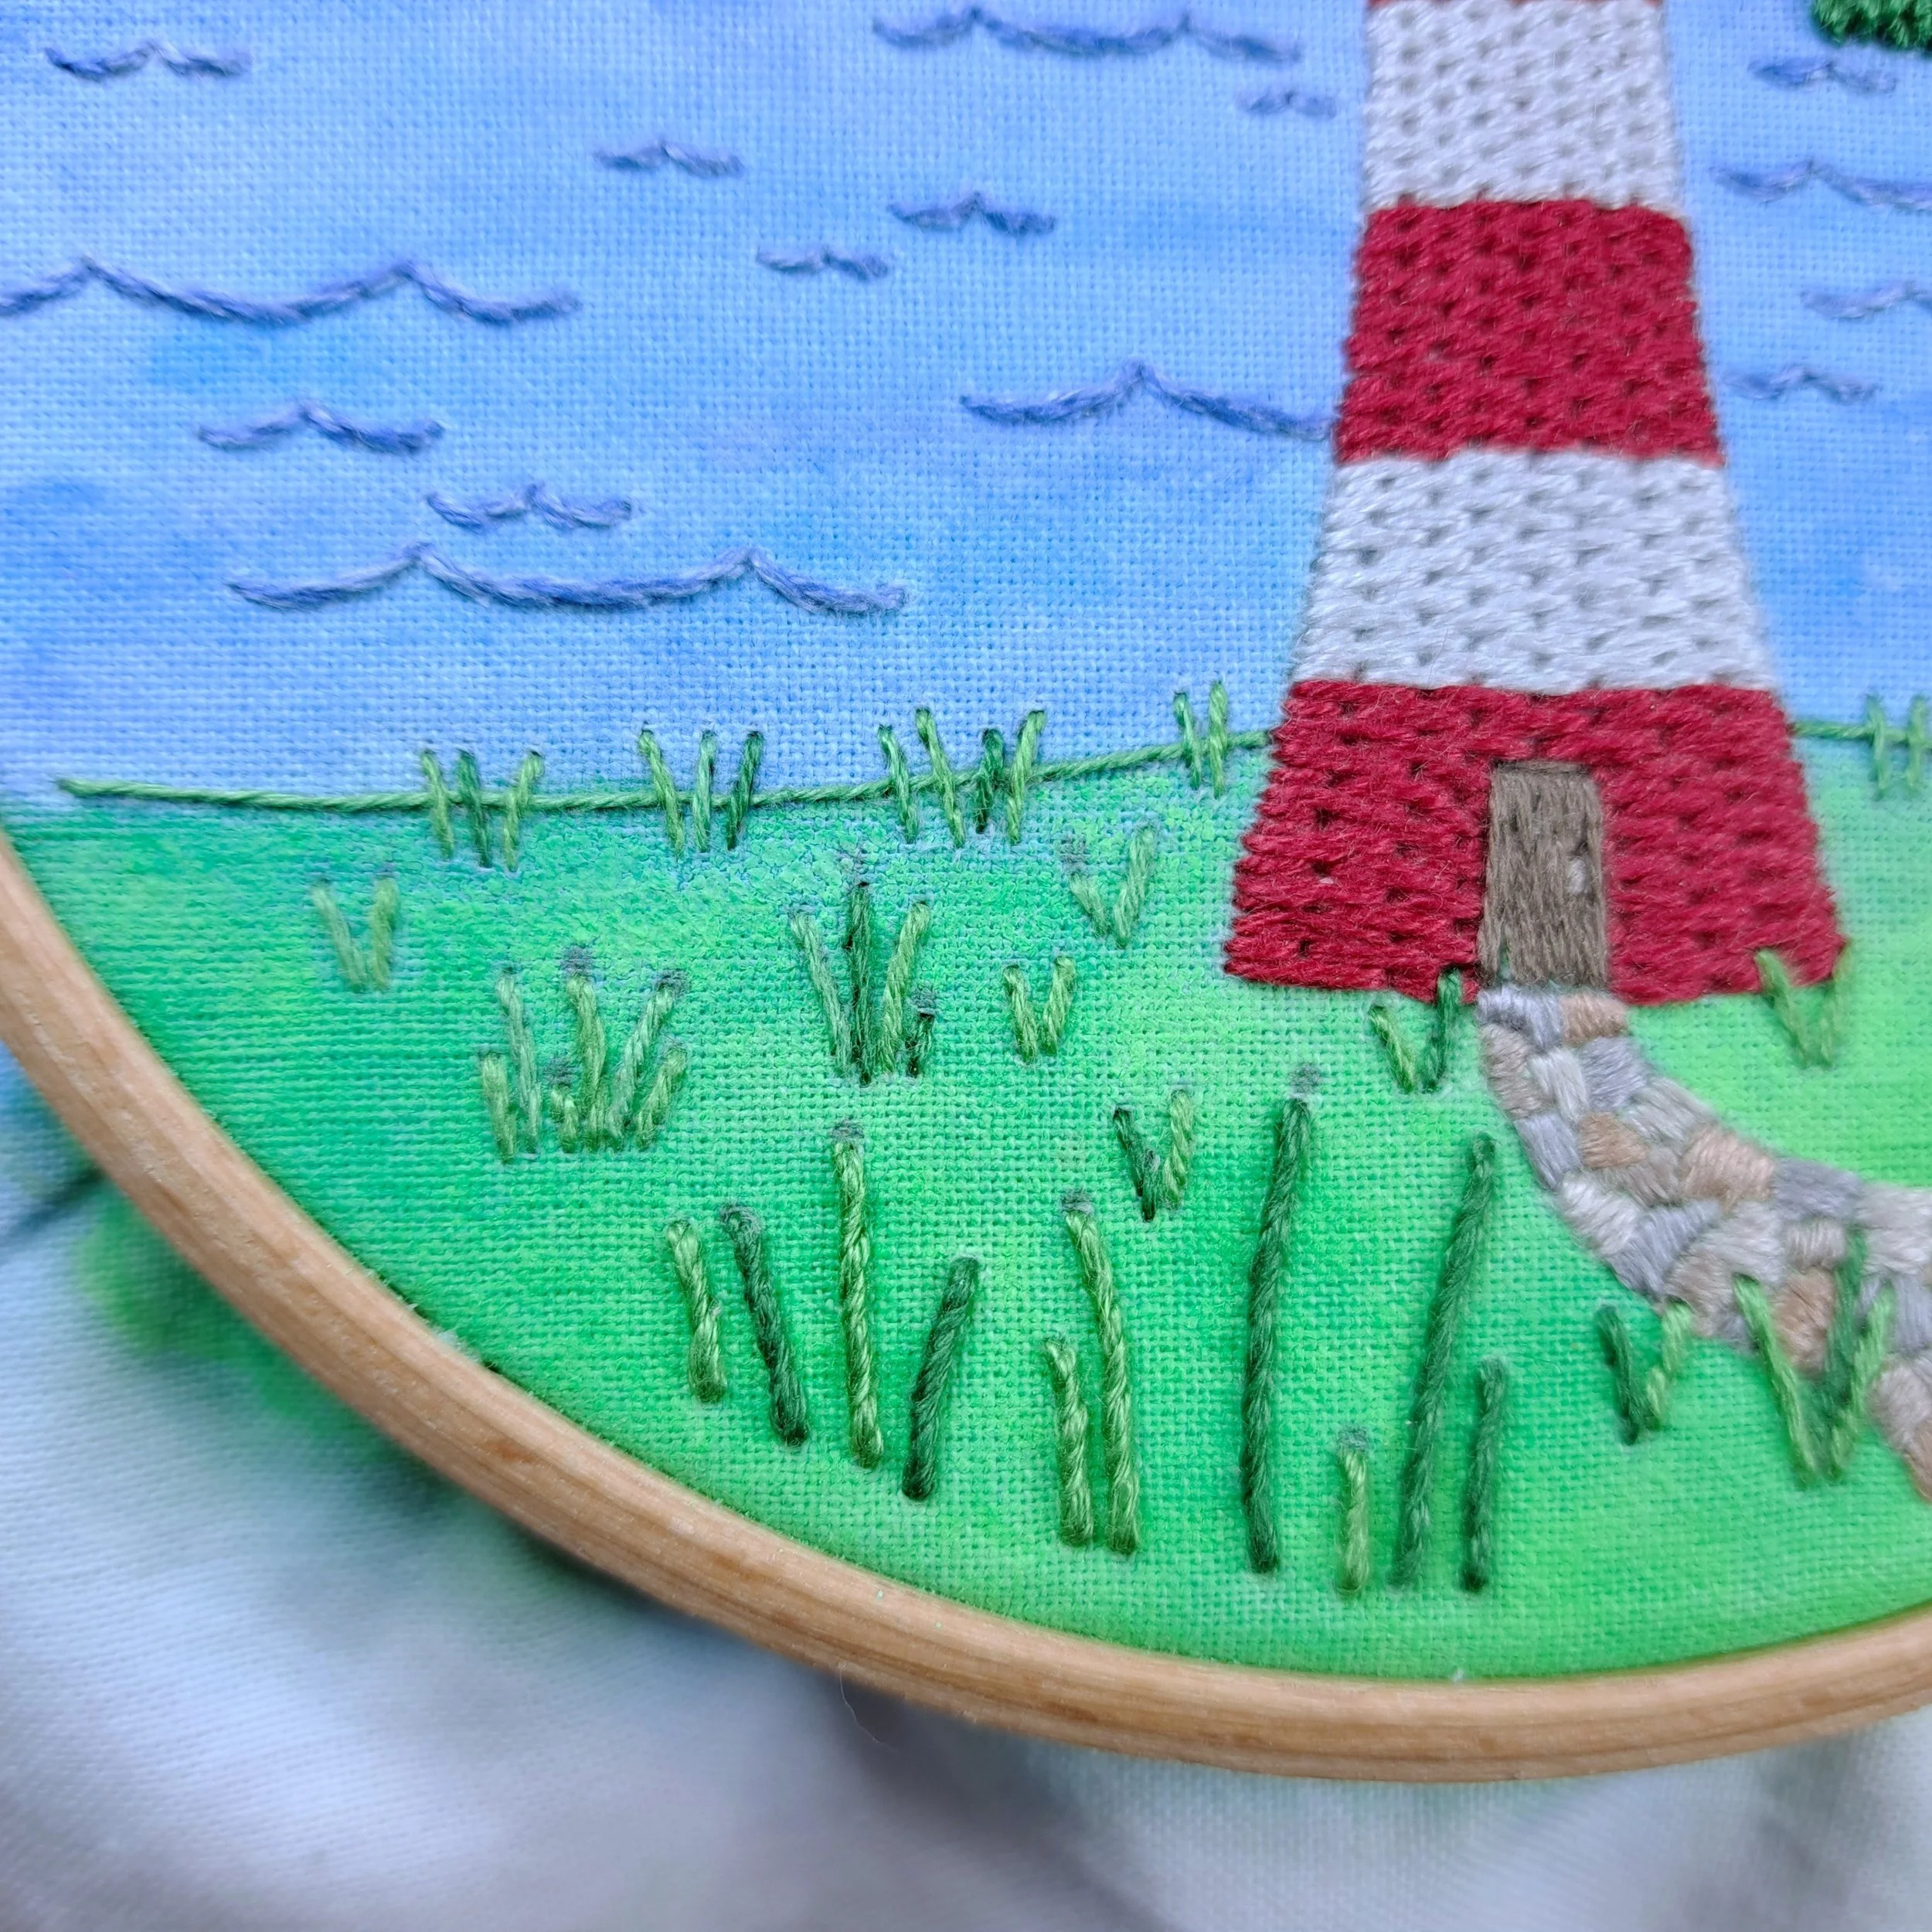
The Cliff Line
All that’s left now is the grass!
I ended up cutting out my original cliff line – I’d stitched it first with Stem Stitch using 1 strand of Anchor 240 (Light Green), but something felt off. I thought maybe it was because I hadn’t stitched the other grasses yet, but even after stitching some grasses, I still wasn’t loving it. So, out it came. That’s one of my favourite things about embroidery - if you don’t like it, just stitch it another way.
I did make it a bit trickier for myself because I’d already stitched some grasses over the top that I didn’t want to cut out, but I just tucked my cliff line underneath them.
My first grass images will still show this original cliff line, so you’ll see it change.
In the end, I stitched this line with Whipped Backstitch in Anchor 209 (Green). It turned out smoother for me and a better green to use.
Stitch – Whipped Backstitch
Thread colour – Anchor 209 (Green)
Number of strands – 1
Needle size – Small
This is my original cliff line that I later unpicked and restitched using a darker green and a different stitch.

This is the new cliff line that I restitched - I think it looks so much better!
The Grass
So, I stitched my grass in different ways – you know me by now, if I can add extra texture and depth, I’m going to do it! I basically divided my grass into a few layers, with some closer to the front than others. I wanted to make sure the grasses at the front had bigger stitches.
The Front Patch of Grass
I started with the grasses at the very front (those at the bottom left of the scene). These are the largest ones. I stitched all of these with Whipped Backstitch, some blades with Anchor 211 (Dark Green) and others with Anchor 243 (Mid Green).
✨ A little tip:
I like to press a finger underneath the hoop, right under the area I’m whipping. It lifts the fabric just enough to help avoid snagging any stitches with the needle.
Stitch – Whipped Backstitch
Thread colours – Anchor 211 (Dark Green) and Anchor 243 (Mid Green)
Number of strands – 4
Needle size – Medium
The front patch of grass.
The Next Patch of Grass (Patch 2)
For this layer, I used the same colours but fewer strands to make them appear further away. I also shortened my stitch length as the grasses got smaller. For these, I switched to Stem Stitch because as the grasses got smaller, whipping them became a bit fiddly (and annoying 😏). Stem Stitch gives a similar look and works well here.
I added in those grasses straight over the path. Since I couldn’t see exactly where they were supposed to go, I made it up a bit - but looking back at my picture before stitching, I think I did pretty well! You can always refer to the image at the top of the blog for guidance.
Stitch – Stem Stitch
Thread colours – Anchor 211 (Dark Green) and Anchor 243 (Mid Green)
Number of strands – 3
Needle size – Medium
These are the grasses I stitched as ‘Patch 2’.

I stitched these grasses straight over the top of the path.
The Next Patch of Grass (Patch 3)
I stitched this layer exactly like the one before, just with fewer strands – I reduced to 2 strands for these.
Stitch – Stem Stitch
Thread colours – Mainly Anchor 243 (Mid Green) and Anchor 209 (Green), with a few using Anchor 211 (Dark Green)
Number of strands – 2
Needle size – Small

These are the grasses I stitched as ‘Patch 3’.
All of the remaining Grasses - (Patch 4)
This is where I realised I didn’t like my cliff line, so I snipped it out and restitched it (you’ll notice the slight colour change in the pics) 🪡
For these final grasses, I stitched the same way as the previous layers, but with just 1 strand of thread.
Stitch – Stem Stitch
Thread colours – Mainly Anchor 243 (Mid Green) and Anchor 209 (Green), with a few using Anchor 211 (Dark Green)
Number of strands – 1
Needle size – Small
All of the remaining grasses I stitched as ‘Patch 4’.

Let’s just take a little moment to appreciate how cute my puffin needle minder looks on this lighthouse embroidery design! (These puffin minders are available in my shop too btw) 🪡
The Small Flowers
Originally, I was going to do little cute French Knot flowers (like I did for the rabbit panel – you can find that blog and see how they turned out). I’ve drawn these flowers as simple dots on the design, so you can really turn these flowers into anything you want!
But lately, I’ve been loving the display of daisies we have at the moment. Look at these in my local churchyard that I walk through when I post your orders!

So, I decided to stitch these adorable Lazy Daisy daisies! I also felt like my grass area was a bit too green, and my watercolour was a bit too bright, so bigger flowers will help balance it out here, I think.
For my daisies, I did the opposite of my grass and started with the smaller ones at the back first. That way, if I wanted to stitch bigger ones over the top, I could - none of the grass was overlapping, so it didn’t really matter there.
I free-stitched these lazy daisies - some have 6 petals, some 5, some 4, and I even stitched a few with 3 petals in a more sideways flower form. I overlapped petals and made them all different sizes and shapes.
If you want a neater, more even look, you could mark little dot guides with your fabric pen for your daisies.
These are the daisies I stitched with 2 strands……
Stitch – Lazy Daisy Stitch
Thread colour – Anchor 2 (White)
Number of strands – 2
Needle size – Small

The Large Flowers
I stitched these just like the smaller daisies, but used more strands and made them much bigger to really stand out.
Stitch – Lazy Daisy Stitch
Thread colour – Anchor 2 (White)
Number of strands – 4
Needle size – Medium

The Small Flower Centres
To be honest, I couldn’t decide on a colour for these flower centres (that happened a few times during this project, didn’t it?). One yellow seemed too bright, and the other a bit pale. Both would’ve worked – I think that’s why it was hard to decide. In the end, I stitched with one strand of each combined. It gives a nice subtle effect in the centre of each flower.
I added one French Knot to the centre of each flower. For the larger of these small flowers, I used 2 wraps, and for the smaller ones, smaller knots with 1 wrap.
Stitch – French Knots, with a mixture of 2, and 1 wraps
Thread colours – Anchor 293 (Mid Yellow) and Anchor 298 (Bright Yellow)
Number of strands – 2 (1 strand of each yellow, combined and stitched together)
Needle size – Small
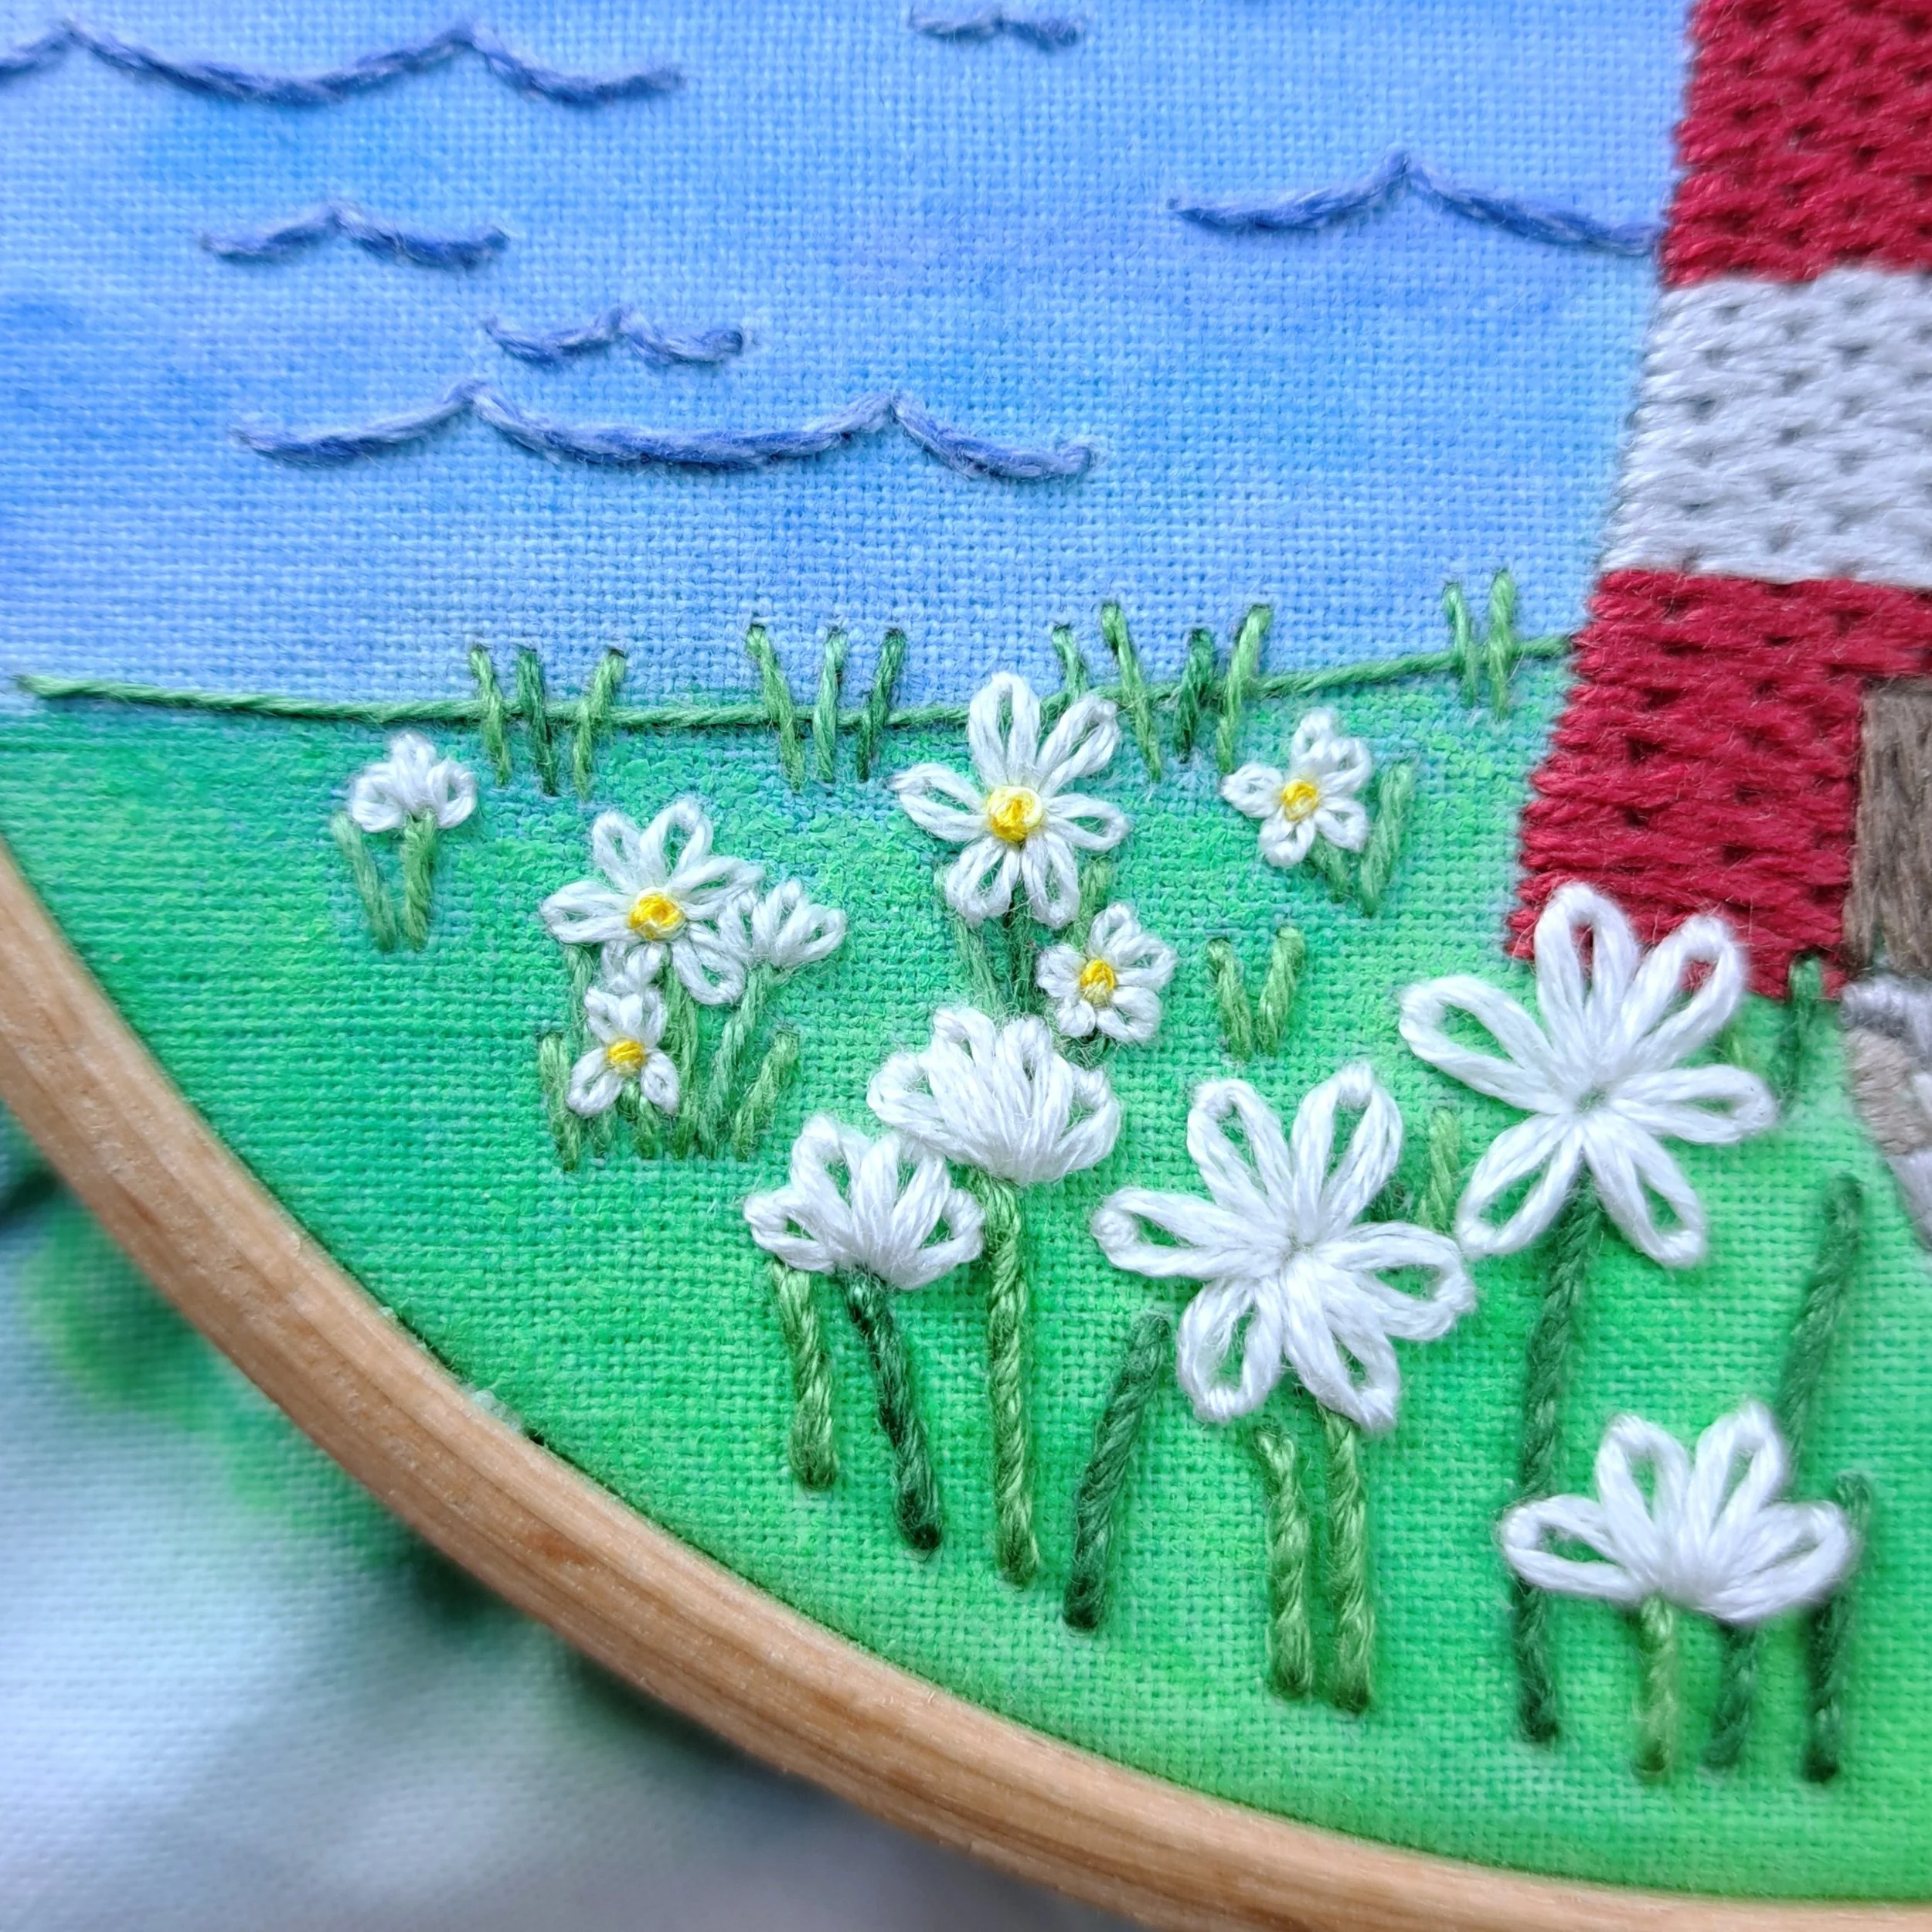
The Large Flower Centres
The final bit!
I only had two of these large flowers that needed a centre, so I finished with a single French Knot in each of them.
Stitch – French Knots with 2 wraps
Thread colour – Anchor 293 (Mid Yellow) and Anchor 298 (Bright Yellow)
Number of strands – 4 (2 strands of each yellow, combined and stitched together)
Needle size – Medium
And I think that’s it!
I say think because I was going to go back to the waves and add some white sea break, but now that I’ve stitched the daisies, I don’t think it needs it. I really love the addition of my daisies - they’ve really saved my grass, I think 😏

5. Finishing and Displaying your Embroidery
You can frame your finished embroidery in the same hoop you used for stitching, which is one of my favourite ways to display my embroidery projects. To do this, trim away the excess fabric, leaving a few cm’s all the way around.
Next, stitch a running stitch about 1 cm from the fabric edge using 6 strands of thread, leaving unknotted tails at both the start and finish. Gently pull these tails to gather the fabric, then tie a knot to hold it in place.
I’ll show you how to do this in this video (it’s a Christmas one, sorry about that! 🙈 but the process is the same):
The best part about this method is that it’s not permanent! If you decide to add more to your embroidery later - like those white wave breaks I mentioned - you can easily remove the running stitches and keep stitching until you’re happy with your design.
Then, step back and admire your beautiful stitching!

I hope you loved this project as much as I did!
I’m going to be stitching my way through all of my new embroidery designs (I’ve just launched 14 of them!) and will be adding similar blog posts like this one as I go. But of course, you can have fun stitching them before that! If you need a bit of guidance, the Panel Packs come with stitch suggestion sheets, and many of the elements from the blog posts I wrote for the hand-printed panels can still be applied to the new designs.
You can find them all here……….
And don’t forget to tag me on social media when you show off your beautiful work - I’d love to see it!

If you enjoyed this blog and would like to support my work, feel free to visit my Ko-fi and leave a tip - every little bit helps keep the creativity flowing! 🌸
Enjoy your stitching!
Until next time,
Liz x